1. அறிமுகம்
This manual provides detailed instructions for the setup, operation, and maintenance of your Vivitek D511 Portable DLP Projector. The D511 is designed to deliver sharp, detailed images with 2600 lumens of brightness and a 3000:1 contrast ratio, utilizing DLP and BrilliantColor technologies. It is also 3D-ready, supporting future media content. Please read this manual thoroughly before using the projector to ensure proper and safe operation.
2. பாதுகாப்பு தகவல்
- காற்றோட்டம்: Ensure adequate ventilation around the projector. Do not block any ventilation openings. Overheating can cause damage to the projector and pose a fire hazard.
- சக்தி ஆதாரம்: குறிப்பிட்ட பவர் அடாப்டரை மட்டும் பயன்படுத்தி, தரையிறக்கப்பட்ட பவர் அவுட்லெட்டுடன் இணைக்கவும்.
- Lamp பாதுகாப்பு: ப்ரொஜெக்டர் எல்amp operates at high temperatures and pressure. l ஐ மாற்ற முயற்சிக்காதீர்கள்amp பயன்பாட்டிற்குப் பிறகு உடனடியாக. Allow the projector to cool down for at least 20 minutes before handling the lamp. Refer to the "Maintenance" section for lamp மாற்று வழிமுறைகள்.
- கண் பாதுகாப்பு: ப்ரொஜெக்டர் லென்ஸை நேரடியாகப் பார்ப்பதைத் தவிர்க்கவும்amp is on, as the intense light can cause eye damage.
- இடம்: ப்ரொஜெக்டரை ஒரு நிலையான, சமமான மேற்பரப்பில் வைக்கவும். நேரடி சூரிய ஒளியில், வெப்ப மூலங்களுக்கு அருகில் அல்லது அதிக ஈரப்பதம் அல்லது தூசி உள்ள சூழல்களில் வைப்பதைத் தவிர்க்கவும்.
- சுத்தம்: சுத்தம் செய்வதற்கு முன் மின் கம்பியைத் துண்டிக்கவும். மென்மையான, உலர்ந்த துணியைப் பயன்படுத்தவும். திரவ அல்லது ஏரோசல் கிளீனர்களைப் பயன்படுத்த வேண்டாம்.
3. தயாரிப்பு முடிந்துவிட்டதுview
3.1 முன்னணி View
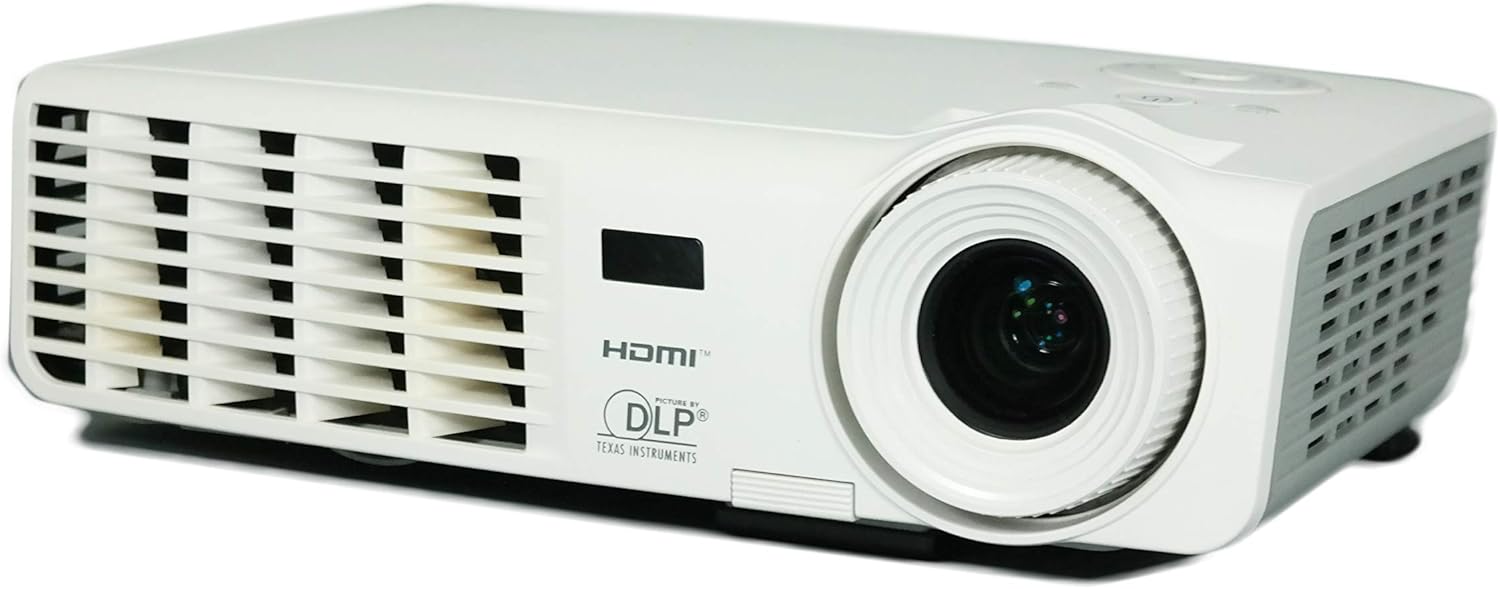
படம் 3.1: முன் view of the Vivitek D511 projector, showing the projection lens and front ventilation grille.
The front of the projector features the main projection lens, which is used to focus the image onto your screen or surface. The front also includes ventilation openings to ensure proper airflow and cooling during operation.
3.2 Rear Panel (Connectivity)

படம் 3.2: Rear panel of the Vivitek D511 projector, displaying various input and output ports.
The rear panel provides a range of connectivity options for various devices:
- , HDMI: High-Definition Multimedia Interface for digital audio and video input.
- VGA (Input 1 & 2): D-sub 15-pin connectors for analog video input from computers.
- கூட்டு வீடியோ: RCA yellow jack for standard definition video input.
- எஸ்-வீடியோ: Mini-DIN 4-pin connector for enhanced standard definition video input.
- Audio In (L-Audio-R & Mini-Jack): RCA red/white jacks and a 3.5mm mini-jack for audio input.
- ஆர்.எஸ் -232: Serial port for projector control via a computer or control system.
- ஆற்றல் உள்ளீடு: AC power connector.
3.3 Top Panel (Control Buttons)

படம் 3.3: Top panel of the Vivitek D511 projector, showing the control buttons and indicator lights.
The top panel houses the primary control buttons for operating the projector without the remote control. These include the Power button, Source selection, Menu access, Auto adjustment, and navigation buttons. Indicator lights for LAMP and TEMP provide status information.
3.4 பக்கம் View(காற்றோட்டம்)

Image 3.4a: இடது பக்கம் view காற்றோட்டத்துடன்.

Image 3.4b: வலது பக்கம் view காற்றோட்டத்துடன்.
Both sides of the projector feature ventilation grilles crucial for dissipating heat generated during operation. Ensure these areas are unobstructed to maintain optimal performance and prevent overheating.
3.5 கீழே View (Label and Lamp அணுகல்)

படம் 3.5: கீழே view of the Vivitek D511 projector, showing the product label and lamp அணுகல் குழு.
The bottom of the projector contains the product information label, including the model number (D511), serial number, and regulatory compliance marks. It also features an access panel for lamp மாற்று. Always refer to the safety warnings regarding lamp replacement on this label.
4 அமைவு
4.1 ப்ரொஜெக்டர் இடம்
Place the projector on a stable, flat surface. The D511 is designed for tabletop mounting. Ensure the projector is positioned at an appropriate distance from the screen to achieve the desired image size. Avoid placing it where ventilation grilles could be blocked.
4.2 இணைக்கும் சாதனங்கள்
Connect your source devices (e.g., laptop, gaming console, DVD player) to the appropriate input ports on the projector's rear panel (refer to Image 3.2).
- , HDMI: For high-quality digital video and audio, connect an HDMI cable from your source device to the projector's HDMI port.
- விஜிஏ: For analog video from a computer, connect a VGA cable to one of the VGA ports. If connecting a computer, you may also need to connect an audio cable to the Audio In mini-jack.
- Composite/S-Video: For older video sources, connect the appropriate cable to the Composite Video or S-Video port. Connect audio cables to the L-Audio-R RCA jacks.
4.3 பவர் ஆன்/ஆஃப்
- பவர் ஆன்: Connect the power cord to the projector and a power outlet. Press the சக்தி button on the top panel or the remote control. The projector will initiate its startup sequence.
- பவர் ஆஃப்: அழுத்தவும் சக்தி button again. A confirmation message may appear. Press the Power button a second time to confirm shutdown. The projector will enter a cooling cycle before completely shutting down. Do not unplug the projector during the cooling cycle.
5. புரொஜெக்டரை இயக்குதல்
5.1 அடிப்படை கட்டுப்பாடுகள்
The projector can be controlled using the buttons on the top panel (refer to Image 3.3) or the included remote control.
- ஆதாரம்: Press to cycle through available input sources (HDMI, VGA, Composite, S-Video).
- பட்டியல்: Press to open the On-Screen Display (OSD) menu for advanced settings. Use the arrow buttons to navigate and உள்ளிடவும் (often the central button) to select.
- ஆட்டோ: Automatically adjusts the image for optimal display, particularly useful for VGA sources.
- அம்புக்குறி பொத்தான்கள் (மேல்/கீழ்/இடது/வலது): Navigate menus and adjust settings.
5.2 Adjusting the Image
- கவனம்: படம் கூர்மையாகவும் தெளிவாகவும் தோன்றும் வரை ப்ரொஜெக்டர் லென்ஸில் ஃபோகஸ் ரிங்கை சுழற்றுங்கள்.
- கீஸ்டோன் திருத்தம்: If the image appears trapezoidal (wider at the top or bottom), use the keystone correction function (usually found in the OSD menu) to adjust it. The D511 supports vertical keystone correction up to 30 inches.
- பெரிதாக்கு: If available, use the zoom ring on the lens to adjust the image size without moving the projector.
5.3 3D செயல்பாடு
The Vivitek D511 is 3D-ready. To experience 3D content, you will need compatible 3D source material, a 3D-capable player, and active shutter 3D glasses (sold separately). Refer to your 3D source device's manual for specific setup instructions. The projector will automatically detect and display 3D signals when properly configured.
6. பராமரிப்பு
6.1 எல்amp மாற்று
ப்ரொஜெக்டர் எல்amp has an operating life of approximately 4000 hours. When the lamp அதன் ஆயுட்காலத்தின் முடிவை அடைகிறது, எல்AMP indicator light may illuminate, or the image brightness may significantly decrease. Refer to the caution label on the bottom of the projector (Image 3.5) before attempting replacement.
- கூல் டவுன்: Ensure the projector has been powered off and allowed to cool for at least 20 minutes before proceeding. The lamp operates at high temperatures.
- மின் இணைப்பை துண்டிக்கவும்: ப்ரொஜெக்டரில் இருந்து மின் கம்பியை துண்டிக்கவும்.
- அணுகல் குழு: எல் கண்டுபிடிக்கவும்amp access panel on the bottom of the projector. Unscrew the retaining screw(s) and carefully remove the cover.
- பழைய L ஐ அகற்றுamp: Unscrew the screws holding the lamp module in place. Carefully pull the lamp module out by its handle.
- புதிய L ஐ நிறுவவும்amp: புதிய எல் செருகவும்amp module, ensuring it is seated correctly. Secure it with the screws.
- பலகத்தை மூடு: l ஐ மாற்றவும்amp access cover and secure it with its screw(s).
- மீட்டமை எல்amp டைமர்: l ஐ மாற்றிய பின்amp, you must reset the lamp timer in the projector's OSD menu to accurately track the new lamp's life.
6.2 சுத்தம் செய்தல்
- ப்ரொஜெக்டர் சிasing: ப்ரொஜெக்டரின் வெளிப்புறத்தைத் துடைக்க மென்மையான, பஞ்சு இல்லாத துணியைப் பயன்படுத்தவும். பிடிவாதமான அடையாளங்களுக்கு, சிறிது dampen துணியை தண்ணீரில் நனைக்கவும். கடுமையான இரசாயனங்களைத் தவிர்க்கவும்.
- ப்ரொஜெக்டர் லென்ஸ்: Gently clean the lens with a lens cleaning cloth or a soft, dry, lint-free cloth specifically designed for optical surfaces. Do not use abrasive materials or excessive force.
- காற்றோட்டம் கிரில்ஸ்: Periodically check the ventilation grilles for dust accumulation. Use a soft brush or compressed air to clear any blockages.
7. சரிசெய்தல்
| பிரச்சனை | சாத்தியமான காரணம் | தீர்வு |
|---|---|---|
| திரையில் படம் இல்லை |
|
|
| படம் மங்கலாக உள்ளது |
|
|
| படம் ட்ரெப்சாய்டல் ஆகும் |
|
|
| Projector overheats / TEMP indicator on |
|
|
| ஆடியோ இல்லை |
|
|
8. விவரக்குறிப்புகள்
| அம்சம் | விவரம் |
|---|---|
| பிராண்ட் | விவிடெக் |
| மாதிரி எண் | D511 |
| காட்சி வகை | டி.எல்.பி |
| நேட்டிவ் ரெசல்யூஷன் | 1024 x 768 (XGA) |
| அதிகபட்ச காட்சி தெளிவுத்திறன் | 1600 x 1200 |
| பிரகாசம் | 2600 லுமன்ஸ் |
| மாறுபாடு விகிதம் | 3000:1 |
| சிறப்பு அம்சம் | 3D-தயார் |
| இணைப்பு தொழில்நுட்பம் | HDMI, VGA, Composite Video, S-Video, RS-232 |
| Lamp வாட்tage | 180 வாட்ஸ் |
| ஒளி மூல இயக்க வாழ்க்கை | 4000 மணிநேரம் |
| படிவம் காரணி | போர்ட்டபிள் |
| மவுண்டிங் வகை | டேப்லெட் மவுண்ட் |
| பொருளின் எடை | 4.2 பவுண்டுகள் |
| நிறம் | வெள்ளை |
| கட்டுப்பாட்டு முறை | ரிமோட் கண்ட்ரோல், சாதனத்தில் உள்ள பொத்தான்கள் |
| Picture Quality Enhancement | BrilliantColor |
9. உத்தரவாதம் மற்றும் ஆதரவு
For warranty information, technical support, or service inquiries, please contact Vivitek customer support. Details regarding your product's specific warranty period and terms can typically be found on the Vivitek official website or included in your product packaging. Please have your model number (D511) and serial number ready when contacting support.