1. அறிமுகம்
This manual provides essential instructions for the safe and effective use of your Ken-A-Vision T-17541C Digital CoreScope 2 Compound Microscope. Designed for biological and educational applications, this digital microscope features a monocular head, LED illumination, and a 1.3-megapixel camera for capturing still images and video. Please read this manual thoroughly before operating the device and retain it for future reference.
2. பாதுகாப்பு தகவல்
- மின் பாதுகாப்பு: Ensure the power supply is connected to a grounded outlet. Do not operate the microscope with wet hands or in damp சுத்தம் செய்வதற்கு அல்லது சர்வீஸ் செய்வதற்கு முன் மின்சாரத்தை துண்டிக்கவும்.
- கையாளுதல்: Always carry the microscope by its base and arm. Avoid sudden impacts or vibrations.
- Optical Care: Do not touch optical surfaces with bare fingers. Use only approved lens cleaning materials.
- காற்றோட்டம்: அதிக வெப்பமடைவதைத் தடுக்க நுண்ணோக்கியைச் சுற்றி போதுமான காற்றோட்டத்தை உறுதி செய்யவும்.
- குழந்தைகள்: This device is not a toy. Adult supervision is recommended when used by children.
3. தொகுப்பு உள்ளடக்கங்கள்
கீழே பட்டியலிடப்பட்டுள்ள அனைத்து பொருட்களும் உங்கள் தொகுப்பில் உள்ளதா என்பதைச் சரிபார்க்கவும்:
- Ken-A-Vision CoreScope 2 Digital Microscope
- பவர் சப்ளை
- Applied Vision 4 Software (for Windows, Mac, and Linux)
- Microscope Cover
- ஆலன் ரெஞ்ச்
- வழிமுறைகள் (இந்த கையேடு)
4. தயாரிப்பு முடிந்துவிட்டதுview
The Ken-A-Vision T-17541C CoreScope 2 is a robust digital compound microscope designed for clarity and ease of use. Key components include:
- Monocular Head: Features a fixed 45-degree incline for comfortable viewing and 360-degree rotation.
- கண் பார்வை: 10x widefield eyepiece with a pointer for easy observation.
- நோக்கங்கள்: Reverse-mounted 4x, 10x, and 40xS DIN achromatic lens objectives, protected against humidity and climate variations.
- Floating Stage: சுற்று எஸ்tage with spring-loaded clips to secure slides and a stop mechanism to prevent damage.
- கவனம் செலுத்தும் குறிப்புகள்: Separate coaxial coarse and fine focus controls for precise adjustments.
- LED வெளிச்சம்: Built-in bright and cool white LED light with dimmer and on/off switch.
- எண்ணியல் படக்கருவி: Integrated 1.3-megapixel (MP), 720P high-definition (HD) CMOS camera with a built-in USB port for direct connection to a computer or monitor.

படம் 1: முன் பக்க view of the Ken-A-Vision T-17541C Digital CoreScope 2 Compound Microscope, showing the monocular head, objective lenses, floating stage, focus knobs, and connected USB cable.
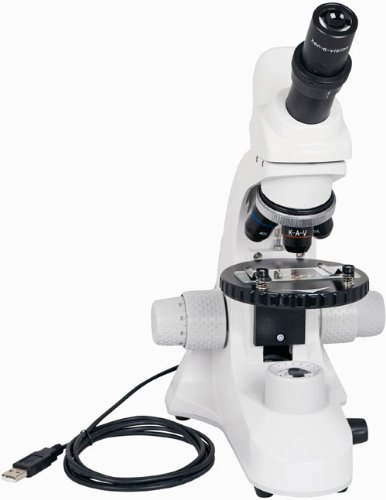
படம் 2: கோணல் view of the Ken-A-Vision T-17541C Digital CoreScope 2 Compound Microscope, highlighting the compact design and the position of the objective lenses and stage.
5 அமைவு
- பேக்கிங்: Carefully remove the microscope and all accessories from the packaging.
- இடம்: நேரடி சூரிய ஒளி, அதிக வெப்பம் அல்லது அதிர்வுகளிலிருந்து விலகி, நிலையான, சமமான மேற்பரப்பில் நுண்ணோக்கியை வைக்கவும்.
- மின் இணைப்பு: Connect the provided power supply to the microscope and then plug it into a standard electrical outlet (120-240V). The microscope can also be powered via a low voltage USB computer connection.
- மென்பொருள் நிறுவல்: For digital imaging, install the Applied Vision 4 software on your computer. The software is compatible with Windows (XP SP2 or later, Vista, 7), Mac (OS 10.5 or later), and Linux. Follow the on-screen instructions during installation.
- USB இணைப்பு: Connect the microscope's built-in USB port to your computer using a USB cable. This connection enables the digital camera functionality and can also provide power.
- அட்டையை அகற்று: Remove the microscope cover before use.
6. இயக்க வழிமுறைகள்
- பவர் ஆன்: Turn on the microscope using the on/off switch for the LED illumination.
- வெளிச்சத்தை சரிசெய்யவும்: Use the dimmer control to adjust the brightness of the LED light to a comfortable level for viewing your specimen.
- Place Specimen: Place your prepared slide on the floating stage, securing it with the spring-loaded clips.
- Select Objective: Rotate the nosepiece to select the desired objective lens (4x, 10x, or 40xS). Start with the lowest magnification (4x) for initial viewing.
- கவனம் செலுத்துதல்:
- பயன்படுத்தவும் coarse focus knob (larger knob) to bring the specimen into approximate focus.
- பின்னர், பயன்படுத்தவும் fine focus knob (smaller knob) for precise focusing and to achieve a sharp image.
- கண் இமை சரிசெய்தல்: Adjust the variable diopter on the eyepiece for optimal visual clarity.
- Rotate Head: The monocular head can be rotated 360 degrees for shared viewing or comfortable positioning.
- Digital Imaging (with software):
- Ensure the microscope is connected to your computer via USB and the Applied Vision 4 software is running.
- The software will display the live feed from the 1.3 MP HD CMOS camera.
- Use the software interface to capture still images or record video. Refer to the Applied Vision 4 software manual for detailed instructions on its features.
- பவர் ஆஃப்: When finished, turn off the LED illumination and disconnect the power supply. Cover the microscope with the provided dust cover.
7. பராமரிப்பு
- உடலை சுத்தம் செய்தல்: நுண்ணோக்கி உடலை மென்மையான, d துணியால் துடைக்கவும்.amp துணி. கடுமையான இரசாயனங்கள் அல்லது கரைப்பான்களைப் பயன்படுத்துவதைத் தவிர்க்கவும்.
- லென்ஸ்களை சுத்தம் செய்தல்: Use a soft lens brush to remove dust. For smudges, use a specialized lens cleaning solution and lens paper. Do not use abrasive materials.
- சேமிப்பு: Always cover the microscope with the dust cover when not in use to protect it from dust and debris. Store in a dry environment.
- ஈரப்பதம் கட்டுப்பாடு: The objective lenses are designed with humidity and climate control protection, but prolonged exposure to extreme conditions should be avoided.
8. சரிசெய்தல்
- வெளிச்சம் இல்லை: Check if the power supply is properly connected and the on/off switch is engaged. Ensure the dimmer is not set to its lowest setting.
- படம் மங்கலாக உள்ளது: Adjust both the coarse and fine focus knobs. Ensure the objective lens is properly clicked into place. Clean the eyepiece and objective lenses if smudges are present.
- No Image on Computer Screen: Verify the USB cable is securely connected to both the microscope and the computer. Ensure the Applied Vision 4 software is installed and running correctly. Check your computer's device manager to confirm the camera is recognized.
- Specimen Not Centered: Gently adjust the position of the slide on the floating stage.
9. விவரக்குறிப்புகள்
| அம்சம் | விவரக்குறிப்பு |
|---|---|
| மாதிரி எண் | T-17541C |
| Viewing கட்டமைப்பு | Monocular with 45-degree incline, 360-degree rotation |
| கண்மணி | 10x widefield with pointer |
| குறிக்கோள் லென்ஸ்கள் | 4x, 10x, 40xS DIN Achromatic |
| அதிகபட்ச உருப்பெருக்கம் | 400x |
| வெளிச்சம் | Bright and cool LED white light with dimmer and on/off switch |
| கவனம் | Coaxial coarse and fine focus |
| டிஜிட்டல் கேமரா | 1.3 MP, 720P HD CMOS, USB 2.0 |
| மென்பொருள் இணக்கத்தன்மை | Applied Vision 4 (Windows XP SP2+, Vista, 7; Mac OS 10.5+; Linux) |
| Stage | Round floating stage with 2 spring-loaded clips |
| சக்தி ஆதாரம் | குறைந்த தொகுதிtage USB computer connection or external USB power plug, 120-240V |
| பொருள் | அலுமினியம் |
| தயாரிப்பு பரிமாணங்கள் (H x W x D) | 40.0 x 30.48 x 22.86 செமீ (15.75 x 12 x 9 அங்குலம்) |
| எடை | 2.31 கிலோ (5.1 பவுண்ட்) |
| சான்றிதழ்கள் | ISO:9001 – 2000, CE, CSA, RoHS |
10. உத்தரவாதம் மற்றும் ஆதரவு
The Ken-A-Vision T-17541C Digital CoreScope 2 Compound Microscope is manufactured by Ken-A-Vision Manufacturing, headquartered in Kansas City, MO. For warranty information, technical support, or service inquiries, please refer to the official Ken-A-Vision website or contact their customer service department directly. Please have your model number (T-17541C) and purchase date available when contacting support.