
1. அறிமுகம்
நன்றி, நன்றி.asing the Fonestar AS-170RU Hi-Fi Amplifier. This device is designed to provide high-fidelity stereo audio amplification, featuring a built-in USB/MP3 player, AM/FM digital tuner, and multiple audio inputs. This manual provides detailed instructions for safe installation, operation, and maintenance of your ampலிஃபையர். பயன்படுத்துவதற்கு முன் இந்த கையேட்டை முழுமையாகப் படித்து, எதிர்கால குறிப்புக்காக அதை வைத்திருங்கள்.
2. பாதுகாப்பு வழிமுறைகள்
- மின்சாரம்: உறுதி செய்யவும் amplifier is connected to a power supply matching the voltage specified on the unit. Disconnect the power cord from the outlet if the unit will not be used for an extended period.
- காற்றோட்டம்: காற்றோட்ட திறப்புகளைத் தடுக்க வேண்டாம். அதிக வெப்பமடைவதைத் தடுக்க, அலகு முழுவதும் சரியான காற்றோட்டத்திற்கு போதுமான இடத்தை உறுதி செய்யவும்.
- நீர் மற்றும் ஈரப்பதம்: மழை, ஈரப்பதம் அல்லது சொட்டு சொட்டாக விழும்/தெறிக்கும் திரவங்களுக்கு அலகை வெளிப்படுத்த வேண்டாம். குவளைகள் போன்ற திரவங்களால் நிரப்பப்பட்ட பொருட்களை அலகின் மீது வைக்க வேண்டாம்.
- வெப்ப ஆதாரங்கள்: ரேடியேட்டர்கள், வெப்பப் பதிவேடுகள், அடுப்புகள் அல்லது பிற சாதனங்கள் (உட்பட) போன்ற வெப்ப மூலங்களிலிருந்து யூனிட்டை விலக்கி வைக்கவும். ampலிஃபையர்ஸ்) வெப்பத்தை உற்பத்தி செய்யும்.
- சுத்தம்: உலர்ந்த துணியால் மட்டுமே சுத்தம் செய்யவும். திரவ கிளீனர்கள் அல்லது ஏரோசல் கிளீனர்களைப் பயன்படுத்த வேண்டாம்.
- சேவை: இந்த தயாரிப்புக்கு நீங்களே சேவை செய்ய முயற்சிக்காதீர்கள். தகுதிவாய்ந்த சேவை ஊழியர்களுக்கு அனைத்து சேவைகளையும் பார்க்கவும்.
- இடம்: Place the unit on a stable, flat surface. Avoid placing it in direct sunlight or near strong magnetic fields.
3. தொகுப்பு உள்ளடக்கங்கள்
பின்வரும் பொருட்கள் உங்கள் தொகுப்பில் சேர்க்கப்பட்டுள்ளதா என்பதைச் சரிபார்க்கவும்:
- Fonestar AS-170RU Hi-Fi Ampஆயுள்
- ரிமோட் கண்ட்ரோல்
- ஏ.எம் ஆண்டெனா
- எஃப்எம் ஆண்டெனா
- பயனர் கையேடு (இந்த ஆவணம்)
4. தயாரிப்பு முடிந்துவிட்டதுview
4.1 முன் குழு
The front panel provides access to essential controls and the display.
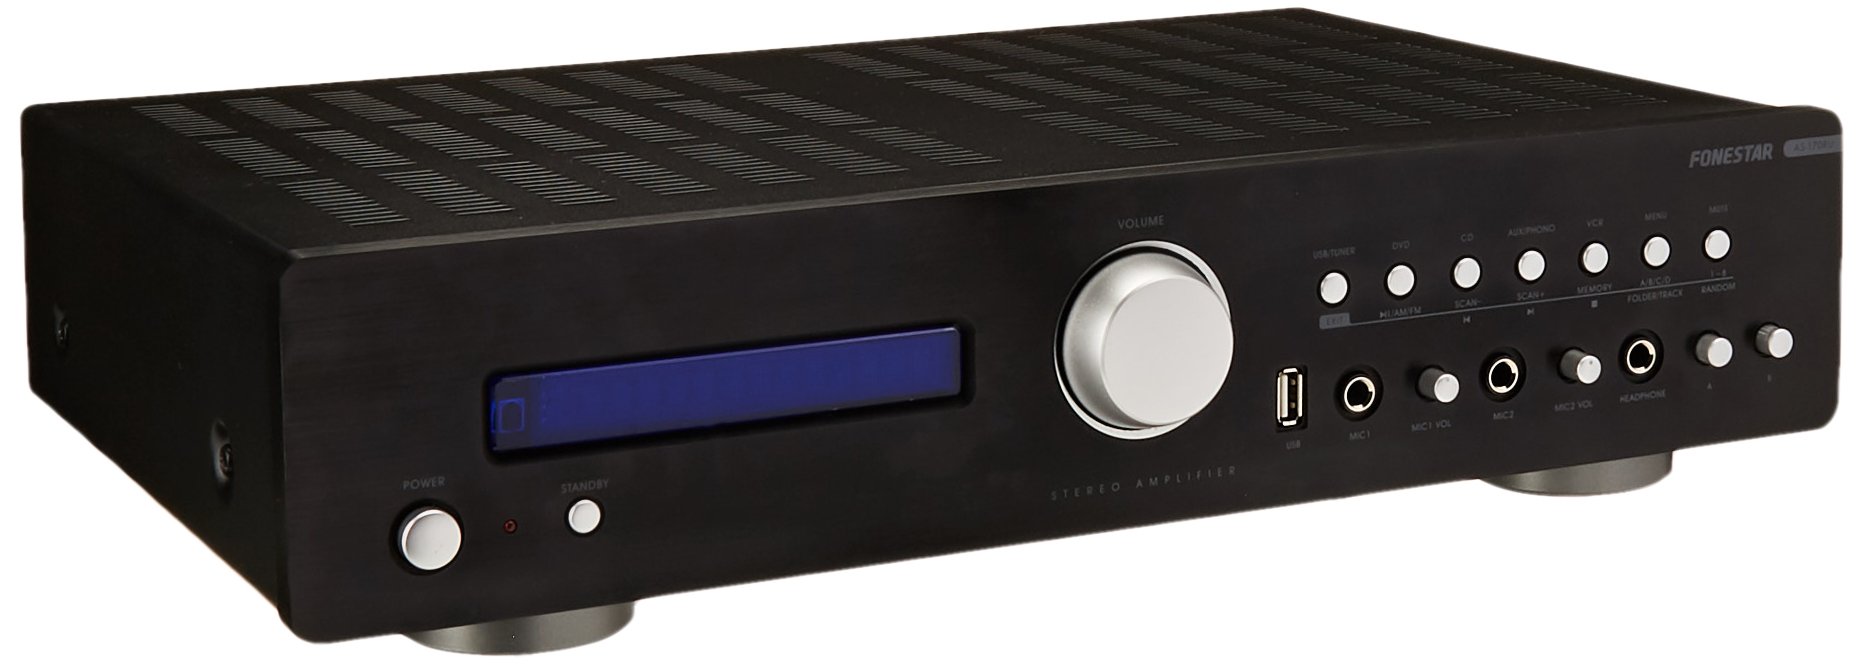
Image: Fonestar AS-170RU Front Panel. இந்தப் படம் முன்பக்கத்தைக் காட்டுகிறது view இன் amplifier, showing the VFD display, USB port, headphone output, input selectors, volume knob, and other control buttons.
- பவர் பட்டன்: திருப்புகிறது ampஆயுள் ஆன் அல்லது ஆஃப்.
- VFD Display: Shows current input, volume level, tuner information (frequency, RDS), and USB/MP3 track details (ID3 tag).
- USB போர்ட்: For connecting USB storage devices to play MP3 files.
- ஹெட்ஃபோன் வெளியீடு: ஹெட்ஃபோன்களை இணைக்க 6.3 மிமீ ஜாக்.
- உள்ளீடு தேர்வாளர்கள்: Buttons for choosing audio sources (CD, DVD, VCR, AUX/Phono, USB/Tuner).
- ஒலியளவு கட்டுப்பாடு: Rotary knob to adjust the master volume level.
- மைக்ரோஃபோன் உள்ளீடுகள்: Two 6.3mm microphone jacks with independent volume control.
- தொனி கட்டுப்பாடுகள்: Buttons or menu options for adjusting Bass, Treble, and Balance.
4.2 பின்புற பேனல்
The rear panel contains all the necessary connections for your audio sources, speakers, and antennas.

Image: Fonestar AS-170RU Rear Panel. This image illustrates the rear connections of the amplifier, including speaker terminals (A/B), various RCA input jacks (CD, DVD, VCR, AUX/Phono), REC OUT, PRE OUT, AMP IN, and antenna connections (FM COAX, AM LOOP ANT).
- ஸ்பீக்கர் வெளியீடுகள் (A/B): Terminals for connecting two pairs of speakers. Supports 4-16 ohms for A or B, or 8-16 ohms for A+B.
- Audio Inputs (RCA):
- குறுவட்டு உள்ளீடு: For connecting a CD player.
- DVD Input: For connecting a DVD player or other audio source.
- VCR Input: For connecting a VCR or other audio source.
- AUX/PHONO Input: For connecting auxiliary devices or a turntable (Phono input may require a pre-amplifier if your turntable does not have one built-in).
- வெளியேறு: RCA output for connecting to a recording device.
- முன்கூட்டியே: RCA output for connecting to an external power ampஆயுள்.
- AMP IN: RCA input for connecting an external pre-ampஆயுள்.
- ஆண்டெனா இணைப்புகள்:
- FM COAX 75Ω: For connecting an FM antenna.
- AM LOOP ANT: For connecting the supplied AM loop antenna.
4.3 தொலை கட்டுப்பாடு
The included remote control allows convenient operation of the ampதூரத்தில் இருந்து தூக்கிலிடுபவர்.

Image: Fonestar AS-170RU Remote Control. This image shows the remote control unit with various buttons for power, input selection, volume, mute, tuner functions, USB playback controls, and tone adjustments.
- காத்திருப்பு: பவர் ஆன்/ஆஃப்.
- உள்ளீடு தேர்வாளர்கள்: Buttons for CD, DVD, VCR, AUX/PHONO, USB/TUNER.
- வால்யூம் அதிக/கீழ் (VOL +/-): முதன்மை அளவை சரிசெய்கிறது.
- முடக்கு: ஆடியோ வெளியீட்டை அமைதிப்படுத்துகிறது.
- AM/FM: Switches between AM and FM tuner modes.
- ஸ்கேன்: வானொலி நிலையங்களுக்கான ஸ்கேன்கள்.
- நினைவு: Stores radio station presets.
- USB Playback Controls: Play/Pause, Stop, Skip Track, Folder/Track navigation.
- EQ OFF / BASS / TREBLE: Access tone controls.
- RDS / ID3: Displays RDS information for radio or ID3 tag எம்பி 3 க்கு files.
5 அமைவு
5.1 ஸ்பீக்கர்களை இணைக்கிறது
- உறுதி செய்யவும் ampலிஃபையர் அணைக்கப்பட்டு மின் நிலையத்திலிருந்து துண்டிக்கப்பட்டுள்ளது.
- Connect your speakers to the "SPEAKERS OUTPUT" terminals on the rear panel.
- Match the positive (+) terminal of the amplifier (red) to the positive (+) terminal of your speaker, and the negative (-) terminal (black) to the negative (-) terminal.
- The AS-170RU supports two groups of speakers (A and B). You can connect one pair to "SPEAKERS A" and another to "SPEAKERS B".
- Ensure your speakers' impedance matches the amplifier's specifications: 4-16 ohms for A or B, or 8-16 ohms for A+B.
5.2 ஆடியோ மூலங்களை இணைத்தல்
Use RCA cables to connect your audio components to the corresponding input jacks on the rear panel.
- சிடி பிளேயர்: Connect to the "CD" input.
- எண்ணியல் ஒளிக்காட்சி தட்டு இயக்கி: Connect to the "DVD" input.
- வி.சி.ஆர்: Connect to the "VCR" input.
- Auxiliary Device (e.g., smartphone, tablet): Connect to the "AUX/PHONO" input.
- டர்ன்டபிள்: Connect to the "AUX/PHONO" input. If your turntable does not have a built-in pre-amplifier, you may need an external phono pre-ampஆயுள்.
5.3 இணைக்கும் ஆண்டெனாக்கள்
- எஃப்.எம் ஆண்டெனா: Connect the supplied FM wire antenna to the "FM COAX 75Ω" terminal. Extend the wire for optimal reception.
- AM ஆண்டெனா: Connect the supplied AM loop antenna to the "AM LOOP ANT" terminals. Position the loop for best reception.
5.4 மின் இணைப்பு
அனைத்து ஆடியோ மற்றும் ஸ்பீக்கர் இணைப்புகளும் செய்யப்பட்டவுடன், ampலிஃபையரின் பவர் கார்டை பொருத்தமான ஏசி பவர் அவுட்லெட்டில் இணைக்கவும்.
6. இயக்க வழிமுறைகள்
6.1 அடிப்படை செயல்பாடு
- பவர் ஆன்/ஆஃப்: Press the Power button on the front panel or the STANDBY button on the remote control to turn the ampஆயுள் ஆன் அல்லது ஆஃப்.
- உள்ளீட்டு மூலத்தைத் தேர்ந்தெடுக்கவும்: Press the desired input selector button on the front panel (CD, DVD, VCR, AUX/PHONO) or the remote control (CD, DVD, VCR, AUX/PHONO, USB/TUNER).
- ஒலியளவைச் சரிசெய்யவும்: Rotate the Volume knob on the front panel or use the VOL +/- buttons on the remote control to adjust the sound level.
- முடக்கு: Press the MUTE button on the remote control to temporarily silence the audio. Press it again to restore sound.
6.2 USB/MP3 பிளேபேக்
- Insert a USB storage device (flash drive) into the USB port on the front panel.
- Select "USB/TUNER" as the input source. The amplifier will automatically detect and begin playing MP3 files.
- Use the playback controls on the remote control (Play/Pause, Stop, Skip Track, Folder/Track) to navigate and control your music.
- The VFD display will show track information, including ID3 tags கிடைத்தால்.
- தி amplifier supports up to 65,000 indexable folders and files, with a maximum of 8 folder levels.
6.3 AM/FM ட்யூனர் செயல்பாடு
- Select "USB/TUNER" as the input source, then press the AM/FM button on the remote control to switch between AM and FM bands.
- தானியங்கி ஸ்கேன்: Press the SCAN button on the remote control to automatically search for and store available radio stations.
- கையேடு சரிப்படுத்தும்: Use the tuning buttons (usually arrow keys) on the remote control to manually adjust the frequency.
- முன்னமைக்கப்பட்ட நிலையங்கள்: தி amplifier supports 64 presets. Use the MEMORY button to store and recall your favorite stations.
- RDS செயல்பாடு: If available, press the RDS button on the remote control to display Radio Data System information (e.g., station name, program type).
6.4 மைக்ரோஃபோன் உள்ளீடுகள்
- Connect microphones to the 6.3mm MIC 1 and MIC 2 jacks on the front panel.
- Adjust the independent volume controls for each microphone to achieve the desired level.
6.5 Tone and Balance Control
தி amplifier allows adjustment of bass, treble, and balance through its menu system or dedicated buttons on the remote control. Refer to the remote control section for specific buttons like EQ OFF, BASS, TREBLE.
7. பராமரிப்பு
- சுத்தம்: Disconnect the power before cleaning. Use a soft, dry cloth to wipe the exterior surfaces. Do not use abrasive cleaners, waxes, or solvents.
- காற்றோட்டம்: காற்றோட்ட திறப்புகள் தூசி மற்றும் குப்பைகள் இல்லாமல் தெளிவாக உள்ளதா என்பதை அவ்வப்போது சரிபார்க்கவும்.
- சேமிப்பு: யூனிட்டை நீண்ட நேரம் சேமித்து வைத்திருந்தால், அதை மின் இணைப்பிலிருந்து துண்டித்து, நேரடி சூரிய ஒளி மற்றும் அதிக வெப்பநிலையிலிருந்து விலகி, குளிர்ந்த, உலர்ந்த இடத்தில் சேமிக்கவும்.
8. சரிசெய்தல்
If you encounter problems with your amplifier, refer to the following table for possible solutions.
| பிரச்சனை | சாத்தியமான காரணம் | தீர்வு |
|---|---|---|
| சக்தி இல்லை | Power cord not connected; Power outlet faulty; Ampகாத்திருப்பு பயன்முறையில் லிஃபையர். | Ensure power cord is securely plugged in. Test the outlet with another device. Press the Power/STANDBY button. |
| ஒலி இல்லை | தவறான உள்ளீடு தேர்ந்தெடுக்கப்பட்டது; ஒலி அளவு மிகக் குறைவு; ஸ்பீக்கர்கள் சரியாக இணைக்கப்படவில்லை; மியூட் செயல்பாடு செயலில் உள்ளது. | Select the correct input source. Increase volume. Check speaker connections. Deactivate MUTE. |
| மோசமான வானொலி வரவேற்பு | ஆண்டெனா இணைக்கப்படவில்லை அல்லது மோசமாக நிலைநிறுத்தப்பட்டுள்ளது; குறுக்கீடு. | Connect and adjust the position of the AM/FM antennas. Move the ampமற்ற மின்னணு சாதனங்களிலிருந்து லிஃபையரை விலக்கி வைக்கவும். |
| USB பிளேபேக் வேலை செய்யவில்லை | USB device not inserted correctly; Incompatible file format; USB device faulty. | Ensure USB device is fully inserted. Check if files are MP3 format. Try a different USB device. |
| Amplifier turns off unexpectedly or cycles power | Overheating; Short circuit in speaker wiring; Internal fault. | Ensure adequate ventilation. Check speaker wires for frayed strands causing short circuits. If the problem persists, disconnect power and contact qualified service personnel. |
9. விவரக்குறிப்புகள்
- மாதிரி: AS-170RU
- சக்தி வெளியீடு: 80 + 80 W RMS at 4 Ω
- ஒலிபெருக்கி மின்மறுப்பு: 4-16 Ω (A or B), 8-16 Ω (A+B)
- பாதுகாப்பு: 3 circuits (short circuits, overload, overvoltage)
- USB பிளேயர்: MP3 file playback, ID3 tag support. Max 65,000 indexable folders/files, max 8 folder levels.
- ட்யூனர்: Digital AM/FM, 64 presets, RDS.
- உள்ளீடுகள்: 2 x Microphone (6.3mm), 4 x RCA (CD, DVD, VCR, AUX/Phono), 1 x RCA (AMP IN).
- வெளியீடுகள்: 1 x RCA (REC OUT), 1 x RCA (PRE OUT), Headphone (6.3mm).
- காட்சி: Blue VFD.
- தொனி கட்டுப்பாடு: Bass, Treble, Balance (via menu/remote).
- பரிமாணங்கள்: 40 x 40 x 60 செ.மீ (தோராயமாக 15.7 x 15.7 x 23.6 அங்குலம்)
- எடை: 7.2 கிலோ (தோராயமாக. 15.87 பவுண்ட்)
10. உத்தரவாதம் மற்றும் ஆதரவு
For warranty information and technical support, please refer to the warranty card included with your product or contact your authorized Fonestar dealer. Do not attempt to repair the unit yourself, as this may void your warranty.