அறிமுகம்
This manual provides essential information for the safe operation, maintenance, and care of your Hyper Tough 2.4A Orbit Sander, Model 2112. Please read and understand all instructions before using the product to ensure proper function and to prevent injury.
The Hyper Tough 2.4A Orbit Sander is designed for dry sanding on painted surfaces, wood, plastic, and metal. It is suitable for smoothing rough surfaces, removing old finishes, and preparing surfaces for new paint or other finishes.
பொது பாதுகாப்பு தகவல்
எச்சரிக்கை: இந்த ஆற்றல் கருவியில் வழங்கப்பட்ட அனைத்து பாதுகாப்பு எச்சரிக்கைகள், அறிவுறுத்தல்கள், விளக்கப்படங்கள் மற்றும் விவரக்குறிப்புகளைப் படிக்கவும். கீழே பட்டியலிடப்பட்டுள்ள அனைத்து வழிமுறைகளையும் பின்பற்றத் தவறினால் மின்சார அதிர்ச்சி, தீ மற்றும்/அல்லது கடுமையான காயம் ஏற்படலாம்.
வேலை பகுதி பாதுகாப்பு
- பணியிடத்தை சுத்தமாகவும், வெளிச்சமாகவும் வைத்திருங்கள். இரைச்சலான அல்லது இருண்ட பகுதிகள் விபத்துக்களை அழைக்கின்றன.
- எரியக்கூடிய திரவங்கள், வாயுக்கள் அல்லது தூசி போன்ற வெடிக்கும் வளிமண்டலங்களில் சக்தி கருவிகளை இயக்க வேண்டாம். ஆற்றல் கருவிகள் தூசி அல்லது புகையை பற்றவைக்கக்கூடிய தீப்பொறிகளை உருவாக்குகின்றன.
- பவர் டூலை இயக்கும் போது குழந்தைகளையும் பார்வையாளர்களையும் தூரத்தில் வைத்திருங்கள். கவனச்சிதறல்கள் உங்கள் கட்டுப்பாட்டை இழக்கச் செய்யலாம்.
மின் பாதுகாப்பு
- பவர் டூல் பிளக்குகள் அவுட்லெட்டுடன் பொருந்த வேண்டும். பிளக்கை எந்த வகையிலும் மாற்ற வேண்டாம்.
- குழாய்கள், ரேடியேட்டர்கள், வரம்புகள் மற்றும் குளிர்சாதனப் பெட்டிகள் போன்ற பூமி அல்லது தரையிறக்கப்பட்ட மேற்பரப்புகளுடன் உடல் தொடர்பைத் தவிர்க்கவும். உங்கள் உடல் மண்ணிலோ அல்லது தரையிலோ இருந்தால் மின்சார அதிர்ச்சி ஏற்படும் அபாயம் அதிகம்.
- மின் கருவிகளை மழை அல்லது ஈரமான நிலையில் வெளிப்படுத்த வேண்டாம். மின் கருவியில் தண்ணீர் நுழைவது மின்சார அதிர்ச்சியின் அபாயத்தை அதிகரிக்கும்.
- தண்டு துஷ்பிரயோகம் செய்ய வேண்டாம். பவர் டூலை எடுத்துச் செல்ல, இழுக்க அல்லது துண்டிக்க கம்பியைப் பயன்படுத்த வேண்டாம். வெப்பம், எண்ணெய், கூர்மையான விளிம்புகள் அல்லது நகரும் பாகங்கள் ஆகியவற்றிலிருந்து கம்பியை விலக்கி வைக்கவும். சேதமடைந்த அல்லது சிக்கிய வடங்கள் மின்சார அதிர்ச்சியின் அபாயத்தை அதிகரிக்கின்றன.
தனிப்பட்ட பாதுகாப்பு
- எப்போதும் கண் பாதுகாப்பு அணியுங்கள். பாதுகாப்பு கண்ணாடிகள் அல்லது கண்ணாடிகளைப் பயன்படுத்துங்கள்.
- Wear appropriate personal protective equipment such as a dust mask, non-skid safety shoes, hard hat, or hearing protection for appropriate conditions.
- மிகைப்படுத்தாதீர்கள். எல்லா நேரங்களிலும் சரியான கால் மற்றும் சமநிலையை வைத்திருங்கள். இது எதிர்பாராத சூழ்நிலைகளில் சக்தி கருவியின் சிறந்த கட்டுப்பாட்டை செயல்படுத்துகிறது.
- ஒழுங்காக உடை அணியுங்கள். தளர்வான ஆடைகள் அல்லது நகைகளை அணிய வேண்டாம். உங்கள் முடி மற்றும் ஆடைகளை நகரும் பகுதிகளிலிருந்து விலக்கி வைக்கவும். தளர்வான ஆடைகள், நகைகள் அல்லது நீண்ட முடி நகரும் பாகங்களில் பிடிக்கப்படலாம்.
தயாரிப்பு முடிந்துவிட்டதுview
Familiarize yourself with the components of your Hyper Tough 2.4A Orbit Sander before operation.
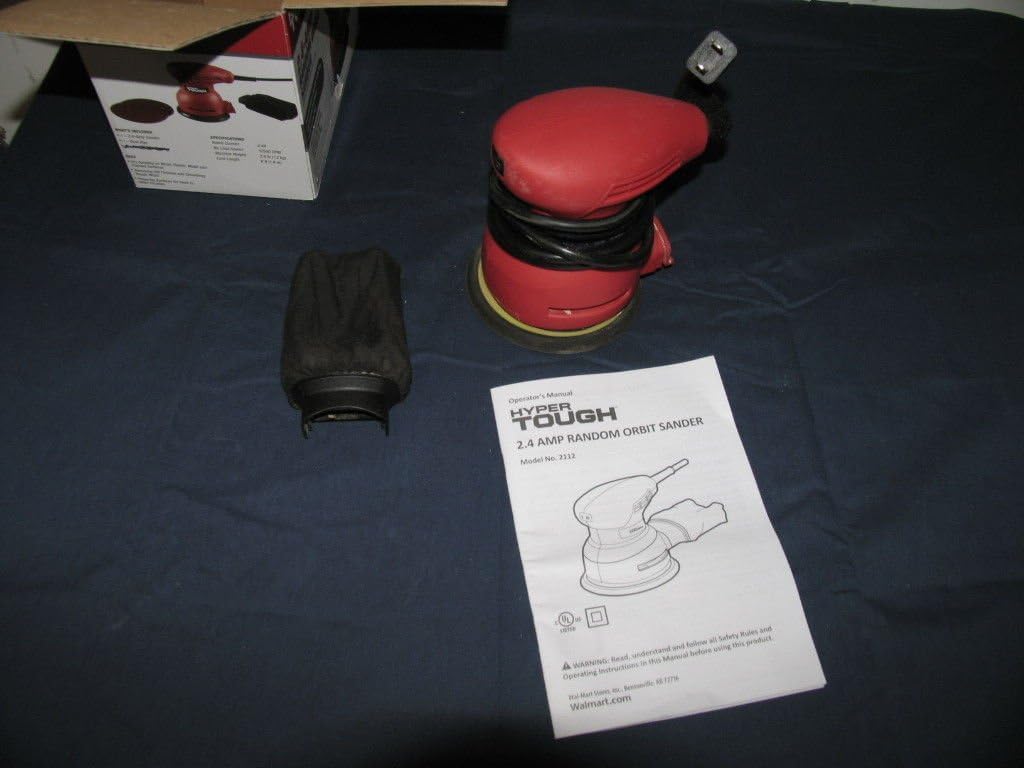
படம் 1: Hyper Tough 2.4A Orbit Sander with accessories and manual.

படம் 2: Underside of the sander with dust bag attached.
முக்கிய கூறுகள்:
- மணல் அள்ளும் திண்டு: Hook-and-loop system for quick sandpaper changes.
- தூசி சேகரிப்பு பை: Attaches to the sander for dust extraction.
- ஆன்/ஆஃப் சுவிட்ச்: Sealed to prevent dust ingress.
- மின் கம்பி: 6-foot length for extended reach.
அமைவு
மணல் காகிதத்தை இணைக்கிறது
- சாண்டர் மின் மூலத்திலிருந்து துண்டிக்கப்பட்டுள்ளதா என்பதை உறுதிப்படுத்தவும்.
- Select the appropriate grit sandpaper for your task. The sander uses hook-and-loop sandpaper.
- Align the holes on the sandpaper with the holes on the sanding pad to ensure proper dust extraction.
- Press the sandpaper firmly onto the sanding pad, ensuring it is securely attached across the entire surface.
தூசி சேகரிப்பு பையை இணைத்தல்
- சாண்டர் துண்டிக்கப்பட்டுள்ளதா என்பதை உறுதிப்படுத்தவும்.
- Locate the dust extraction port on the sander.
- Slide the dust collection bag onto the port until it is firmly seated. Ensure a tight fit to maximize dust collection efficiency.
இயக்க வழிமுறைகள்
அறுவை சிகிச்சைக்கு முன்
- Always wear safety glasses and a dust mask.
- பணிப்பகுதி பாதுகாப்பாக cl இருப்பதை உறுதி செய்யவும்ampமணல் அள்ளும் போது அசைவைத் தடுக்க எட் அல்லது ஹோல்ட்.
- Check that the sandpaper is correctly attached and the dust bag is securely in place.
- சாண்டரை பொருத்தமான பவர் அவுட்லெட்டில் செருகவும்.
Sanding Procedure
- இரண்டு கைகளாலும் சாண்டரை உறுதியாகப் பிடித்துக் கொள்ளுங்கள்.
- Place the sanding pad flat on the workpiece before turning the tool on.
- சாண்டரைத் தொடங்க ஆன்/ஆஃப் சுவிட்சை அழுத்தவும்.
- Move the sander slowly and evenly over the surface in overlapping circular or linear patterns. Avoid applying excessive pressure; the weight of the tool is usually sufficient.
- Keep the sander moving to prevent gouging or creating swirl marks. The mechanical pad brake helps reduce free-spin to minimize gouging.
- When finished, lift the sander from the workpiece before turning it off.
- Press the On/Off switch to turn the sander off.
- Unplug the sander from the power source after use.
குறிப்பு: For best results, start with a coarser grit sandpaper to remove material quickly, then switch to finer grits for a smoother finish.
பராமரிப்பு
சுத்தம் செய்தல்
- சுத்தம் செய்வதற்கு முன்பு எப்போதும் சாண்டரை அவிழ்த்து விடுங்கள்.
- கருவியின் வெளிப்புறத்தை ஒரு சுத்தமான, d துணியால் துடைக்கவும்.amp துணி. கடுமையான இரசாயனங்கள் அல்லது சிராய்ப்பு கிளீனர்களைப் பயன்படுத்த வேண்டாம்.
- Periodically clean the ventilation openings to prevent overheating. Use compressed air if available.
தூசி சேகரிப்பு பை
- Empty the dust collection bag frequently, especially when sanding fine dust. A full bag reduces dust extraction efficiency.
- To empty, remove the bag from the sander and shake out the dust.
- Clean the inside of the bag periodically to ensure optimal airflow.
சாண்டிங் பேட்
- Inspect the sanding pad regularly for wear or damage. Replace if necessary to maintain sanding performance.
- Ensure the hook-and-loop surface is clean and free of debris for proper sandpaper adhesion.
சரிசெய்தல்
| பிரச்சனை | சாத்தியமான காரணம் | தீர்வு |
|---|---|---|
| சாண்டர் தொடங்கவில்லை. | மின்சாரம் இல்லை. தவறான சுவிட்ச். | பவர் கார்டு மற்றும் அவுட்லெட்டை சரிபார்க்கவும். Contact customer support for switch replacement. |
| மோசமான தூசி சேகரிப்பு. | Dust bag full or improperly attached. Sandpaper holes not aligned. | Empty and reattach dust bag securely. Ensure sandpaper holes align with pad holes. |
| அதிகப்படியான அதிர்வு அல்லது சத்தம். | Damaged sanding pad. Loose sandpaper. | Inspect and replace sanding pad if damaged. Reattach sandpaper firmly. |
| சாண்டர் சுழல் அடையாளங்களை விட்டுச் செல்கிறார். | அதிக அழுத்தத்தைப் பயன்படுத்துதல். Not moving the sander evenly. அணிந்த மணர்த்துகள்கள் கொண்ட காகிதம். | அழுத்தத்தைக் குறைக்கவும். Move sander smoothly and evenly. மணர்த்துகள்கள் கொண்ட காகிதத்தை மாற்றவும். |
விவரக்குறிப்புகள்
- மாதிரி எண்: 2112
- பிராண்ட்: Hyper Tough
- சக்தி ஆதாரம்: மின்சாரம்
- ஏசி அடாப்டர் மின்னோட்டம்: 2.4 Amps
- கிரிட் வகை: Medium (typically ships with 80 grit)
- பொருளின் எடை: 5 பவுண்டுகள் (தோராயமாக 2.27 கிலோ)
- தயாரிப்பு பரிமாணங்கள்: 7 x 5 x 4.8 அங்குலம் (தோராயமாக 17.8 x 12.7 x 12.2 செ.மீ)
- தண்டு நீளம்: 6 அடி (தோராயமாக 1.83 மீட்டர்)
- மணல் அள்ளும் திண்டு: ஹூக் மற்றும் லூப் அமைப்பு
உத்தரவாதம் மற்றும் ஆதரவு
This product is tested and certified to look and work like new. For specific warranty information or technical support, please refer to the documentation included with your purchase or contact the manufacturer directly. Keep your purchase receipt as proof of purchase.
For further assistance, please visit the Hyper Tough webதளம் அல்லது அவர்களின் வாடிக்கையாளர் சேவைத் துறையைத் தொடர்புகொள்ளவும்.