UNIC UC30 (IDSP-004)
UNIC UC30 LED Mini Projector User Manual
Model: UC30 (IDSP-004)
1. அறிமுகம்
The UNIC UC30 LED Mini Projector is a compact and versatile multimedia device designed for home theater projection. It supports a wide range of input sources and file formats, making it suitable for various entertainment and presentation needs.
முக்கிய அம்சங்கள் அடங்கும்:
- Multiple Input Interfaces: AV, VGA, HDMI, USB, SD, and TV input.
- விரிவானது File Format Support: Compatible with various video, audio, image, and e-book formats.
- Keystone Correction: Adjusts image distortion for optimal viewing.
- Integrated Speaker: Built-in 2.0W *2 stereo speakers for audio output.
- Flexible Projection: Supports front and rear projection models.

படம் 1: முன் view of the UNIC UC30 LED Mini Projector, showcasing அதன் சிறிய வடிவமைப்பு மற்றும் லென்ஸ்.
2 அமைவு
2.1 பேக்கிங் மற்றும் பிளேஸ்மெண்ட்
Carefully remove the projector and all accessories from the packaging. Place the projector on a stable, flat surface. Ensure adequate ventilation around the unit to prevent overheating.
2.2 மின் இணைப்பு
- பவர் அடாப்டரை ப்ரொஜெக்டரின் பவர் உள்ளீட்டு போர்ட்டுடன் இணைக்கவும்.
- பவர் அடாப்டரை பொருத்தமான மின் கடையில் செருகவும்.
2.3 உள்ளீட்டு சாதனங்களை இணைத்தல்
The UC30 projector offers multiple input options. Connect your desired source device (e.g., laptop, DVD player, game console, USB drive) to the corresponding port on the projector.

படம் 2: பின்புறம் view of the white UNIC UC30 projector, showing various input ports including AV, VGA, HDMI, and USB.
- , HDMI: உயர் வரையறை டிஜிட்டல் வீடியோ மற்றும் ஆடியோவிற்கு.
- விஜிஏ: கணினிகள் அல்லது மடிக்கணினிகளை இணைப்பதற்கு.
- ஏ.வி: For standard definition video and stereo audio (using the included 3-in-1 AV cable).
- USB: மீடியாவை விளையாடுவதற்கு fileகள் நேரடியாக USB ஃபிளாஷ் டிரைவிலிருந்து.
- SD கார்டு: மீடியாவை விளையாடுவதற்கு fileSD மெமரி கார்டிலிருந்து நேரடியாகப் பதிவிறக்கம் செய்யலாம்.
- டிவி: For connecting to a TV signal source (if applicable to your region/model).
2.4 ஃபோகஸ் மற்றும் கீஸ்டோன் திருத்தம்
After powering on the projector, adjust the focus ring around the lens until the projected image is clear. Use the keystone correction feature (usually a dial or button on the projector) to correct any trapezoidal distortion in the image, ensuring a rectangular projection.
3. இயக்க வழிமுறைகள்
3.1 பவர் ஆன்/ஆஃப்
Press the power button on the projector or the remote control to turn the unit on or off. Allow a few seconds for the projector to warm up or cool down.
3.2 உள்ளீட்டு மூலத்தைத் தேர்ந்தெடுப்பது
Use the "Source" button on the projector or remote control to cycle through the available input options (HDMI, VGA, AV, USB, SD, TV) until your desired source is displayed.
3.3 மீடியா பிளேபேக் (USB/SD)
When a USB drive or SD card is inserted, the projector's media player interface will typically appear. Navigate through the menus using the directional buttons on the projector or remote to select and play your desired files.
- ஆதரிக்கப்படும் வீடியோ வடிவங்கள்: AVI, MOV, VOB, DAT, MPEG, MPG, RM, RMVB (encoding: MPEG1/MPEG2/MPEG4/DivX/Xvid).
- ஆதரிக்கப்படும் ஆடியோ வடிவங்கள்: MP3, WMA, WAV.
- ஆதரிக்கப்படும் பட வடிவங்கள்: JPEG, BMP, GIF, PNG.
- ஆதரிக்கப்படும் மின் புத்தக வடிவம்: TXT.

Figure 3: The UNIC UC30 projector displaying a video of a man in a soccer jersey, demonstrating its video playback capability.
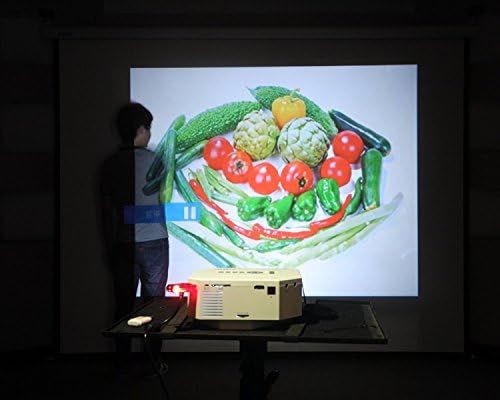
Figure 4: The UNIC UC30 projector displaying a vibrant image of vegetables, showcasing its image display quality.
3.4 ஆடியோ வெளியீடு
The projector has built-in stereo speakers. For private listening or connecting to external audio systems, use the stereo earphone output terminal.
3.5 Projection Model
The projector supports both front and rear projection. This setting can typically be adjusted in the projector's menu to suit your setup (e.g., projecting from behind a translucent screen).
4. பராமரிப்பு
4.1 லென்ஸை சுத்தம் செய்தல்
ப்ரொஜெக்டர் லென்ஸை மெதுவாக துடைக்க, ஆப்டிகல் லென்ஸ்களுக்காக பிரத்யேகமாக வடிவமைக்கப்பட்ட மென்மையான, பஞ்சு இல்லாத துணியைப் பயன்படுத்தவும். லென்ஸைக் கீறக்கூடிய சிராய்ப்பு கிளீனர்கள் அல்லது அதிகப்படியான சக்தியைப் பயன்படுத்துவதைத் தவிர்க்கவும்.
4.2 ப்ரொஜெக்டர் உடலை சுத்தம் செய்தல்
ப்ரொஜெக்டரின் வெளிப்புறத்தை மென்மையான, உலர்ந்த துணியால் துடைக்கவும். பிடிவாதமான அடையாளங்களுக்கு, சிறிது டி.amp cloth can be used, but ensure no liquid enters the ventilation openings.
4.3 காற்றோட்டம்
Ensure the projector's ventilation ports are clear of dust and obstructions. Proper airflow is crucial for maintaining optimal operating temperature and extending the lifespan of the LED lamp.
5. சரிசெய்தல்
5.1 No Image or "No Signal" Message
- Check if the projector is powered on and the power indicator light is active.
- Verify that the input cable (HDMI, VGA, AV) is securely connected to both the projector and the source device.
- Ensure the correct input source is selected on the projector (use the "Source" button).
- If using a computer, ensure its display output is enabled (e.g., press Fn + F8 or similar key combination).
5.2 மங்கலான படம்
- Adjust the focus ring around the projector lens until the image is sharp.
- பரிந்துரைக்கப்பட்ட வரம்பிற்குள் (1-3.5 மீட்டர்) திட்ட தூரம் இருப்பதை உறுதிசெய்யவும்.
- ப்ரொஜெக்டர் லென்ஸ் அழுக்காகத் தெரிந்தால் அதை சுத்தம் செய்யுங்கள்.
5.3 ஒலி இல்லை
- ப்ரொஜெக்டர் மற்றும் மூல சாதனம் இரண்டிலும் ஒலி அளவைச் சரிபார்க்கவும்.
- HDMI ஐப் பயன்படுத்தினால், மூல சாதனம் HDMI வழியாக ஆடியோவை அனுப்புவதை உறுதிசெய்யவும்.
- If using AV, ensure the red and white audio cables are correctly connected.
- If external speakers are connected, ensure they are powered on and functioning correctly.
5.4 Image Distortion (Trapezoid Shape)
- Adjust the keystone correction feature on the projector to square the image.
- Ensure the projector is placed on a level surface and is as perpendicular to the screen as possible.
6. விவரக்குறிப்புகள்
Below are the detailed technical specifications for the UNIC UC30 LED Mini Projector:
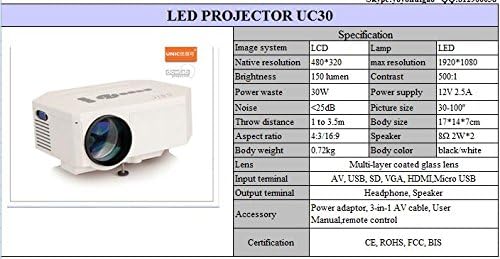
Figure 5: Official specification table for the UNIC UC30 LED Mini Projector, detailing its technical characteristics.
| அம்சம் | விவரம் |
|---|---|
| பட அமைப்பு | எல்சிடி |
| நேட்டிவ் ரெசல்யூஷன் | 480 x 320 பிக்சல்கள் |
| அதிகபட்ச தெளிவுத்திறன் ஆதரவு | 1920 x 1080 (முழு எச்டி) |
| பிரகாசம் | 150 LUX (150 lumen) |
| மாறுபாடு விகிதம் | 500:1 |
| மின் நுகர்வு | 30W |
| பவர் சப்ளை | 12V 2.5A |
| இரைச்சல் நிலை | <25dB |
| தூரத்தை எறியுங்கள் | 1 முதல் 3.5 மீட்டர் வரை |
| படத்தின் அளவு | 30-120 அங்குலம் |
| தோற்ற விகிதம் | 4:3 / 16:9 |
| உடல் எடை | 0.72 கிலோ |
| உடல் அளவு | 17 x 14 x 7 செ.மீ |
| பேச்சாளர் | 2.0W *2 Stereo |
| லென்ஸ் | Multi-layer coated glass lens |
| உள்ளீட்டு முனையங்கள் | AV, USB, SD, VGA, HDMI, Micro USB |
| வெளியீடு டெர்மினல்கள் | Stereo Earphone, Speaker |
| துணைக்கருவிகள் அடங்கும் | Power adapter, 3-in-1 AV cable, User Manual, Remote control |
| சான்றிதழ்கள் | CE, ROHS, FCC, BIS |
7. உத்தரவாதம் மற்றும் ஆதரவு
For information regarding warranty coverage, technical support, or service, please refer to the warranty card included with your product or contact the retailer or manufacturer directly. Keep your purchase receipt as proof of purchase.
Ask a question about this manual
Ask about setup, troubleshooting, compatibility, parts, safety, or missing instructions. Manuals+ will review the question and use this page’s manual context to help answer it.