
1. அறிமுகம்
This manual provides detailed instructions for the proper setup, operation, maintenance, and troubleshooting of your Andonstar ADSM302 Digital Microscope. Please read this manual thoroughly before use to ensure optimal performance and longevity of the device.
The Andonstar ADSM302 is a versatile digital microscope designed for various applications, including circuit board inspection, soldering, and detailed examination of small objects. It features a 5-inch integrated screen, HDMI output, and USB connectivity for enhanced viewing and data capture.
2. தொகுப்பு உள்ளடக்கங்கள்
கீழே பட்டியலிடப்பட்டுள்ள அனைத்து பொருட்களும் உங்கள் தொகுப்பில் சேர்க்கப்பட்டுள்ளதா என்பதை சரிபார்க்கவும்:
- Andonstar ADSM302 Digital Microscope Unit
- Adjustable Stand with Base
- 5-inch LCD Screen (integrated)
- ஐஆர் ரிமோட் கண்ட்ரோல்
- HDMI கேபிள்
- USB கேபிள்
- பவர் அடாப்டர்
- பயனர் கையேடு (இந்த ஆவணம்)
- Additional Lenses (e.g., Lens L, Lens D, Lens A for various magnifications)
- Integrated LED Lights (2x flexible gooseneck lights)
- Light Source for Transmitted Light (for highest magnification lens)

Figure 1: Andonstar ADSM302 Digital Microscope and included accessories.
3 அமைவு
3.1 நுண்ணோக்கியை அசெம்பிள் செய்தல்
- Place the microscope base on a stable, flat surface.
- Insert the vertical stand pole into the designated slot on the base and secure it using the tightening knob.
- Attach the microscope unit to the adjustable holder on the vertical stand. Ensure it is securely fastened.
- Connect the flexible LED lights to the designated ports on the microscope unit or base, positioning them to illuminate the working area.
- Connect the power adapter to the microscope unit and plug it into a power outlet.

Figure 2: Assembled Andonstar ADSM302 Digital Microscope with LED lights positioned.
3.2 ஆரம்ப பவர் ஆன் மற்றும் ஃபோகஸ் சரிசெய்தல்
- Press the Power On/Off button on the integrated 5-inch LCD screen to turn on the microscope.
- Place a specimen on the base directly under the microscope lens.
- Adjust the height of the microscope unit using the focus knob on the stand until the image appears clear on the screen.
- Adjust the flexible LED lights to provide optimal illumination for your specimen.

Figure 3: Illustration of the microscope's adjustable focus range (5cm to 22cm).
4. Operating the Microscope
4.1 அடிப்படை கட்டுப்பாடுகள்
The microscope can be operated using the buttons on the integrated screen or the included IR remote control.
- பவர் ஆன்/ஆஃப்: சாதனத்தை ஆன் அல்லது ஆஃப் செய்கிறது.
- பயன்முறை/பட்டி: Accesses the menu for settings adjustments (resolution, date stamp, exposure, etc.).
- OK/Start Video Record: Confirms selections or starts/stops video recording.
- மேல் கீழ்: Navigates menu options.
- Picture Capture: Takes a still photograph.
- பிரகாசம் +/-: LED விளக்குகளின் பிரகாசத்தை சரிசெய்கிறது.
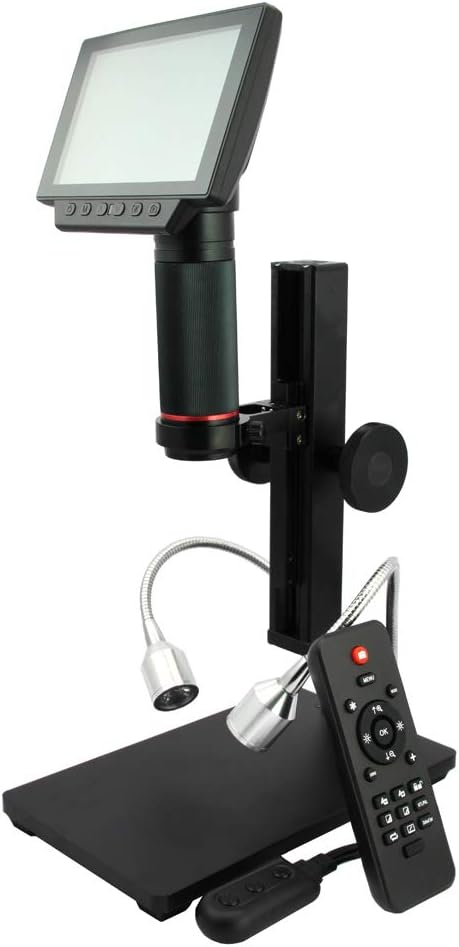
Figure 4: The microscope with its remote control for convenient operation.
4.2 வெளிப்புற காட்சிகளுடன் இணைத்தல் (HDMI/USB)
The ADSM302 supports output to external monitors or computers for a larger viewஅனுபவம்.
- HDMI வெளியீடு: Connect the provided HDMI cable from the microscope to an HDMI-compatible monitor or TV. The integrated screen will typically turn off when HDMI output is active.
- USB இணைப்பு (PC): Connect the provided USB cable from the microscope to your computer. You may need to download and install the Andonstar software (e.g., AMCap) for full functionality, including measurement tools. The integrated screen will display "PC Camera" and turn off when connected via USB. Note that USB mode may limit resolution to 720p for live viewing and 640x480 for video recording.

Figure 5: Microscope displaying output on an external HDMI monitor.

Figure 6: Microscope connected to a PC via USB, showing measurement software.
4.3 படம் மற்றும் வீடியோ பிடிப்பு
The microscope supports capturing still images and recording videos directly to a Micro-SD card (up to 32GB, not always included).
- Insert a Micro-SD card into the designated slot on the microscope unit.
- Press the "Picture Capture" button on the unit or remote to take a photo.
- Press the "OK/Start Video Record" button to start video recording. Press again to stop.
- Access the menu to adjust photo resolution (e.g., 1080p, 12MP) and video quality.
Video 1: Demonstration of the Andonstar 1080P Digital Microscope in use, showcasing its HDMI output capabilities.
Video 2: The Andonstar microscope used as a helping tool for soldering, demonstrating its utility in detailed electronic work.
5. பராமரிப்பு
- லென்ஸை சுத்தம் செய்தல்: Use a soft, lint-free cloth and lens cleaning solution to gently wipe the lens. Avoid abrasive materials or harsh chemicals.
- திரையை சுத்தம் செய்தல்: Use a microfiber cloth to clean the LCD screen. Do not press hard on the screen.
- பொது சுத்தம்: Keep the microscope free from dust and debris. Use a soft brush or compressed air to clean hard-to-reach areas.
- சேமிப்பு: Store the microscope in a dry, dust-free environment when not in use.
6. சரிசெய்தல்
- திரையில் படம் இல்லை:
- Ensure the power adapter is securely connected and the device is turned on.
- Check if an HDMI or USB cable is connected; the integrated screen may turn off when external output is active.
- Adjust the focus knob to bring the specimen into view.
- மங்கலான படம்:
- Adjust the focus knob carefully.
- Ensure the specimen is flat and properly positioned under the lens.
- Clean the lens if smudges or dust are visible.
- No Image on External Monitor/PC:
- Verify that the correct input source is selected on your monitor/PC.
- கேபிள்கள் பாதுகாப்பாக இணைக்கப்பட்டுள்ளதை உறுதி செய்யவும்.
- For PC connection, confirm the Andonstar software is installed and running, and the microscope is in "PC Camera" mode.
- ரிமோட் கண்ட்ரோல் பதிலளிக்கவில்லை:
- Ensure there are no obstructions between the remote and the microscope's IR receiver.
- தேவைப்பட்டால் ரிமோட் கண்ட்ரோல் பேட்டரிகளைச் சரிபார்த்து மாற்றவும்.
7. விவரக்குறிப்புகள்
| அம்சம் | விவரம் |
|---|---|
| தயாரிப்பு பரிமாணங்கள் | 6.89 x 4.72 x 10.43 அங்குலம் |
| பொருளின் எடை | 4.49 பவுண்டுகள் (2.04 கிலோகிராம்கள்) |
| பொருள் மாதிரி எண் | ADSM302 |
| திரை அளவு | 5 அங்குலம் |
| வீடியோ வெளியீடு | 1080P Full HD (via HDMI) |
| பெரிதாக்கம் அதிகபட்சம் | 560x (Digital) |
| ஒளி மூல வகை | LED (Adjustable) |
| பொருள் | உலோகம் |
| நிறம் | கருப்பு, வெள்ளி |
| தொகுதிtage | 5 வோல்ட் |
| பேட்டரிகள் | 1 லித்தியம் மெட்டல் பேட்டரி தேவை (சேர்க்கப்பட்டுள்ளது) |
8. உத்தரவாதம் மற்றும் ஆதரவு
For warranty information, technical support, or service inquiries, please refer to the documentation included with your product or visit the official Andonstar webஉத்தரவாதக் கோரிக்கைகளுக்கான வாங்கியதற்கான சான்றாக உங்கள் கொள்முதல் ரசீதை வைத்திருங்கள்.
ஆன்லைன் ஆதாரங்கள் மற்றும் அடிக்கடி கேட்கப்படும் கேள்விகள் ஆகியவையும் இங்கு கிடைக்கக்கூடும். Andonstar Store Page.