1. அறிமுகம்
The URayCoder UHE265-1L-4K is an advanced HDMI to Ethernet IP Video Audio Encoder designed for professional live streaming and video transmission. It supports H.265 and H.264 dual encoding, enabling 4K UHD (3840x2160) video input and output. This device facilitates stable and efficient transmission of video streams across various network environments and platforms.
முக்கிய அம்சங்கள்:
- 4K UHD Support: Supports 4K (3840x2160) video input and output at 30fps, and up to 120fps at 2K and lower resolutions.
- Dual Encoding: Equipped with H.265 / H.264 dual encoding chip for versatile compatibility.
- பல நெறிமுறை இணக்கத்தன்மை: Supports HTTP, RTSP, RTMP(S), SRT, HLS(M3U8), MP4, Multicast (UDP, RTP, PTL), ONVIF, FLV, WebRTC, TRTC, ICECAST.
- Multi-Platform Streaming: Simultaneously stream to platforms like YouTube, Facebook, Twitch, and Vimeo.
- தனிப்பயனாக்கக்கூடிய அமைப்புகள்: Allows adjustment of video resolution, frame rate, bitrate, OSD (text, logo, timestamp), and video editing functions (cropping, rotation, flipping, mirroring).
- Dual Audio Input: Supports HDMI embedded audio and line-in audio with adjustable sound quality.
- HDCP 1.4 Decryption: Decodes various HDMI Ultra HD video sources.

Image 1.1: The advanced H.265/H.264 dual encoding chip at the core of the URayCoder encoder, ensuring powerful and stable performance.

படம் 1.2: முடிந்ததுview of the URayCoder encoder highlighting key features such as HEVC encoding, multi-channel streaming, 4K UHD resolution, and multiple protocol support.
2. தயாரிப்பு முடிந்துவிட்டதுview
This section details the physical components and ports of the URayCoder UHE265-1L-4K encoder.
முன் குழு:
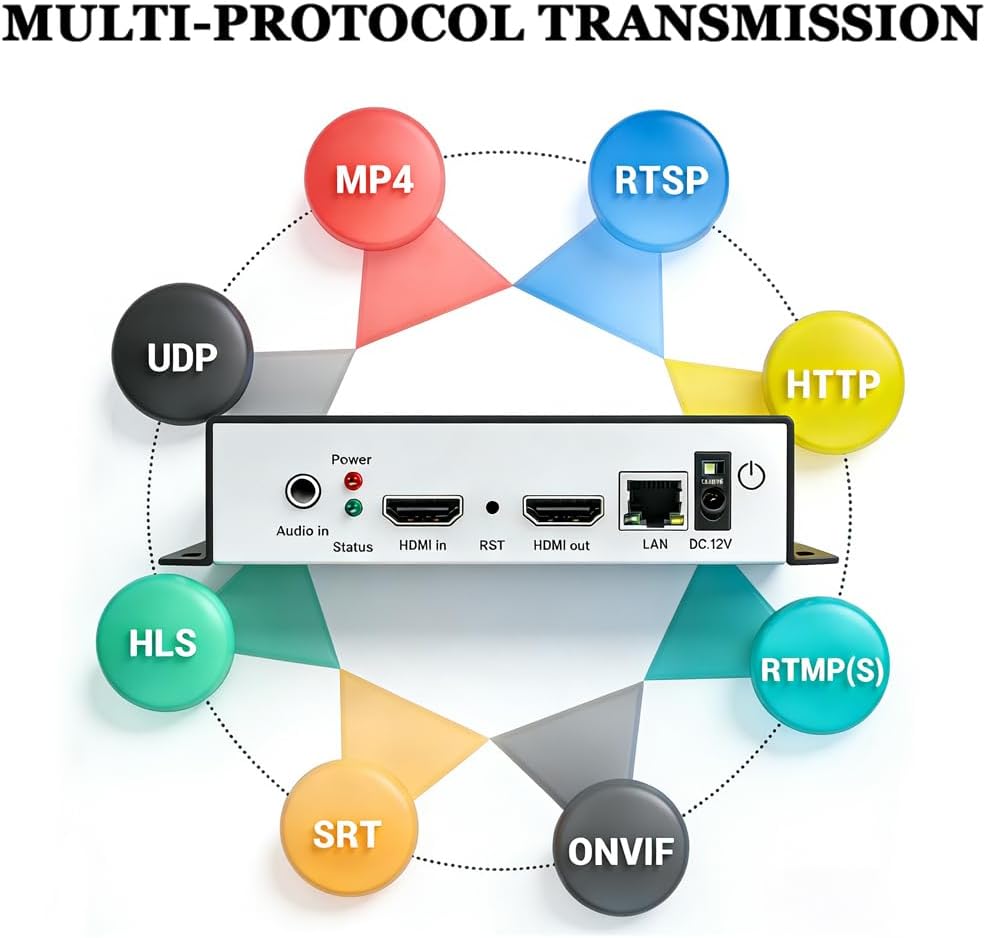
Image 2.1: Front panel of the URayCoder encoder, showing the Audio In port, Status LEDs, HDMI In, RST (Reset) button, HDMI Out, LAN port, and DC 12V power input.
- ஆடியோ இன்: 3.5mm jack for external audio input.
- நிலை LED கள்: Indicators for Power and Status.
- HDMI இல்: Connects to the HDMI video source.
- ஆர்எஸ்டி: மீட்டமை பொத்தான்.
- HDMI அவுட்: HDMI loop-out port for local display.
- லேன்: Ethernet port for network connection.
- டிசி 12 வி: பவர் உள்ளீடு போர்ட்.
பின்புற குழு:

Image 2.2: Rear panel of the URayCoder encoder, showing ventilation and product information.
The rear panel primarily features ventilation openings for heat dissipation and product labeling.
3. அமைவு வழிகாட்டி
Follow these steps to set up your URayCoder HDMI encoder for operation.
3.1 வன்பொருள் இணைப்பு
- HDMI மூலத்தை இணைக்கவும்: Use an HDMI cable to connect your video source (e.g., camera, set-top box, laptop) to the HDMI இன் port on the encoder.
- Connect Display (Optional): If you require a local display, connect an HDMI cable from the HDMI அவுட் (loop-out) port on the encoder to your display monitor.
- ஆடியோவை இணைக்கவும் (விரும்பினால்): If using external audio, connect your audio device to the ஆடியோ இன் 3.5 மிமீ பலா.
- பிணையத்தை இணைக்கவும்: இலிருந்து ஈத்தர்நெட் கேபிளை இணைக்கவும் லேன் port on the encoder to your router or network switch.
- பவர் இணைக்கவும்: Plug the 12V DC power adapter into the DC 12V port on the encoder and then into a power outlet. The Power LED should illuminate.

Image 3.1: A typical connection diagram illustrating how to connect the URayCoder encoder to an HDMI source, a local display, a network router, and streaming platforms.
3.2 அணுகல் Web இடைமுகம்
After connecting the hardware, you can access the encoder's web உள்ளமைவுக்கான இடைமுகம்.
- Ensure your computer is on the same network as the encoder.
- திற a web உலாவி (எ.கா., குரோம், பயர்பாக்ஸ்).
- Enter the encoder's default IP address in the address bar. (Refer to the device label or included documentation for the default IP address, typically 192.168.1.168 or similar).
- Log in using the default username and password (usually 'admin' for both, refer to documentation).
4. இயக்க வழிமுறைகள்
This section guides you through configuring the encoder via its web இடைமுகம்.
4.1 நிலை பக்கம்
Upon logging in, the Status page provides an overview of the encoder's current operation, including running time, input resolution, collected frames, and network status.

படம் 4.1: தி web interface status page displaying real-time operational data and stream URLs.
4.2 Encoder Settings (Main Stream)
Navigate to the 'Encoder' section, then 'Main stream' to configure video encoding parameters.

Image 4.2: Main stream settings page, allowing configuration of encoding type (H.265/H.264), resolution, frame rate, bitrate, and various streaming protocols.
- குறியீட்டு வகை: Select H.265 or H.264.
- தீர்மானம்: Choose output resolution (e.g., 3840x2160, 1920x1080).
- FPS: பிரேம் வீதத்தை அமைக்கவும்.
- பிட்ரேட்: Adjust the video bitrate for quality and bandwidth control.
- Protocol Settings: Enable and configure URLs for various streaming protocols (RTSP, RTMP(S), HLS, UDP, SRT, etc.).
4.3 OSD (On-Screen Display) Settings
The 'OSD' section allows you to add custom text, scrolling captions, logos, and timestamps to your video stream.

Image 4.3: OSD settings interface, where users can enable and customize text, scroll text, or time displays, including font size, color, and background.
- Enable/Disable Zones: Configure up to three OSD zones.
- வகை: Select text, bitmap (logo), scroll text, or time.
- பதவி: Set X and Y coordinates for placement.
- Text/Logo Upload: Enter text or upload a logo image.
- Font/Color: Customize font size, color, and background.
4.4 ஆடியோ அமைப்புகள்
In the 'Audio' section, you can configure audio input and encoding parameters.

Image 4.4: Audio settings page, allowing selection of audio input type (digital/analog), sampling rate, encoder type (AAC, MP3), channel, bitrate, and digital volume gain.
- ஆடியோ உள்ளீடு: Select Digital (HDMI embedded) or Analog (Line-in).
- Sampலிங் விகிதம்: Set the audio sampலிங் விகிதம்.
- குறியாக்கி: Choose audio codec (e.g., AAC, MP3).
- பிட்ரேட்: Adjust audio bitrate.
- Digital Volume Gain: Control audio volume.
4.5 மேம்பட்ட அமைப்புகள்
The 'Advanced' section provides options for EDID management, color range, and other system-level configurations.

Image 4.5: Advanced settings page, offering options for EDID, color range, and other fine-tuning parameters for video output.
5. பராமரிப்பு
Proper maintenance ensures the longevity and optimal performance of your URayCoder encoder.
5.1 பொது பராமரிப்பு
- சாதனத்தை குளிர்ந்த, உலர்ந்த மற்றும் நன்கு காற்றோட்டமான இடத்தில் வைக்கவும்.
- Avoid exposing the device to direct sunlight, high temperatures, or excessive humidity.
- மென்மையான, உலர்ந்த துணியால் வெளிப்புறத்தை சுத்தம் செய்யவும். திரவ கிளீனர்கள் அல்லது ஏரோசோல்களைப் பயன்படுத்த வேண்டாம்.
- அனைத்து கேபிள்களும் பாதுகாப்பாக இணைக்கப்பட்டுள்ளதா என்பதையும், அழுத்தத்தில் இல்லை என்பதையும் உறுதிப்படுத்திக் கொள்ளுங்கள்.
5.2 நிலைபொருள் புதுப்பிப்புகள்
Periodically check the URayCoder official website for firmware updates. Firmware updates can improve performance, add new features, or fix bugs. Follow the instructions provided with the firmware update package carefully to avoid damaging the device.
6. சரிசெய்தல்
இந்தப் பிரிவு நீங்கள் சந்திக்கக்கூடிய பொதுவான பிரச்சினைகளைப் பற்றி விவாதிக்கிறது மற்றும் தீர்வுகளை வழங்குகிறது.
6.1 No Video Output/Signal
- Check HDMI Cables: Ensure all HDMI cables are securely connected to both the source and the encoder. Try different HDMI cables if necessary.
- Verify HDMI Source: Confirm that your HDMI source is powered on and outputting a signal. Test the source with a direct connection to a display.
- உள்ளீட்டுத் தீர்மானம்: Ensure the input resolution from your source is supported by the encoder.
- HDCP: The encoder supports HDCP 1.4. If your source uses a higher HDCP version, it might cause compatibility issues.
6.2 நெட்வொர்க் இணைப்பு சிக்கல்கள்
- ஈதர்நெட் கேபிளைச் சரிபார்க்கவும்: Ensure the Ethernet cable is properly connected to the encoder's LAN port and your router/switch.
- பிணைய கட்டமைப்பு: Verify that the encoder's IP address, subnet mask, and gateway settings are correct and compatible with your network. If unsure, try resetting the encoder to factory defaults (refer to the reset button on the front panel).
- Firewall/Router: Check your network firewall or router settings to ensure they are not blocking the encoder's communication.
6.3 Streaming Problems (Buffering, Disconnections)
- பிணைய அலைவரிசை: Ensure your internet connection has sufficient upload bandwidth for your chosen video bitrate and resolution.
- Encoder Bitrate: Reduce the video bitrate in the encoder settings if your network bandwidth is limited.
- Streaming Platform Settings: Verify that the streaming settings (stream key, server URL) on the encoder match those provided by your streaming platform.
- Router/Switch Performance: A congested or underperforming router/switch can cause issues. Try connecting the encoder directly to a high-performance network port if possible.
7. விவரக்குறிப்புகள்
Below are the detailed technical specifications for the URayCoder UHE265-1L-4K HDMI to Ethernet IP Video Audio Encoder.
| அம்சம் | விளக்கம் |
|---|---|
| பிராண்ட் | யுரேகோடர் |
| மாதிரி பெயர் | UHE265-1L-4K |
| இணைப்பு தொழில்நுட்பம் | HDMI, ஈதர்நெட் |
| இணைப்பான் வகை | HDMI |
| தீர்மானம் | Max 3840x2160 Input and Output |
| வீடியோ கோடெக் | H.265, H.264, MJPEG. |
| ஆதரிக்கப்படும் இணைய சேவைகள் | YouTube, Facebook, Ustream, Livestream, Twitch, Vimeo, Streamspot, Dacast, Tikilive, Netrmedi, etc. |
| படிவம் காரணி | Video Encoder Box |
| தயாரிப்பு பரிமாணங்கள் | 7"லி x 5"அங்குலம் x 1"அங்குலம் |
| இணக்கமான சாதனங்கள் | Devices with HDMI Output |
| ஆற்றல் உள்ளீடு | DC 12V |
8. உத்தரவாதம் மற்றும் ஆதரவு
URayCoder is committed to providing reliable products and excellent customer service.
8.1 உத்தரவாதத் தகவல்
All URayCoder video encoders come with a lifetime free warranty. This warranty covers manufacturing defects and ensures long-term product reliability.
8.2 தொழில்நுட்ப ஆதரவு
URayCoder provides lifetime free technical support for all its products. If you encounter any issues or have questions regarding setup, operation, or troubleshooting, please contact URayCoder customer support through their official webஉங்கள் வாங்குதலுடன் வழங்கப்பட்ட தளம் அல்லது தொடர்புத் தகவல்.
8.3 தனிப்பயனாக்குதல் சேவைகள்
URayCoder also offers secondary development and feature customization services to meet enterprise-level personalized needs. This includes shell pattern printing, logo addition, and hardware/function development.