
அறிமுகம்
This manual provides detailed instructions for the setup, operation, and maintenance of your Sunbuck TAV-339BT Wireless Karaoke Bluetooth Power Amplifier System. This 2-channel stereo amplifier is designed for home audio and karaoke applications, featuring Bluetooth connectivity, USB/SD card playback, FM radio, and dual microphone inputs. Please read this manual thoroughly before using the product to ensure proper operation and to prevent damage.

படம் 1: முன் view of the Sunbuck TAV-339BT amplifier. This image displays the main unit with its various controls and inputs on the front panel, including the power switch, microphone inputs, volume knobs, and digital display.
பாதுகாப்பு தகவல்
- சக்தி ஆதாரம்: இணைக்கவும் amplifier only to the specified power supply (AC 110V or DC 12V 5A). Ensure the voltage matches the requirements before plugging in.
- காற்றோட்டம்: காற்றோட்ட திறப்புகளைத் தடுக்க வேண்டாம். அதிக வெப்பமடைவதைத் தடுக்க அலகு சுற்றி போதுமான காற்றோட்டத்தை உறுதி செய்யவும்.
- நீர் மற்றும் ஈரப்பதம்: மழை, ஈரப்பதம் அல்லது சொட்டு சொட்டாக விழும்/தெறிக்கும் திரவங்களுக்கு யூனிட்டை வெளிப்படுத்த வேண்டாம். குவளைகள் போன்ற திரவங்களால் நிரப்பப்பட்ட பொருட்களை கருவியின் மீது வைக்க வேண்டாம்.
- வெப்ப ஆதாரங்கள்: ரேடியேட்டர்கள், வெப்பப் பதிவேடுகள், அடுப்புகள் அல்லது பிற சாதனங்கள் (உட்பட) போன்ற வெப்ப மூலங்களிலிருந்து யூனிட்டை விலக்கி வைக்கவும். ampலிஃபையர்ஸ்) வெப்பத்தை உற்பத்தி செய்யும்.
- சுத்தம்: Unplug the unit from the power outlet before cleaning. Use a dry cloth for cleaning.
- சேவை: இந்த தயாரிப்புக்கு நீங்களே சேவை செய்ய முயற்சிக்காதீர்கள். தகுதிவாய்ந்த சேவை ஊழியர்களுக்கு அனைத்து சேவைகளையும் பார்க்கவும்.
- குழந்தைகள்: Keep the unit and its accessories out of reach of children.
தொகுப்பு உள்ளடக்கங்கள்
பின்வரும் பொருட்களுக்கு தொகுப்பைச் சரிபார்க்கவும்:
- 1 x Sunbuck TAV-339BT Ampலைஃபையர் (110V)
- 1 x ரிமோட் கண்ட்ரோல்
- 1 x பயனர் கையேடு
தயாரிப்பு அம்சங்கள்
- Compact and powerful 2-channel stereo ampலைஃபையர் அமைப்பு.
- Integrated Bluetooth for wireless audio streaming from compatible devices (smartphones, tablets, PCs).
- Supports USB flash drive and SD memory card playback.
- Built-in FM radio tuner.
- Dual 1/4-inch microphone input jacks for karaoke functions.
- RCA (L/R) audio input for external devices.
- Front panel controls for master volume, bass, treble, microphone volume, echo, and microphone bass/treble.
- Traditional VU meter display.
- வசதியான செயல்பாட்டிற்கு ரிமோட் கண்ட்ரோல் அடங்கும்.
முன் குழு ஓவர்view
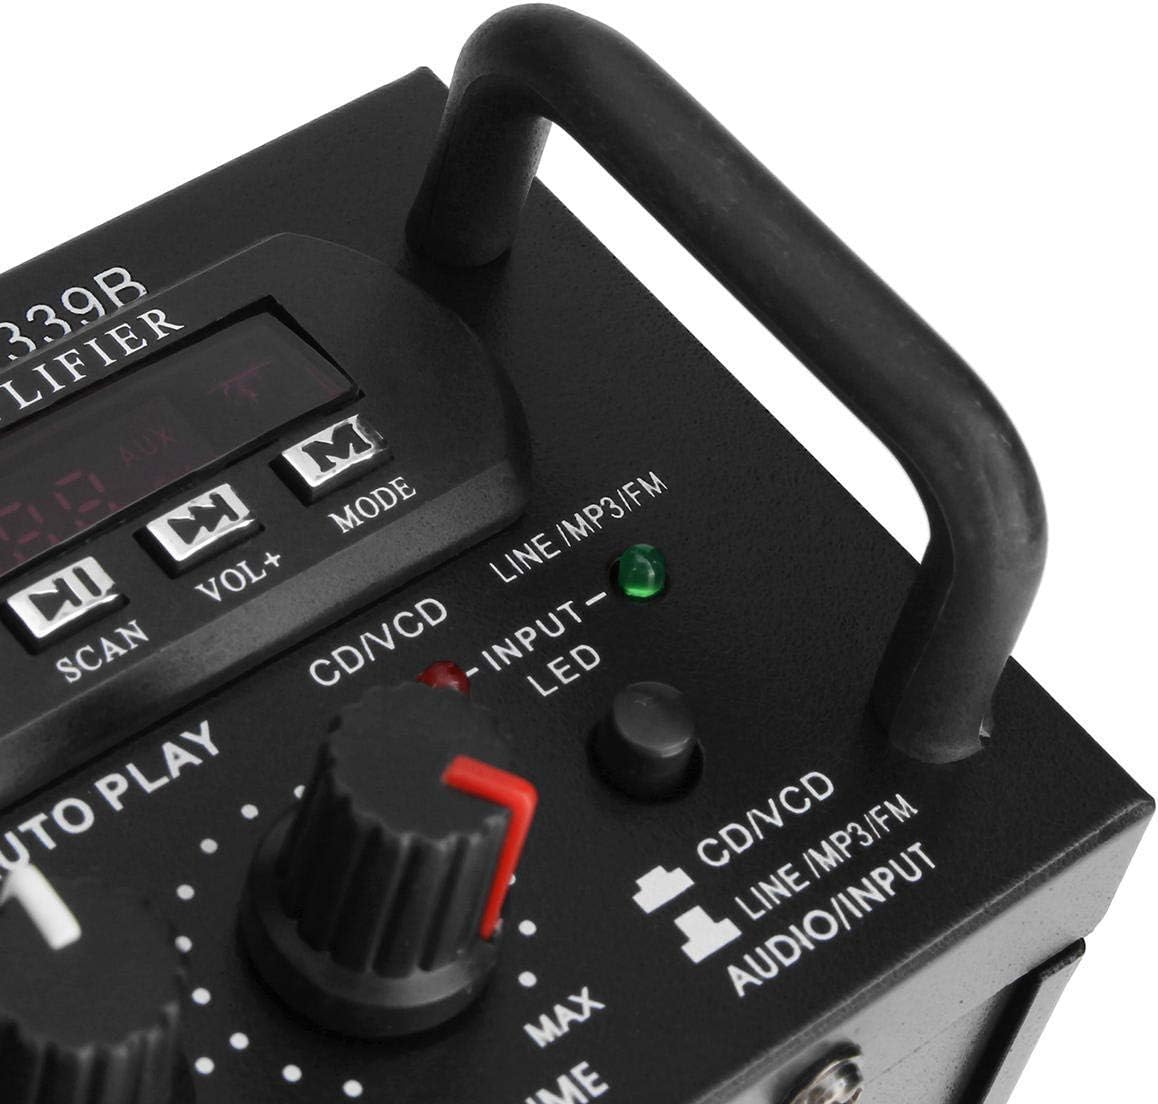
படம் 2: விரிவானது view இன் amplifier's front panel, highlighting the various knobs, buttons, and input ports.
- மின்விசை மாற்றும் குமிழ்: திருப்புகிறது ampஆயுள் ஆன் அல்லது ஆஃப்.
- ECHO Control: மைக்ரோஃபோன்களுக்கான எதிரொலி விளைவைச் சரிசெய்கிறது.
- MIC1/MIC2 Input: 1/4-inch jacks for connecting microphones.
- M.BASS/M.TREBLE: Adjusts bass and treble for microphone input.
- MIC/VOL: Adjusts the volume level for microphones.
- VU மீட்டர்: ஆடியோ வெளியீட்டு அளவைக் காட்டுகிறது.
- USB/SD Card Slot: For connecting USB flash drives or SD memory cards.
- டிஜிட்டல் காட்சி: தற்போதைய பயன்முறை, டிராக் எண் அல்லது FM அதிர்வெண்ணைக் காட்டுகிறது.
- Control Buttons (SCAN, VOL-, VOL+, MODE): For navigating USB/SD/FM functions.
- BASS/TREBLE: Adjusts the main audio bass and treble levels.
- வால்யூம்: Master volume control for all audio sources.
- INPUT தேர்வி: Cycles through input sources (CD/VCD, LINE, MP3/FM, Bluetooth).
- INPUT LED Indicators: Lights up to show the currently selected input source.
பின்புற குழு மேல்view

படம் 3: பின்புறம் view இன் amplifier, showing the various input and output terminals for connecting speakers and audio sources.
- INPUT (CD/VCD, LINE): RCA (L/R) audio input jacks for connecting external audio sources like CD/DVD players, TVs, or other line-level devices.
- ஒலிபெருக்கி அமைப்பு: Spring clip terminals for connecting passive speakers. Ensure correct polarity (+ to + and - to -).
- POWER DC 12V INPUT: DC power input for 12V power supply (e.g., car battery, not included).
- AC 110V 60Hz: AC power input for standard household power.
- எஃப்.எம் ஆண்டெனா: Connector for the included FM antenna.
ரிமோட் கண்ட்ரோல் ஓவர்view
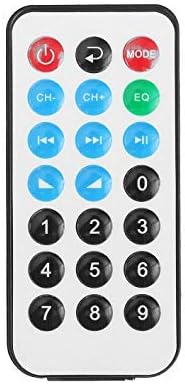
Figure 4: Layout of the remote control buttons.
ரிமோட் கண்ட்ரோல் வசதியான செயல்பாட்டை அனுமதிக்கிறது amplifier's functions from a distance. It typically includes buttons for power, mode selection, volume adjustment, track navigation (for USB/SD), and FM radio controls.
ரிமோட் கண்ட்ரோலுக்கான பேட்டரி நிறுவல்

Figure 5: Step-by-step guide for installing the CR2025 lithium battery into the remote control.
The remote control requires a CR2025 lithium battery (3V). To install or replace the battery:
- ரிமோட் கண்ட்ரோலின் பின்புறத்தில் பேட்டரி பெட்டியைக் கண்டறியவும்.
- Push the small tab to release the battery tray.
- பேட்டரி தட்டை வெளியே இழுக்கவும்.
- நேர்மறை (+) பக்கம் மேல்நோக்கி இருக்கும்படி CR2025 பேட்டரியைச் செருகவும்.
- Slide the battery tray back into the remote until it clicks into place.
அமைவு
1 பேச்சாளர் இணைப்பு
Connect your passive speakers to the "SPEAKER SYSTEM" terminals on the rear panel. Ensure that the positive (+) terminal of the amplifier connects to the positive (+) terminal of the speaker, and the negative (-) terminal of the amplifier connects to the negative (-) terminal of the speaker. Incorrect polarity can affect sound quality.
2. ஆடியோ உள்ளீட்டு இணைப்பு
- RCA Inputs (CD/VCD, LINE): Use RCA cables to connect external audio sources (e.g., CD player, DVD player, TV audio output) to the corresponding "INPUT" jacks on the rear panel.
- USB/SD கார்டு: Insert a USB flash drive or SD memory card into the respective slot on the front panel.
- புளூடூத்: No physical connection is needed for Bluetooth. Refer to the "Operating Instructions" section for pairing.
3. மைக்ரோஃபோன் இணைப்பு
Connect up to two 1/4-inch microphones to the "MIC1" and "MIC2" input jacks on the front panel for karaoke use.
4. FM ஆண்டெனா இணைப்பு
Connect the included FM antenna to the FM antenna terminal on the rear panel for improved radio reception.
5. மின் இணைப்பு
Connect the power cord to the AC 110V 60Hz input on the rear panel and then plug it into a standard wall outlet. Alternatively, for DC operation, connect a 12V DC power source (not included) to the "POWER DC 12V INPUT" terminals.
இயக்க வழிமுறைகள்
1. பவர் ஆன்/ஆஃப்
Press the "POWER" switch on the front panel to turn the amplifier on or off. The digital display will illuminate when the unit is powered on.
2. மூல தேர்வு
Press the "INPUT" button on the front panel or the "MODE" button on the remote control to cycle through available input sources: CD/VCD, LINE, MP3/FM, and Bluetooth. The corresponding LED indicator on the front panel will light up.
3. புளூடூத் செயல்பாடு
- Select "Bluetooth" as the input source using the "INPUT" or "MODE" button. The digital display will show "BLUE" or a similar indicator.
- Enable Bluetooth on your mobile device (smartphone, tablet, PC).
- தேடுங்கள் available Bluetooth devices and select "TAV-339BT" or "Sunbuck" from the list.
- Once paired, you can stream audio wirelessly from your device to the ampஆயுள்.
4. USB/SD கார்டு பிளேபேக்
- MP3 ஆடியோ கொண்ட USB ஃபிளாஷ் டிரைவ் அல்லது SD கார்டைச் செருகவும். fileமுன் பலகத்தில் உள்ள அந்தந்த ஸ்லாட்டில் கள்.
- Select "MP3/FM" as the input source. The amplifier will automatically detect and begin playing audio files.
- Use the "SCAN", "VOL-", "VOL+" buttons on the front panel or the corresponding buttons on the remote control to navigate tracks (play/pause, next/previous).
5. எஃப்எம் ரேடியோ செயல்பாடு
- Ensure the FM antenna is connected.
- Select "MP3/FM" as the input source.
- Press the "SCAN" button to automatically scan and store available FM radio stations.
- Use the "VOL-" and "VOL+" buttons (or remote control) to manually tune or select stored stations.
6. கரோக்கி செயல்பாடு
- Connect microphones to the "MIC1" and "MIC2" jacks.
- Adjust the "MIC/VOL" knob to control the microphone volume.
- Use the "ECHO" knob to add an echo effect to the vocals.
- Adjust "M.BASS" and "M.TREBLE" to fine-tune the microphone's tone.
7. ஒலி அளவு மற்றும் தொனி கட்டுப்பாடு
- வால்யூம்: Use the large "VOLUME" knob on the front panel to adjust the overall output volume.
- BASS/TREBLE: Use the "BASS" and "TREBLE" knobs to adjust the low and high frequencies of the main audio output.
பராமரிப்பு
- சுத்தம்: Disconnect the power before cleaning. Use a soft, dry cloth to wipe the exterior of the unit. Do not use liquid cleaners or aerosol cleaners.
- காற்றோட்டம்: Ensure that the ventilation openings are clear of dust and debris to maintain proper cooling.
- சேமிப்பு: யூனிட்டை நீண்ட நேரம் சேமித்து வைத்தால், அதை மின்சார விநியோகத்திலிருந்து துண்டித்து, குளிர்ந்த, உலர்ந்த இடத்தில் சேமிக்கவும்.
சரிசெய்தல்
| பிரச்சனை | சாத்தியமான காரணம் | தீர்வு |
|---|---|---|
| சக்தி இல்லை | மின் கம்பி இணைக்கப்படவில்லை; மின் சுவிட்ச் அணைக்கப்பட்டுள்ளது; அவுட்லெட்டிலிருந்து மின்சாரம் இல்லை. | Ensure power cord is securely connected. Turn the POWER switch on. Check the power outlet with another device. |
| ஒலி வெளியீடு இல்லை | Incorrect input source selected; Speaker wires loose or incorrectly connected; Volume too low; Mute activated (if applicable). | Select the correct input source. Check speaker connections and polarity. Increase the VOLUME. Ensure no mute function is active. |
| புளூடூத் இணைக்கப்படவில்லை | Ampலிஃபையர் புளூடூத் பயன்முறையில் இல்லை; சாதனம் மிக தொலைவில் உள்ளது; சாதனம் ஏற்கனவே வேறொரு சாதனத்துடன் இணைக்கப்பட்டுள்ளது. amplifier; Bluetooth on device is off. | Select Bluetooth input on the amplifier. Move device closer. Disconnect from other devices. Enable Bluetooth on your device. |
| USB/SD கார்டு இயங்கவில்லை. | Incorrect input source; Files not in supported format (MP3); USB/SD card corrupted or empty. | Select MP3/FM input. Ensure files are MP3 format. Try another USB/SD card. |
| ரிமோட் கண்ட்ரோல் வேலை செய்யவில்லை | Battery depleted or incorrectly installed; Obstruction between remote and amplifier; Remote sensor blocked. | Replace battery (CR2025) and ensure correct polarity. Remove any obstructions. Ensure the remote sensor on the amplifier is clear. |
விவரக்குறிப்புகள்
| அம்சம் | விவரம் |
|---|---|
| மாதிரி | TAV-339BT |
| மதிப்பிடப்பட்ட மின்மறுப்பு | 4 முதல் 8 ஓம்ஸ் |
| ஆர்எம்எஸ் சக்தி வெளியீடு | 200W + 200W (Recommended for speaker boxes with speakers less than 8") |
| Peak Music Power Output (P.M.P.O) | 300W + 300W (மொத்தம் 600W) |
| பவர் சப்ளை | AC: 110V 60Hz or DC: 12V 5A |
| சேனல்கள் | 2 சேனல்கள் |
| ஆடியோ உள்ளீடு | Multi-channel signal input (RCA L/R), USB, SD, Bluetooth |
| மைக்ரோஃபோன் உள்ளீடு | Dual 1/4-inch Jack |
| இணைப்பு தொழில்நுட்பம் | Bluetooth, USB, RCA |
| வயர்லெஸ் வகை | Bluetooth, Infrared (for remote) |
| தயாரிப்பு பரிமாணங்கள் (L x W x H) | 25.4 x 20.32 x 7.01 செமீ (10 x 8 x 2.76 அங்குலம்) |
| தயாரிப்பு எடை | 2.72 கிலோ (6 பவுண்ட்) |
| இணக்கமான சாதனங்கள் | Headphones, Laptops, Smartphones |
உத்தரவாதம் மற்றும் ஆதரவு
உத்தரவாதத் தகவல் அல்லது தொழில்நுட்ப ஆதரவுக்கு, வாங்கும் போது வழங்கப்பட்ட ஆவணங்களைப் பார்க்கவும் அல்லது உங்கள் சில்லறை விற்பனையாளரைத் தொடர்பு கொள்ளவும். உத்தரவாதக் கோரிக்கைகளுக்கு உங்கள் வாங்கியதற்கான ஆதாரத்தை வைத்திருங்கள்.