1. அறிமுகம்
The Gravity 4000.1D is a high-performance Class D monoblock amplifier designed for automotive audio systems. This amplifier delivers 4000 Watts maximum power and is stable at 1 Ohm, 2 Ohm, and 4 Ohm loads, making it suitable for driving subwoofers. It features a digital design with a MOSFET power supply for efficient operation. This manual provides essential information for proper installation, operation, and maintenance of your ampஆயுள்.
2. பாதுகாப்பு முன்னெச்சரிக்கைகள்
- Always disconnect the vehicle's battery negative terminal before starting any installation.
- சேதம் அல்லது ஷார்ட் சர்க்யூட்களைத் தடுக்க அனைத்து வயரிங்களும் சரியாக இணைக்கப்பட்டு பாதுகாக்கப்பட்டுள்ளதா என்பதை உறுதிப்படுத்தவும்.
- நிறுவல் பிரிவில் குறிப்பிடப்பட்டுள்ளபடி பொருத்தமான கேஜ் பவர் மற்றும் தரை கம்பிகளைப் பயன்படுத்தவும்.
- நிறுவவும் ampஅதிக வெப்பமடைவதைத் தடுக்க, நன்கு காற்றோட்டமான பகுதியில் உள்ள லிஃபையர்.
- ஏற்றுவதைத் தவிர்க்கவும் amplifier in locations exposed to direct sunlight or excessive moisture.
- ஏதேனும் நிறுவல் படிகள் குறித்து உங்களுக்குத் தெரியாவிட்டால், ஒரு தொழில்முறை கார் ஆடியோ நிறுவியை அணுகவும்.
3. தொகுப்பு உள்ளடக்கங்கள்
தொகுப்பில் அனைத்து பொருட்களும் உள்ளதா என சரிபார்க்கவும்:
- Gravity 4000.1D Class D Car Ampஆயுள்
- கேபிளுடன் கூடிய ரிமோட் பாஸ் நாப்
- மவுண்டிங் வன்பொருள் (திருகுகள்)
- பயனர் கையேடு (இந்த ஆவணம்)
- SoundXtreme AP6 Bass Machine (Bundle Component)
4. தயாரிப்பு முடிந்துவிட்டதுview
உங்களைப் பழக்கப்படுத்திக்கொள்ளுங்கள் amplifier's layout and connections.

படம் 1: மேல் view of the Gravity 4000.1D Class D Car Amplifier, showing the 'GRAVITY' logo and 'WARZONE' branding, along with the model number 'WZ 4000-1D'.
4.1 Input and Control Panel

படம் 2: நெருக்கமான காட்சி view இன் amplifier's input and control panel. This side features RCA input jacks, a remote bass knob port, and various adjustment controls.
- LED பாதுகாக்க: போது ஒளிர்கிறது ampலைஃபையர் பாதுகாப்பு முறையில் உள்ளது.
- அகற்று: Port for connecting the wired remote bass knob.
- உள்ளீடு (RCA): Audio signal input from your head unit or source.
- BRIDGE IN: Used for bridging multiple amplifiers (refer to advanced setup).
- கெய்ன்: இன் உள்ளீட்டு உணர்திறனை சரிசெய்கிறது ampஆயுள்.
- LPF (குறைந்த பாஸ் வடிகட்டி): Adjusts the low-pass crossover frequency (40 Hz ~ 180 Hz).
- சப்சோனிக்: Adjusts the subsonic filter frequency (0 Hz ~ 50 Hz).
- BASS BOOST FREQ: Selects the center frequency for bass boost (30 Hz, 40 Hz, 60 Hz).
- பாஸ் பூஸ்ட்: Adjusts the level of bass boost (0 dB ~ 12 dB).
- பவர் எல்இடி: போது ஒளிர்கிறது ampலைஃபையர் இயக்கப்படுகிறது.
4.2 Power and Speaker Terminal Panel

படம் 3: நெருக்கமான காட்சி view இன் amplifier's power and speaker terminal panel. This side includes connections for power, ground, remote turn-on, and speaker outputs.
- பேச்சாளர்: Output terminals for connecting your subwoofer(s).
- POWER (+12V): Connects to the positive terminal of the vehicle's battery.
- REM (ரிமோட்): Connects to the remote turn-on output of your head unit.
- GND (தரையில்): Connects to a solid chassis ground point in the vehicle.
5. நிறுவல்
5.1 பொருத்துதல் Ampஆயுள்
உலர்ந்த, நன்கு காற்றோட்டமான மற்றும் பாதுகாப்பான ஒரு பொருத்துதல் இடத்தைத் தேர்வு செய்யவும். சுற்றி போதுமான காற்றோட்டம் இருப்பதை உறுதி செய்யவும். amplifier to prevent overheating. The amplifier can be mounted horizontally or vertically. Use the provided mounting screws to secure the ampஉங்கள் வாகனத்தில் ஒரு திடமான மேற்பரப்பில் லிஃபையரை இணைக்கவும்.
5.2 வயரிங் இணைப்புகள்
Proper wiring is crucial for optimal performance and safety. Refer to Figure 3 for terminal locations.
- மின் இணைப்பு (+12V): Run a heavy-gauge power cable (e.g., 4-gauge or larger) directly from the vehicle's positive battery terminal to the amplifier's +12V terminal. Install an in-line fuse holder with an appropriate fuse (not included) within 18 inches (45 cm) of the battery.
- தரை இணைப்பு (GND): Run a heavy-gauge ground cable (same gauge as power cable) from the amplifier's GND terminal to a clean, unpainted metal surface on the vehicle's chassis. Ensure a good electrical connection by scraping away any paint or rust. The ground cable should be as short as possible, ideally less than 3 feet (1 meter).
- Remote Turn-On Connection (REM): Connect a smaller gauge wire (e.g., 18-gauge) from the amplifier's REM terminal to the remote turn-on output of your head unit. This wire tells the amplifier to turn on when your head unit is active.
- RCA உள்ளீட்டு இணைப்பு: Connect RCA cables from the pre-out outputs of your head unit to the INPUT RCA jacks on the ampஆயுள்.
- பேச்சாளர் இணைப்பு: Connect your subwoofer(s) to the SPEAKER output terminals. Ensure correct polarity (+ to + and - to -). The amplifier is stable down to 1 Ohm. Consult your subwoofer's specifications for proper wiring configurations to achieve the desired impedance.
- ரிமோட் பாஸ் குமிழ்: Plug the remote bass knob cable into the REMOTE port on the amplifier and mount the knob in a convenient location for adjustment.
6. ஆபரேஷன்
6.1 ஆரம்ப பவர்-அப்
After all connections are made and verified, reconnect the vehicle's battery. Turn on your head unit. The POWER LED on the amplifier should illuminate. If the PROTECT LED illuminates, refer to the Troubleshooting section.
6.2 சரிசெய்தல் Ampலைஃபையர் அமைப்புகள்
Adjust these settings carefully to optimize sound quality and prevent damage to your speakers.
- கெய்ன்: Start with the GAIN control at minimum. Play a familiar piece of music at a moderate volume on your head unit. Slowly increase the GAIN until you hear distortion, then back off slightly. This sets the ampஉங்கள் ஹெட் யூனிட்டின் வெளியீட்டைப் பொருத்த லிஃபையரின் உள்ளீட்டு உணர்திறன்.
- LPF (குறைந்த பாஸ் வடிகட்டி): Adjust the LPF to filter out frequencies above your desired subwoofer range. A common starting point is 80-100 Hz. This ensures only low frequencies are sent to your subwoofer.
- SUBSONIC Filter: This filter removes extremely low frequencies that your subwoofer cannot reproduce efficiently, preventing damage and improving sound quality. Set it slightly below your subwoofer's port tuning frequency or around 25-30 Hz for sealed enclosures.
- BASS BOOST FREQ & BASS BOOST: Use these controls to enhance bass output at a specific frequency. Start with Bass Boost at 0 dB and adjust only if needed. Excessive bass boost can cause distortion and damage.
6.3 ரிமோட் பாஸ் நாப்

Figure 4: The wired remote bass knob, used for convenient adjustment of bass level from the driver's seat.
The remote bass knob allows you to adjust the subwoofer output level conveniently from your listening position. This control typically acts as a master volume for the subwoofer channel, allowing you to fine-tune bass levels without accessing the ampநேரடியாக உயிரிழப்பவர்.
7. விவரக்குறிப்புகள்
| அம்சம் | விவரக்குறிப்பு |
|---|---|
| மாதிரி | 4000.1D |
| வெளியீட்டு சக்தி | அதிகபட்சம் 4000 வாட்ஸ் |
| வகுப்பு | வகுப்பு டி |
| நிலைத்தன்மை | 1 Ohm, 2 Ohm, 4 Ohm Stable |
| S/N விகிதம் | > 70 dB |
| அதிர்வெண் பதில் | 8 Hz ~ 180 Hz |
| THD | < 0.2% |
| பாஸ் பூஸ்ட் லெவல் | 0~12dB |
| LPF (குறைந்த பாஸ் வடிகட்டி) | 40 Hz ~ 180 Hz |
| சப்ஸோனிக் வடிகட்டி | 0 ~ 50 ஹெர்ட்ஸ் |
| உள்ளீடுகள் | High and Low Level Inputs |
| பரிமாணங்கள் (L×W×H) | 286 மிமீ (11.3 அங்குலம்) × 211 மிமீ (8.3 அங்குலம்) × 64.5 மிமீ (2.5 அங்குலம்) |
| சேனல்களின் எண்ணிக்கை | 1 (மோனோபிளாக்) |
| மவுண்டிங் வகை | freestanding |
8. சரிசெய்தல்
உங்களுக்கு ஏதேனும் சிக்கல்கள் ஏற்பட்டால் amplifier, consult the following table:
| பிரச்சனை | சாத்தியமான காரணம் | தீர்வு |
|---|---|---|
| Amplifier does not turn on (POWER LED off) | No power, no ground, or no remote signal. Blown fuse. | Check +12V, GND, and REM connections. Verify in-line fuse. |
| PROTECT LED illuminates | Short circuit in speaker wiring, impedance too low, overheating, or DC offset. | Check speaker wiring for shorts. Verify speaker impedance. Ensure proper ventilation. Allow ampகுளிர்விக்க உயிரி. |
| ஒலி வெளியீடு இல்லை | No input signal, incorrect gain setting, or speaker wiring issue. | Check RCA input connections. Adjust GAIN. Verify speaker connections and polarity. |
| சிதைந்த ஒலி | GAIN set too high, improper crossover settings, or damaged speakers. | Reduce GAIN. Adjust LPF and Subsonic filters. Inspect speakers for damage. |
| Engine noise/whine | Poor grounding, RCA cable routing, or power cable interference. | Ensure solid ground connection. Route RCA cables away from power cables. Consider a ground loop isolator. |
9. பராமரிப்பு
To ensure the longevity and optimal performance of your Gravity 4000.1D ampஆயுள்:
- வைத்திருங்கள் ampலிஃபையரை சுத்தமாகவும் தூசி இல்லாததாகவும் வைக்கவும். சுத்தம் செய்ய மென்மையான, உலர்ந்த துணியைப் பயன்படுத்தவும்.
- சரியான வெப்பச் சிதறலை அனுமதிக்க குளிரூட்டும் துடுப்புகள் தடைபடாமல் இருப்பதை உறுதி செய்யவும்.
- இறுக்கம் மற்றும் அரிப்புக்காக அனைத்து வயரிங் இணைப்புகளையும் அவ்வப்போது சரிபார்க்கவும்.
- திரவங்கள் மீது சிந்துவதைத் தவிர்க்கவும். ampஆயுள்.
10. SoundXtreme AP6 Bass Machine (Bundle Component)
The Gravity 4000.1D amplifier may be bundled with a SoundXtreme AP6 Bass Machine. This component is designed to enhance bass response and provide additional control over low frequencies in your audio system.
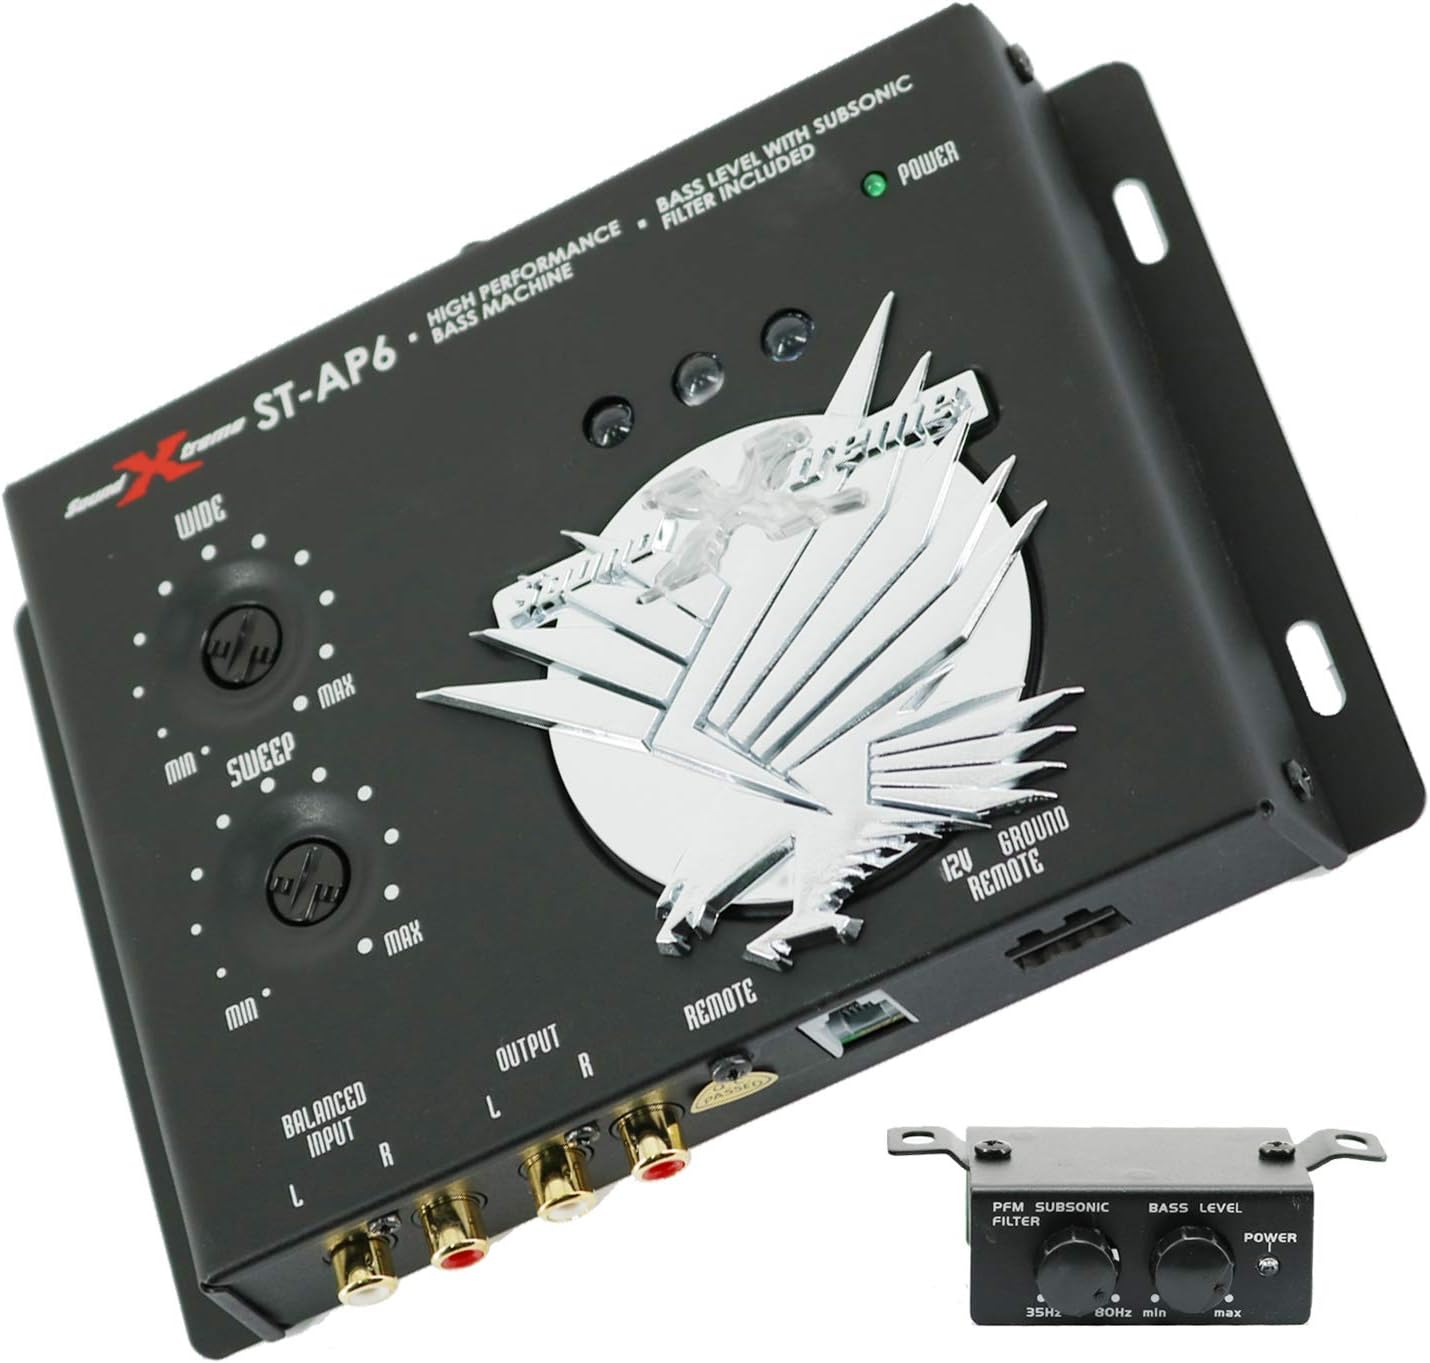
Figure 5: The SoundXtreme AP6 Bass Machine, a high-performance bass processor included in some bundles.
For detailed installation and operation instructions for the SoundXtreme AP6 Bass Machine, please refer to its dedicated user manual, as its functionality is separate from the Gravity 4000.1D ampஆயுள்.
11. உத்தரவாதம் மற்றும் ஆதரவு
For warranty information and technical support, please refer to the documentation provided with your purchase or contact Gravity customer service. Keep your proof of purchase for warranty claims.