
அறிமுகம்
This manual provides detailed instructions for the installation, operation, maintenance, and troubleshooting of the HP ProDesk 400 G3 MS-7957 motherboard. Please read this manual thoroughly before proceeding with any installation or operation to ensure proper functionality and safety.
பாதுகாப்பு தகவல்
மதர்போர்டுக்கு சேதம் ஏற்படுவதையோ அல்லது உங்களுக்கு காயம் ஏற்படுவதையோ தடுக்க பின்வரும் பாதுகாப்பு முன்னெச்சரிக்கை நடவடிக்கைகளை எப்போதும் பின்பற்றவும்:
- Disconnect the power supply from the wall outlet before installing or removing any components.
- Wear an anti-static wrist strap or frequently touch a grounded metal object to discharge static electricity before handling the motherboard.
- உணர்திறன் வாய்ந்த கூறுகளைத் தொடுவதைத் தவிர்க்க மதர்போர்டை அதன் விளிம்புகளால் கையாளவும்.
- Ensure proper ventilation within the computer case to prevent overheating.
- மதர்போர்டை ஈரப்பதம் மற்றும் தீவிர வெப்பநிலையிலிருந்து விலக்கி வைக்கவும்.
தயாரிப்பு முடிந்துவிட்டதுview
The HP ProDesk 400 G3 MS-7957 is a MicroATX motherboard designed for Intel processors with an LGA 1151 socket. It supports DDR4 RAM and features a B250 chipset, offering a reliable foundation for desktop computing.
முக்கிய அம்சங்கள்
- Compatible CPU Brand: இன்டெல்
- சாக்கெட் வகை: LGA 1151/Socket H4
- படிவக் காரணி: மைக்ரோஏடிஎக்ஸ்
- I/O இணைப்பிகள்: Ethernet (RJ-45), USB 2.0, USB 3.0, VGA, DisplayPort, HD Audio Jack
கூறு அடையாளம்
Familiarize yourself with the layout of the motherboard to facilitate proper installation and connection of components.

படம் 1: கோணல் view of the HP ProDesk 400 G3 MS-7957 motherboard. This image highlights the CPU socket (LGA 1151), four DDR4 RAM slots, PCIe slots, and various headers for front panel connections and storage devices.
அமைவு மற்றும் நிறுவல்
நீங்கள் தொடங்குவதற்கு முன்
- Ensure your computer case is compatible with the MicroATX form factor.
- Gather all necessary components: CPU, RAM, CPU cooler, power supply, storage devices, and graphics card (if not using integrated graphics).
- Prepare your workspace by ensuring it is clean, well-lit, and static-free.
மதர்போர்டு நிறுவல்
- Install the CPU into the LGA 1151 socket. Carefully align the CPU with the socket's notch and gently lower it into place. Close the retention arm.
- CPU-வில் வெப்பப் பேஸ்ட்டைப் பூசி, அதன் உற்பத்தியாளரின் அறிவுறுத்தல்களின்படி CPU கூலரை நிறுவவும்.
- Install the DDR4 RAM modules into the designated slots. Ensure they are fully seated until the clips lock into place.
- Mount the motherboard into the computer case using the appropriate standoffs and screws.
- பிரதான 24-பின் ATX மின் இணைப்பான் மற்றும் 4-பின் அல்லது 8-பின் CPU மின் இணைப்பியை உங்கள் மின் விநியோகத்திலிருந்து மதர்போர்டுடன் இணைக்கவும்.
- Install any expansion cards (e.g., graphics card) into the PCIe slots.

படம் 2: மேலிருந்து கீழ் நோக்கிய கோணம் view of the HP ProDesk 400 G3 MS-7957 motherboard. This perspective provides a clear view of the processor socket, memory slots, and the layout of the various internal connectors and components.
பெரிஃபெரல்களை இணைக்கிறது
- Connect SATA storage devices (HDDs/SSDs) to the SATA ports on the motherboard.
- Connect front panel headers (power button, reset button, USB ports, audio jacks) to their respective pins on the motherboard. Refer to your case manual for specific pin assignments.
- Connect external peripherals such as monitor, keyboard, mouse, and Ethernet cable to the rear I/O panel.
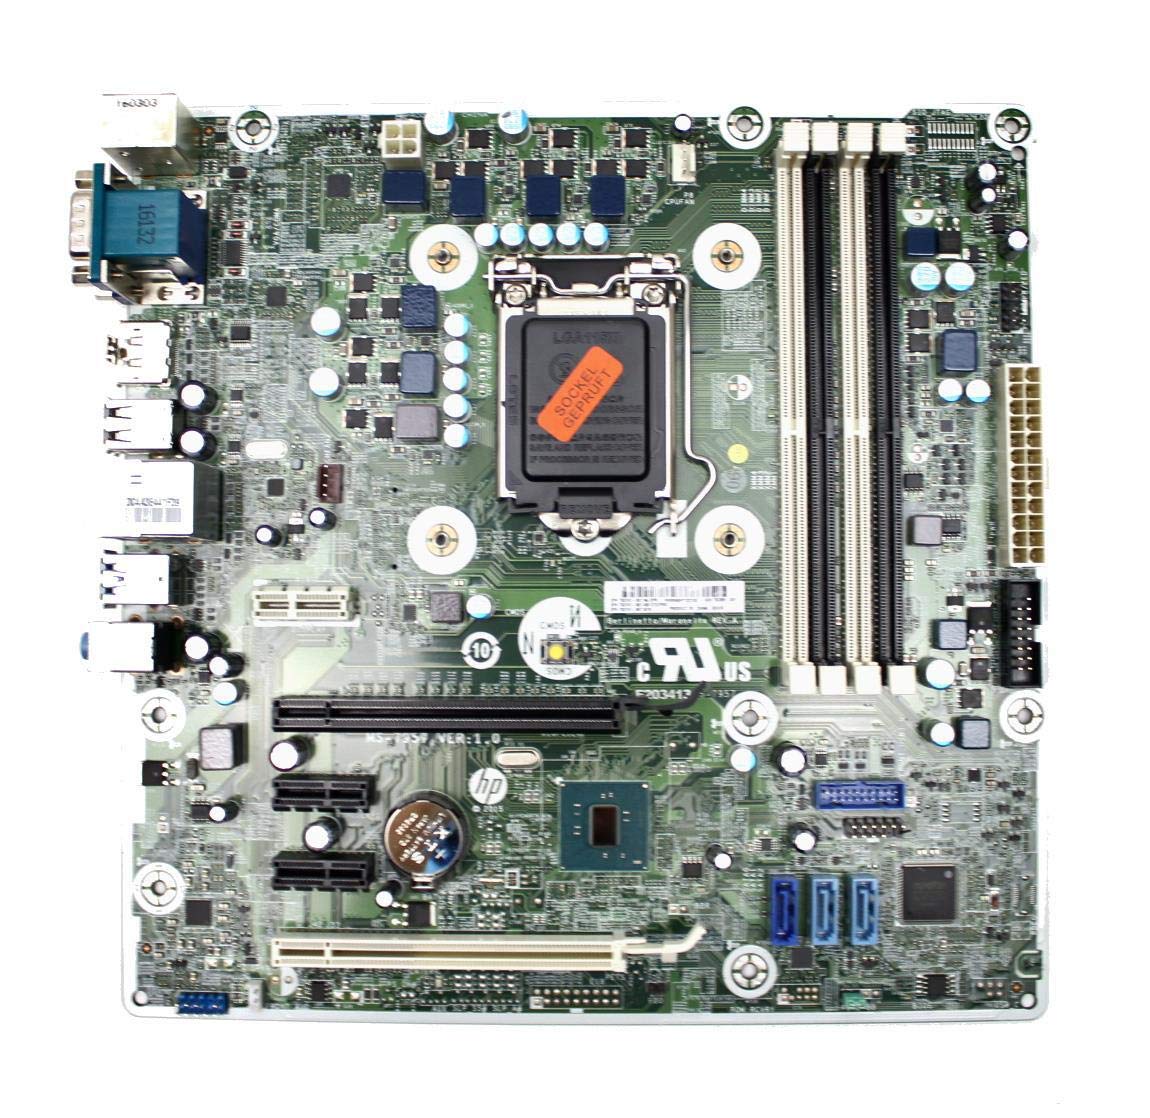
Figure 3: Rear I/O panel of the HP ProDesk 400 G3 MS-7957 motherboard. This image displays the available external connectivity options, including PS/2 ports, serial port, VGA, DisplayPort, USB 2.0, USB 3.0, Ethernet (RJ-45), and HD audio jacks.
இயக்க வழிமுறைகள்
ஆரம்ப பவர் ஆன்
After all components are installed and connected, connect the power cable to the power supply and press the power button on your computer case. The system should initiate the boot process.
பயாஸ்/யுஇஎஃப்ஐ உள்ளமைவு
BIOS/UEFI அமைவு பயன்பாட்டை அணுக, நியமிக்கப்பட்ட விசையை அழுத்தவும் (பொதுவாக டெல், F2, F10, அல்லது F12) during the initial boot sequence. Here you can configure boot order, system time, and other hardware settings.
இயக்கி நிறுவல்
After installing your operating system, it is crucial to install the latest drivers for your motherboard's chipset, integrated graphics, audio, and network adapter. These drivers can typically be found on the HP support website or the chipset manufacturer's webதளம்.
பராமரிப்பு
- சுத்தம்: அழுத்தப்பட்ட காற்றைப் பயன்படுத்தி மதர்போர்டு மற்றும் கூறுகளிலிருந்து தூசியைத் தொடர்ந்து சுத்தம் செய்யவும். சுத்தம் செய்வதற்கு முன் கணினி மின்சாரம் துண்டிக்கப்பட்டு, மின் இணைப்பு துண்டிக்கப்பட்டுள்ளதா என்பதை உறுதிப்படுத்தவும்.
- பயாஸ்/யுஇஎஃப்ஐ புதுப்பிப்புகள்: Periodically check for BIOS/UEFI updates from HP's official support website. Updates can improve stability, compatibility, and performance. Follow update instructions carefully to avoid system damage.
- இயக்கி புதுப்பிப்புகள்: Keep all system drivers updated to ensure optimal performance and compatibility with new software and hardware.
சரிசெய்தல்
நீங்கள் சந்திக்கும் பொதுவான பிரச்சினைகளுக்கான தீர்வுகளை இந்தப் பிரிவு வழங்குகிறது:
- சக்தி இல்லை: Check all power connections, including the 24-pin ATX and CPU power cables. Ensure the power supply is switched on and the wall outlet is functional.
- காட்சி இல்லை: Verify that your monitor is connected to the correct video output (VGA or DisplayPort) and is powered on. Reseat the graphics card (if applicable) and RAM modules.
- கணினி உறுதியற்ற தன்மை/செயலிழப்புகள்: This could be due to overheating, faulty RAM, or outdated drivers. Check CPU and GPU temperatures, run memory diagnostic tools, and update drivers.
- புறம் கண்டறியப்படவில்லை: Ensure the peripheral is properly connected. Try a different port or update the relevant drivers.
- பயாஸ்/யுஇஎஃப்ஐ சிக்கல்கள்: If you encounter issues after changing BIOS settings, try resetting the CMOS by removing the CMOS battery for a few minutes or using the clear CMOS jumper (refer to motherboard diagram for location).
விவரக்குறிப்புகள்
| அம்சம் | விவரக்குறிப்பு |
|---|---|
| பிராண்ட் | HP |
| CPU சாக்கெட் | LGA 1151 |
| இணக்கமான சாதனங்கள் | டெஸ்க்டாப் கணினி |
| ரேம் தொழில்நுட்பம் | DDR4 |
| இணக்கமான செயலிகள் | Intel Core i3-6xxx, Intel Core i5-6xxx, Intel Core i7-6xxx, Intel Core i3-7xxx, Intel Core i5-7xxx, Intel Core i7-7xxx, Intel Core i3-8xxx, Intel Core i5-8xxx, Intel Core i7-8xxx |
| சிப்செட் வகை | இன்டெல் பி250 |
| மேடை | விண்டோஸ் |
| மாதிரி பெயர் | MS-7957 |
| CPU மாதிரி | Core i3 (Note: Supports i3, i5, i7 as listed above) |
| முக்கிய பவர் கனெக்டர் வகை | 24 முள் |
| கிராபிக்ஸ் அட்டை இடைமுகம் | பிசிஐ எக்ஸ்பிரஸ் |
| கிடைக்கும் நினைவக இடங்கள் | 4 |
| Total SATA Ports | 6 |
| மொத்த USB போர்ட்கள் | 2 (Note: Refers to internal headers, rear I/O has more) |
| மொத்த ஈதர்நெட் போர்ட்கள் | 1 |
| Total PCIe Ports | 3 |
| உற்பத்தியாளர் | Computer Store Berlin (Reseller/Supplier) |
| பகுதி எண் | 4061435962741 |
| ASIN | B08CS13PTQ |
உத்தரவாதம் மற்றும் ஆதரவு
இந்த தயாரிப்பு ஒரு உடன் வருகிறது 1 வருட உத்தரவாதம் வாங்கிய தேதியிலிருந்து. இந்த உத்தரவாதமானது சாதாரண பயன்பாட்டின் கீழ் பொருட்கள் மற்றும் வேலைப்பாடுகளில் உள்ள குறைபாடுகளை உள்ளடக்கும்.
For technical support, warranty claims, or further assistance, please contact your point of purchase or refer to the official HP support resources for the ProDesk 400 G3 series.