அறிமுகம்
This manual provides detailed instructions for the GLIDiC SB-WS91-MRTW/BK TW-9000 Fully Wireless Earphones. Please read this guide thoroughly before using your device to ensure proper operation and to maximize its lifespan. Keep this manual for future reference.

Image: The GLIDiC SB-WS91-MRTW/BK TW-9000 fully wireless earphones, shown with their charging case. The earphones are black and feature the GLIDiC logo. The charging case is also black and has an open lid, revealing the earbud compartments.
அமைவு
தொகுப்பு உள்ளடக்கங்கள்
தொகுப்பில் அனைத்து பொருட்களும் இருப்பதை உறுதி செய்து கொள்ளுங்கள்:
- GLIDiC SB-WS91-MRTW/BK TW-9000 Earphones (Left and Right)
- வயர்லெஸ் சார்ஜிங் கேஸ்
- USB சார்ஜிங் கேபிள்
- பயனர் கையேடு (இந்த ஆவணம்)
இயர்போன்கள் மற்றும் கேஸை சார்ஜ் செய்தல்
Before first use, fully charge the earphones and the charging case. The case can be charged via the included USB cable or wirelessly.
- இயர்போன்களை சார்ஜிங் கேஸில் வைக்கவும், அவை சரியாக அமர்ந்திருப்பதை உறுதிசெய்யவும்.
- கம்பி சார்ஜிங்: Connect the USB charging cable to the charging port on the case and to a USB power adapter (not included) or a computer's USB port.
- வயர்லெஸ் சார்ஜிங்: Place the charging case on a compatible Qi-certified wireless charging pad.
- The indicator lights on the case will show the charging status. Refer to the LED indicator section for details.

Image: The GLIDiC SB-WS91-MRTW/BK TW-9000 charging case with earphones inside, placed on a wireless charging pad. A USB cable is connected to the pad. The setup is on a table with breakfast items in the background, illustrating everyday use.
ஆரம்ப புளூடூத் இணைத்தல்
Follow these steps to pair your earphones with a new device for the first time:
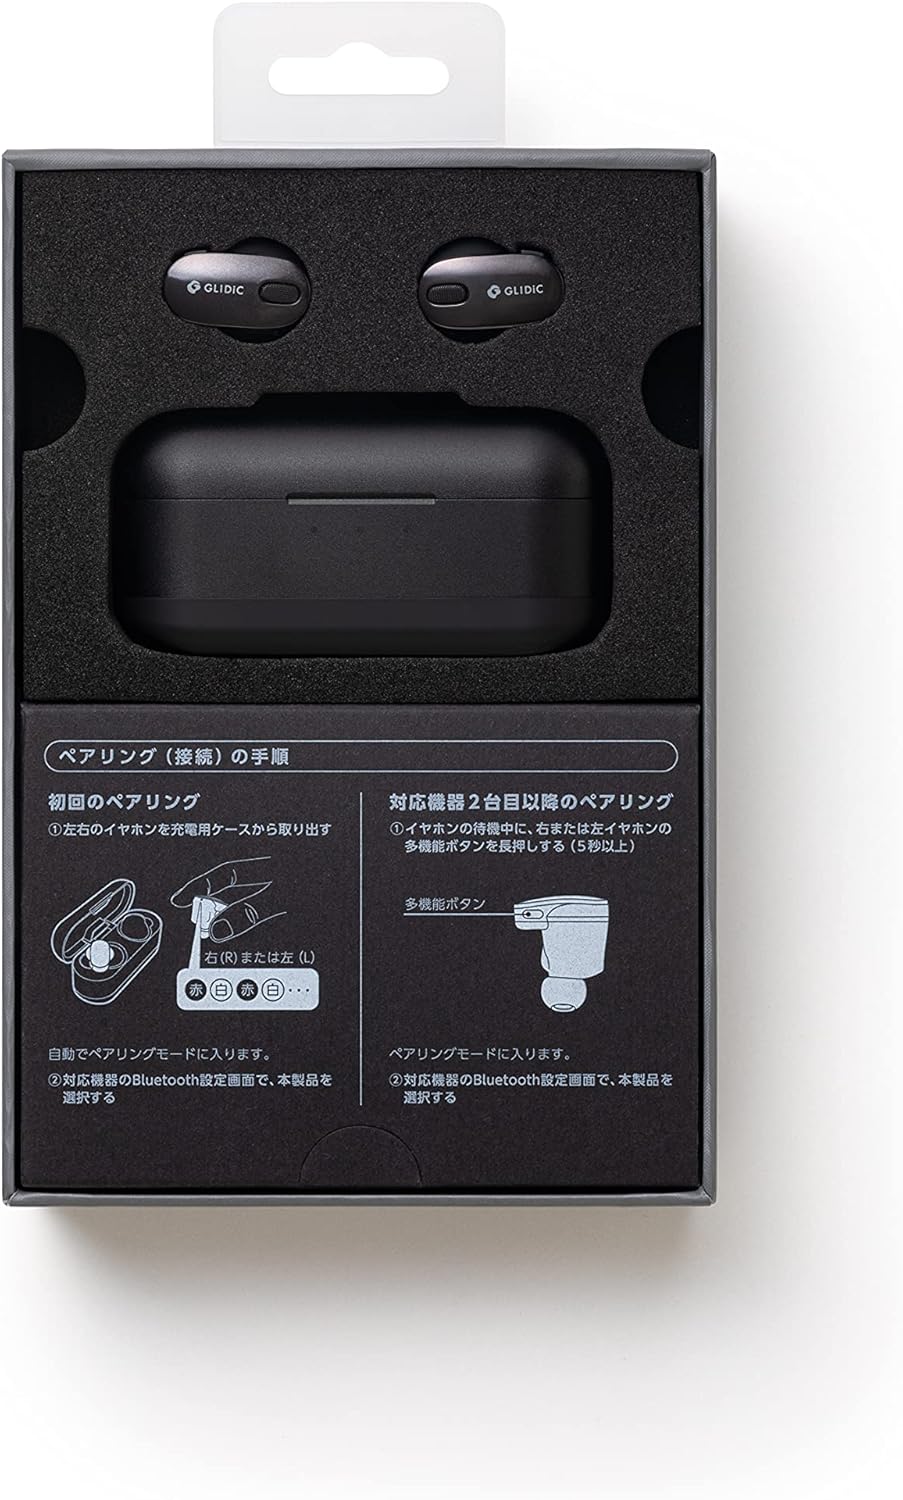
Image: A diagram illustrating the pairing procedure for the GLIDiC SB-WS91-MRTW/BK TW-9000 earphones. It shows two main sections: "First Pairing" and "Pairing with a second device or later". For first pairing, it depicts taking the earphones out of the case, which automatically enters pairing mode. For subsequent pairings, it shows pressing and holding the multi-function button on either the left or right earphone for 5 seconds while in standby mode to enter pairing mode.
- Open the charging case and remove both the left and right earphones. They will automatically enter pairing mode.
- உங்கள் சாதனத்தில் (ஸ்மார்ட்போன், டேப்லெட், மடிக்கணினி), புளூடூத் அமைப்புகளுக்குச் செல்லவும்.
- தேடுங்கள் கிடைக்கக்கூடிய சாதனங்கள் மற்றும் "" என்பதைத் தேர்ந்தெடுக்கவும்.GLIDiC TW-9000"பட்டியலிலிருந்து.
- Once connected, a confirmation sound or message will indicate successful pairing.
Pairing with a Second Device or Later
To pair with another device or re-pair after initial setup:
- Ensure the earphones are in standby mode (not connected to another device).
- Press and hold the multi-function button on either the left (L) or right (R) earphone for approximately 5 seconds until the indicator light flashes, indicating pairing mode.
- On your device, go to Bluetooth settings and select "GLIDiC TW-9000" to connect.
இயர்போன்களை இயக்குதல்
பவர் ஆன்/ஆஃப்
- பவர் ஆன்: Remove the earphones from the charging case. They will power on automatically.
- பவர் ஆஃப்: Place the earphones back into the charging case. They will power off automatically and begin charging.
இயர்போன்களை அணிந்துகொண்டு
Insert the earphones gently into your ears, ensuring a comfortable and secure fit. Adjust them until the sound quality is optimal and external noise is minimized. The correct fit is crucial for effective Active Noise Cancellation.
கட்டுப்பாடுகள்
The GLIDiC TW-9000 earphones feature touch controls and support voice control for various functions. Specific touch gestures and voice commands may vary. Refer to the quick start guide or manufacturer's website for detailed control mappings.
- விளையாடு/இடைநிறுத்தம்: Typically a single tap on either earphone.
- அடுத்த ட்ராக்: Often a double tap on the right earphone.
- முந்தைய ட்ராக்: Often a double tap on the left earphone.
- பதில்/முடிவு அழைப்பு: உள்வரும் அழைப்பின் போது ஒருமுறை தட்டவும்.
- குரல் உதவியாளரைச் செயலாக்கு: Long press or specific tap sequence.
செயலில் ஒலித்தல் ரத்து (ANC)
The earphones are equipped with Active Noise Cancellation to reduce ambient noise. This feature can be toggled on or off, or switched to an ambient sound mode, typically through a specific touch control gesture. Consult the detailed control instructions for your model.
பராமரிப்பு
சுத்தம் செய்தல்
வழக்கமான சுத்தம் செய்தல் ஒலி தரம் மற்றும் சுகாதாரத்தை பராமரிக்க உதவுகிறது.
- இயர்போன்கள் மற்றும் சார்ஜிங் கேஸைத் துடைக்க மென்மையான, உலர்ந்த, பஞ்சு இல்லாத துணியைப் பயன்படுத்தவும்.
- பிடிவாதமான அழுக்குக்கு, சிறிது dampen the cloth with water or a mild, non-abrasive cleaner. Avoid getting moisture into openings.
- Clean the ear tips regularly. If removable, they can be washed with mild soap and water, then thoroughly dried before reattaching.
- Do not use harsh chemicals, alcohol, or abrasive materials.
சேமிப்பு
பயன்பாட்டில் இல்லாதபோது, இயர்போன்களை தூசி, சேதம் ஆகியவற்றிலிருந்து பாதுகாக்கவும், அவற்றை சார்ஜ் செய்து வைத்திருக்கவும் அவற்றின் சார்ஜிங் கேஸில் வைக்கவும்.
பேட்டரி பராமரிப்பு
பேட்டரி ஆயுளை நீட்டிக்க:
- பேட்டரிகளை அடிக்கடி முழுமையாக சார்ஜ் செய்வதைத் தவிர்க்கவும்.
- தீவிர வெப்பநிலையிலிருந்து விலகி, குளிர்ந்த, உலர்ந்த இடத்தில் சாதனத்தை சேமிக்கவும்.
- If storing for an extended period, charge the case and earphones to about 50% capacity.
சரிசெய்தல்
நீங்கள் சிக்கல்களை எதிர்கொண்டால், பின்வரும் தீர்வுகளை முயற்சிக்கவும்:
ஒலி அல்லது இடைப்பட்ட இணைப்பு இல்லை
- இயர்போன்கள் சார்ஜ் செய்யப்பட்டுள்ளதா என்பதை உறுதிப்படுத்திக் கொள்ளுங்கள்.
- உங்கள் சாதனத்தில் புளூடூத் இயக்கப்பட்டுள்ளதா என்பதையும், இயர்போன்கள் இணைக்கப்பட்டுள்ளதா என்பதையும் சரிபார்க்கவும்.
- Move the earphones closer to your device and away from potential interference sources (e.g., Wi-Fi routers, other Bluetooth devices).
- உங்கள் சாதனத்துடன் இயர்போன்களை இணைத்து மீண்டும் இணைக்க முயற்சிக்கவும்.
- Restart your audio source device.
இயர்போன்கள் சார்ஜ் ஆகவில்லை
- சார்ஜிங் கேபிள் கேஸ் மற்றும் பவர் சோர்ஸ் இரண்டிலும் பாதுகாப்பாக இணைக்கப்பட்டுள்ளதா என்பதை உறுதிப்படுத்தவும்.
- வயர்லெஸ் சார்ஜிங்கைப் பயன்படுத்தினால், சார்ஜிங் பேடில் கேஸ் சரியாக நிலைநிறுத்தப்பட்டுள்ளதா என்பதை உறுதிப்படுத்திக் கொள்ளுங்கள்.
- Check for any debris in the charging port of the case or on the earphone charging contacts.
- வேறு சார்ஜிங் கேபிள் அல்லது பவர் அடாப்டரை முயற்சிக்கவும்.
One Earphone Not Working
- Place both earphones back into the charging case, close the lid, wait a few seconds, then remove them.
- இரண்டு இயர்போன்களும் சார்ஜ் செய்யப்பட்டுள்ளதா என்பதை உறுதிப்படுத்திக் கொள்ளுங்கள்.
- Perform a factory reset if the issue persists (refer to manufacturer's webகுறிப்பிட்ட வழிமுறைகளுக்கான தளம்).
விவரக்குறிப்புகள்
| மாதிரி பெயர் | SB-WS91-MRTW/BK (TW-9000) |
| பிராண்ட் | GLIDiC |
| இணைப்பு தொழில்நுட்பம் | வயர்லெஸ் (புளூடூத்) |
| வயர்லெஸ் தொடர்பு தொழில்நுட்பங்கள் | புளூடூத் |
| காது வைப்பு | காதில் |
| படிவம் காரணி | காதில் |
| சத்தம் கட்டுப்பாடு | செயலில் இரைச்சல் ரத்து |
| கட்டுப்பாட்டு வகை | குரல் கட்டுப்பாடு |
| இணக்கமான சாதனங்கள் | Laptops, Smart Speakers, Smartphones |
| பேட்டரிகள் | 3 லித்தியம் பாலிமர் பேட்டரிகள் (சேர்க்கப்பட்டுள்ளது) |
| பொருளின் எடை | 0.24 கிலோகிராம் (240 கிராம்) |
| தயாரிப்பு பரிமாணங்கள் | 3 x 8 x 4 செ.மீ |
| பொருள் வகை | Metallic (Material not specified) |
| உள்ளிட்ட கூறுகள் | Cable, Wireless Charging Case |
உத்தரவாதம் மற்றும் ஆதரவு
For warranty information and technical support, please refer to the warranty card included with your product or visit the official GLIDiC webஉத்தரவாதக் கோரிக்கைகளுக்கு உங்கள் வாங்கியதற்கான ஆதாரத்தை வைத்திருங்கள்.
If you require further assistance, please contact GLIDiC customer service through their official channels.