
சன்பக் AS-60BU
Sunbuck Home Audio Ampஆயுள் ஸ்டீரியோ ரிசீவர் பயனர் கையேடு
Model: AS-60BU
1. அறிமுகம்
This user manual provides detailed instructions for the operation and maintenance of your Sunbuck AS-60BU Home Audio Amplifier Stereo Receiver. This 2-channel amplifier is designed to enhance your home audio experience, offering versatile input options including Bluetooth 5.0, USB, SD card, AUX, CD, Line-in, and microphone inputs. Please read this manual thoroughly before using the product to ensure proper function and safety.

Figure 1: Sunbuck AS-60BU Ampலிஃபையர் மற்றும் ரிமோட் கண்ட்ரோல்
2. பாதுகாப்பு வழிமுறைகள்
- இந்த கருவியை மழை அல்லது ஈரப்பதத்திற்கு வெளிப்படுத்த வேண்டாம்.
- Do not remove the cover. No user-serviceable parts inside. Refer servicing to qualified personnel.
- அலகு சுற்றி சரியான காற்றோட்டத்தை உறுதி செய்யவும். காற்றோட்ட திறப்புகளை அடைக்க வேண்டாம்.
- Connect only to a grounded AC power outlet.
- மின் நிலையங்கள் அல்லது நீட்டிப்பு கம்பிகளை ஓவர்லோட் செய்ய வேண்டாம்.
- வெப்ப மூலங்களுக்கு அருகில் அல்லது நேரடி சூரிய ஒளியில் அலகு வைப்பதைத் தவிர்க்கவும்.
- இடி மின்னலின் போது அல்லது நீண்ட நேரம் பயன்படுத்தப்படாத போது மின்சாரத்தை துண்டிக்கவும்.
- குழந்தைகளுக்கு எட்டாத இடத்தில் வைக்கவும்.
3. தொகுப்பு உள்ளடக்கங்கள்
உங்கள் தொகுப்பில் அனைத்து பொருட்களும் சேர்க்கப்பட்டுள்ளதா என்பதைச் சரிபார்க்கவும்:
- சன்பக் AS-60BU Ampஆயுள் பெறுபவர்
- ஏசி பவர் கார்டு
- பயனர் கையேடு (இந்த ஆவணம்)
- ரிமோட் கண்ட்ரோல்

படம் 2: பெட்டியில் என்ன இருக்கிறது
4. தயாரிப்பு முடிந்துவிட்டதுview
4.1 முன் குழு

படம் 3: முன் மற்றும் பின்புற பேனல் தளவமைப்பு
| அம்சம் | விளக்கம் |
|---|---|
| பவர் (ஆன்/ஆஃப்) | அலகுக்கான முக்கிய சக்தி சுவிட்ச். |
| AUX உள்ளீடு | வெளிப்புற ஆடியோ சாதனங்களை இணைப்பதற்கான 3.5 மிமீ ஜாக். |
| உள்ளீடு தேர்வி | Rotary knob to select audio input source: LINE, CD, AUX, MEDIA PLAYER. |
| BASS கட்டுப்பாடு | குறைந்த அதிர்வெண் ஆடியோ வெளியீட்டை சரிசெய்கிறது. |
| TREBLE கட்டுப்பாடு | உயர் அதிர்வெண் ஆடியோ வெளியீட்டை சரிசெய்கிறது. |
| ECHO கட்டுப்பாடு | மைக்ரோஃபோன் உள்ளீடுகளுக்கான எதிரொலி விளைவை சரிசெய்கிறது. |
| M.TONE Control | Adjusts the microphone tone. |
| MIC VOLUME கட்டுப்பாடு | Adjusts the volume of the microphone inputs. |
| மாஸ்டர் வால்யூம் | அனைத்து ஆடியோ வெளியீட்டிற்கும் முக்கிய ஒலியளவு கட்டுப்பாடு. |
| USB/SD/MMC Port | Input for USB flash drives and SD/MMC cards for media playback. |
| MEDIA PLAYER Display & Buttons | Digital display and controls (MODE, Play/Pause, Previous, Next) for USB/SD/Bluetooth playback. |
| MIC 1 / MIC 2 | 6.35மிமீ மைக்ரோஃபோன் உள்ளீட்டு ஜாக்குகள். |
4.2 பின்புற பேனல்
| அம்சம் | விளக்கம் |
|---|---|
| CD L/R IN | RCA stereo input for CD players. |
| LINE L/R IN | RCA stereo input for general line-level audio sources. |
| எஃப்எம் ஆண்டெனா | Connection point for the FM radio antenna. |
| DC பவர் உள்ளீடு | Power input for the ampஆயுள். |
| ஸ்பீக்கர் வெளியீடு (L/R) | Binding posts for connecting passive speakers (4-16 ohms). |
5 அமைவு
Follow these steps to set up your Sunbuck AS-60BU ampஆயுள்:
- பேச்சாளர் இணைப்பு: Connect your passive speakers to the "Speaker Output (L/R)" binding posts on the rear panel. Ensure correct polarity (+ to + and - to -) for optimal sound. This amplifier supports speakers with an impedance range of 4 to 16 ohms.
- ஆடியோ மூல இணைப்பு:
- For CD players, connect RCA cables from the CD player's output to the "CD L/R IN" on the ampஆயுள்.
- For other line-level devices (e.g., tape drive, tuner), connect RCA cables to the "LINE L/R IN".
- For devices with a 3.5mm output (e.g., smartphones, tablets), use a 3.5mm audio cable to connect to the "AUX INPUT" on the front panel.
- For PC connection, use appropriate cables to connect your PC's audio output to either the LINE IN or AUX IN.

படம் 4: இணைப்பு வரைபடம்
- FM ஆண்டெனா இணைப்பு: If you plan to use the FM radio function, connect an FM antenna to the "FM Antenna" terminal on the rear panel.
- மின் இணைப்பு: உறுதி செய்யவும் amplifier's POWER switch is in the OFF position. Connect the supplied AC power cord to the "DC Power Input" on the rear panel and then to a suitable wall outlet.
6. இயக்க வழிமுறைகள்
6.1 பவர் ஆன்/ஆஃப்
இயக்க ampலிஃபையர், அழுத்தவும் சக்தி switch to the ON position. The LED display will illuminate. To turn off, press the சக்தி OFF நிலைக்கு மாறவும்.
6.2 உள்ளீடு தேர்வு
சுழற்று உள்ளீடு தேர்வி knob on the front panel to choose your desired audio source (LINE, CD, AUX, MEDIA PLAYER). When selecting MEDIA PLAYER, you can then use the MODE button on the front panel or remote to switch between USB, SD, and Bluetooth modes.
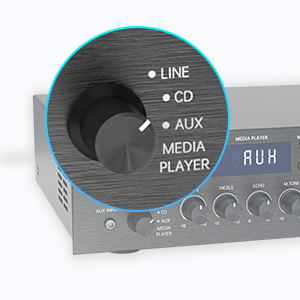
Figure 5: Input Selector
6.3 புளூடூத் இணைப்பு
புளூடூத் மூலம் இணைக்க:
- அமைக்கவும் உள்ளீடு தேர்வி to MEDIA PLAYER.
- அழுத்தவும் பயன்முறை button until "BLUETOOTH" or "BT" appears on the display.
- உங்கள் மொபைல் சாதனத்தில் (ஸ்மார்ட்போன், டேப்லெட், மடிக்கணினி), புளூடூத்தை இயக்கி, கிடைக்கக்கூடிய சாதனங்களைத் தேடுங்கள்.
- Select "SUNBUCK" or "AS-60BU" from the list to pair.
- Once paired, you can stream audio wirelessly from your device to the ampஆயுள்.
The Bluetooth range is approximately 40+ feet, but can be affected by obstacles and interference.

படம் 6: புளூடூத் இணைப்பு
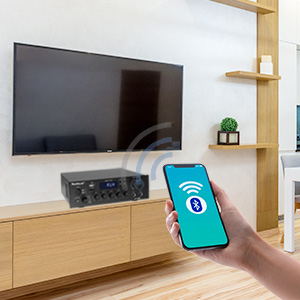
Figure 7: Bluetooth Connection Indicator
6.4 USB/SD கார்டு பிளேபேக்
To play media from a USB drive or SD/MMC card:
- Insert your USB flash drive or SD/MMC card into the corresponding port on the front panel.
- அமைக்கவும் உள்ளீடு தேர்வி to MEDIA PLAYER.
- தி amplifier will automatically detect and begin playing supported audio files (MP3, WAV, WMA, APE, FLAC).
- Use the Play/Pause, Previous, and Next buttons on the front panel or remote to control playback.
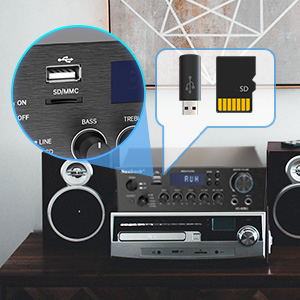
Figure 8: USB/SD Card Slots
6.5 மைக்ரோஃபோன் பயன்பாடு
Connect up to two microphones to the MIC 1 and MIC 2 jacks on the front panel. Adjust the MIC தொகுதி, எதிரொலி, மற்றும் M.TONE controls to achieve your desired sound for karaoke or public address.

Figure 9: Ideal for Karaoke and Home Entertainment
6.6 எஃப்எம் ரேடியோ
எஃப்எம் ரேடியோவைப் பயன்படுத்த:
- Ensure an FM antenna is connected to the rear panel.
- அமைக்கவும் உள்ளீடு தேர்வி to MEDIA PLAYER.
- அழுத்தவும் பயன்முறை காட்சியில் "FM" தோன்றும் வரை பொத்தான்.
- Use the Previous/Next buttons to scan for stations. Note that this model cannot fix and save FM stations.

Figure 10: FM Mode Display
6.7 ஆடியோ சரிசெய்தல்கள்
பயன்படுத்தவும் BASS, மரம், மற்றும் மாஸ்டர் வால்யூம் knobs on the front panel to fine-tune your audio output. The மாஸ்டர் வால்யூம் controls the overall sound level.
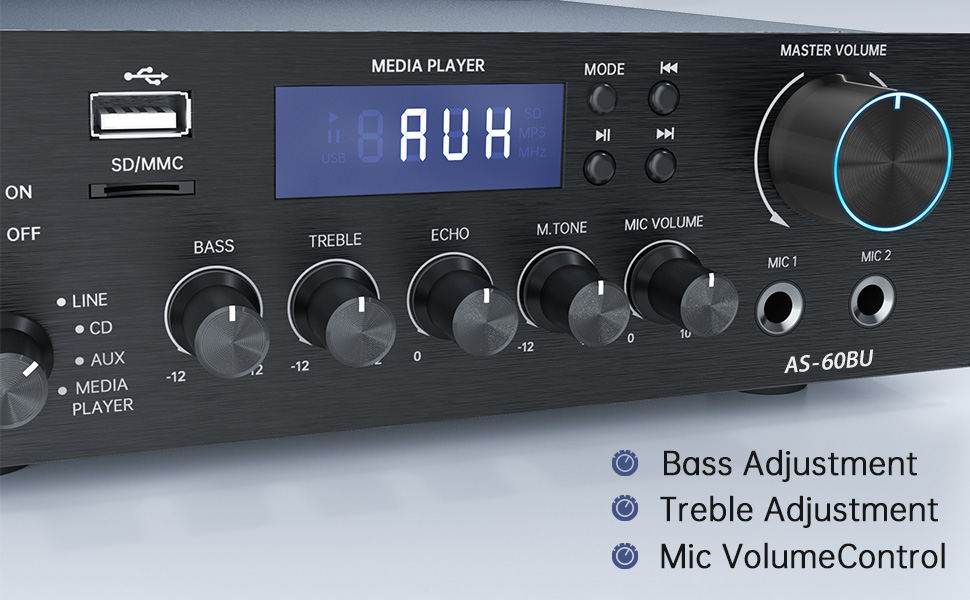
Figure 11: Audio Adjustment Controls
Video 1: Demonstration of Sunbuck AS-60BU amplifier features and sound quality.
7. பராமரிப்பு
- சுத்தம்: வெளிப்புறத்தை சுத்தம் செய்ய மென்மையான, உலர்ந்த துணியைப் பயன்படுத்தவும் ampலிஃபையர். திரவ கிளீனர்கள் அல்லது ஏரோசோல்களைப் பயன்படுத்த வேண்டாம்.
- சேமிப்பு: நீண்ட காலத்திற்குப் பயன்படுத்தப்படாதபோது, சேமிக்கவும் ampநேரடி சூரிய ஒளி மற்றும் தீவிர வெப்பநிலையிலிருந்து விலகி குளிர்ந்த, உலர்ந்த இடத்தில் லிஃபையரை வைக்கவும்.
- காற்றோட்டம்: அதிக வெப்பமடைவதைத் தடுக்க காற்றோட்ட திறப்புகள் தூசி மற்றும் குப்பைகள் இல்லாமல் இருப்பதை உறுதி செய்யவும்.
8. சரிசெய்தல்
| பிரச்சனை | சாத்தியமான காரணம் | தீர்வு |
|---|---|---|
| ஒலி வெளியீடு இல்லை. | Incorrect input selected, loose speaker connections, low volume. | Verify input selection, check speaker wiring polarity and tightness, increase MASTER VOLUME. |
| Bluetooth connection unstable or short range. | Obstacles between device and amplifier, interference, device too far. | Reduce distance between devices, remove obstacles, avoid other wireless devices. |
| ரிமோட் கண்ட்ரோல் வேலை செய்யவில்லை. | Dead batteries, line of sight blocked. | Replace batteries, ensure clear path to ampலிஃபையரின் ஐஆர் ரிசீவர். |
| Settings not saved after power off. | This is normal behavior for some settings (e.g., input mode). | Re-select desired input mode after powering on. |
| சிதைந்த ஆடியோ. | Input signal too high, speaker impedance mismatch, faulty cables. | Reduce source volume, ensure speakers are within 4-16 ohm range, check/replace cables. |
9. விவரக்குறிப்புகள்
- மாதிரி: AS-60BU
- சக்தி வெளியீடு: MAX 400W x 2 (RMS 70W x 2)
- சேனல்கள்: 2-சேனல்
- ஒலிபெருக்கி மின்மறுப்பு: 4-16 ஓம்ஸ்
- வெளியீட்டு மின்மறுப்பு: 0.1 ஓம்
- உள்ளீடுகள்: 2 x RCA Audio (CD, Line), 2 x Microphone (6.35mm), USB 2.0, SD Card, Bluetooth 5.0, AUX In (3.5mm), FM Radio
- Supported Audio Formats (USB/SD): MP3, WAV, WMA, APE, FLAC
- தயாரிப்பு பரிமாணங்கள்: 8.27 x 7.68 x 2.44 அங்குலம்
- எடை: 3.24 பவுண்டுகள்
- உற்பத்தியாளர்: JS Electronics Limited
- முதலில் கிடைக்கும்: செப்டம்பர் 9, 2021
10. உத்தரவாதம் மற்றும் ஆதரவு
Sunbuck products are designed for reliability and performance. For warranty information or technical support, please refer to the contact details provided with your purchase documentation or visit the official Sunbuck webஉத்தரவாதக் கோரிக்கைகளுக்கான வாங்கியதற்கான சான்றாக உங்கள் கொள்முதல் ரசீதை வைத்திருங்கள்.
For further assistance, you may contact the manufacturer, JS Electronics Limited.
Ask a question about this manual
Ask about setup, troubleshooting, compatibility, parts, safety, or missing instructions. Manuals+ will review the question and use this page’s manual context to help answer it.