1. அறிமுகம்
நன்றி, நன்றி.asing the JCPOWER JC1800.5 5-Channel Ampலிஃபையர். இந்த கையேடு உங்கள் சரியான நிறுவல், செயல்பாடு மற்றும் பராமரிப்புக்கான அத்தியாவசிய தகவல்களை வழங்குகிறது. amplifier. Please read this manual thoroughly before attempting to install or operate the unit to ensure optimal performance and safety.
The JC1800.5 is designed to deliver high-quality audio performance for your vehicle's sound system, featuring a 5-channel configuration for versatile speaker and subwoofer setups.
2. பாதுகாப்பு வழிமுறைகள்
நிறுவல் மற்றும் செயல்பாட்டின் போது பின்வரும் பாதுகாப்பு முன்னெச்சரிக்கை நடவடிக்கைகளைக் கவனியுங்கள்:
- தொழில்முறை நிறுவல் பரிந்துரைக்கப்படுகிறது: Installation of this product requires experience with electrical wiring and car audio systems. Professional installation is highly recommended.
- பேட்டரியை துண்டிக்கவும்: மின் தடைகளைத் தடுக்க, நிறுவல் பணியைத் தொடங்குவதற்கு முன், வாகனத்தின் எதிர்மறை பேட்டரி முனையத்தைத் துண்டிக்கவும்.
- முறையான வயரிங்: Ensure all wiring is correctly connected and insulated to prevent short circuits and damage to the amplifier or vehicle's electrical system. Use appropriate gauge wires as specified.
- மவுண்டிங்: மவுண்ட் தி amplifier securely in a dry, well-ventilated area, away from direct sunlight, heat sources, and moisture. Ensure adequate airflow around the unit to prevent overheating.
- உருகிகள்: Always use fuses of the specified rating. Never replace a fuse with one of a higher amperage or bypass the fuse.
- தொகுதி நிலைகள்: Prolonged exposure to high volume levels can cause hearing damage. Adjust the volume to a comfortable level.
- வெப்பச் சிதறல்: தி amplifier generates heat during operation. Do not cover the amplifier or obstruct its heat sinks.
3. தொகுப்பு உள்ளடக்கங்கள்
தொகுப்பில் அனைத்து பொருட்களும் உள்ளதா என சரிபார்க்கவும்:
- JCPOWER JC1800.5 5-Channel Ampஆயுள்
- பயனர் கையேடு (இந்த ஆவணம்)
- மவுண்டிங் வன்பொருள் (திருகுகள்)
- Spare Fuses (if included)

Figure 3.1: JCPOWER JC1800.5 Amplifier in its retail packaging.
4. அமைவு மற்றும் நிறுவல்
உங்கள் சாதனத்தின் செயல்திறன் மற்றும் நீண்ட ஆயுளுக்கு சரியான நிறுவல் மிக முக்கியமானது. amplifier. Refer to the diagram below for connection points.
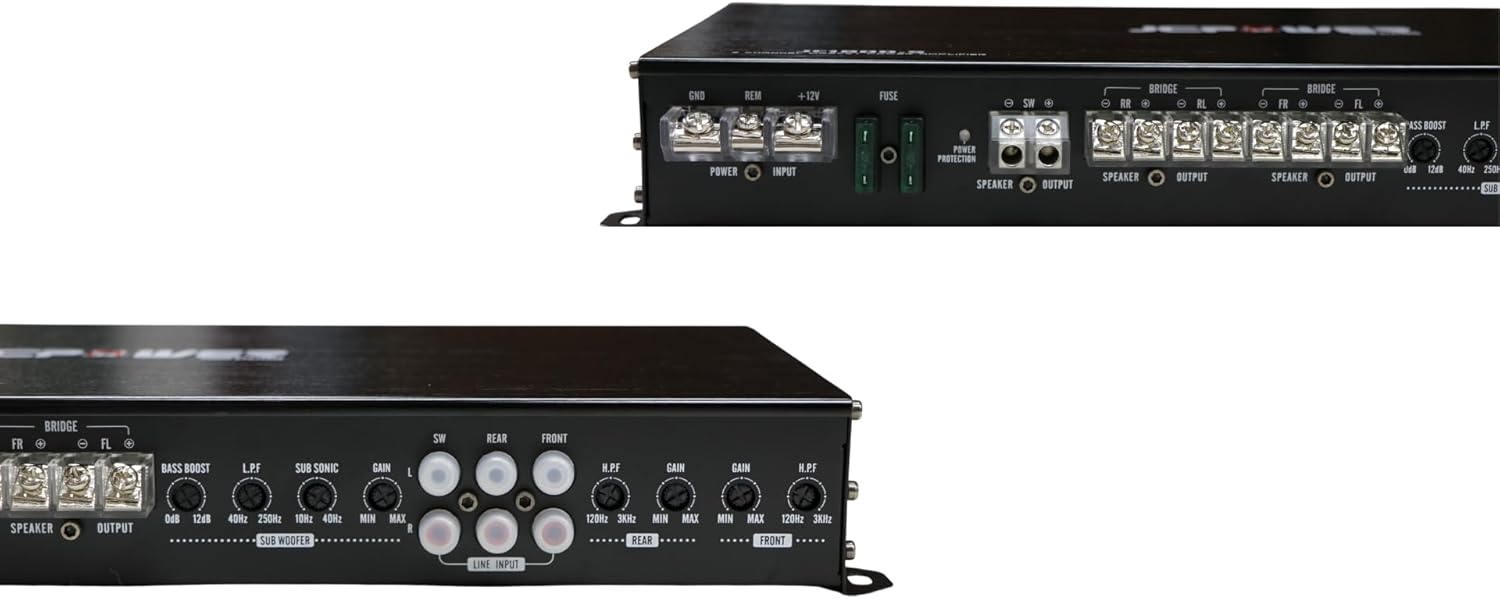
Figure 4.1: Rear panel connections and controls of the JCPOWER JC1800.5 ampஆயுள்.
4.1. மின் இணைப்புகள்
- மைதானம் (GND): Connect a heavy-gauge wire (minimum 8 AWG, preferably 4 AWG) from the amplifier's GND terminal to a clean, unpainted metal point on the vehicle's chassis. Ensure a solid, low-resistance connection.
- ரிமோட் (REM): Connect a 18 AWG wire from the amplifier's REM terminal to the remote turn-on output of your head unit. This wire turns the ampஉங்கள் கார் ஸ்டீரியோவுடன் லிஃபையரை ஆன் மற்றும் ஆஃப் செய்யவும்.
- +12V (சக்தி): Connect a heavy-gauge wire (minimum 8 AWG, preferably 4 AWG) from the amplifier's +12V terminal directly to the positive terminal of the vehicle's battery. Install an in-line fuse holder within 18 inches (45 cm) of the battery, using a fuse of appropriate amperage (refer to specifications).
4.2. பேச்சாளர் இணைப்புகள்
The JC1800.5 is a 5-channel amplifier. Channels 1-4 are typically used for full-range speakers, and Channel 5 (Subwoofer channel) is for a subwoofer.
- Connect your front speakers to the FR+ and FR- terminals and FL+ and FL- terminals.
- Connect your rear speakers to the RR+ and RR- terminals and RL+ and RL- terminals.
- Connect your subwoofer to the SW+ and SW- terminals.
- Ensure correct polarity (+ to + and - to -) for all speaker connections. Incorrect polarity can lead to poor sound quality.
- Bridging (Channels 1-4): Channels 1-4 can be bridged to power two speakers at higher power. Refer to the amplifier's specifications for minimum impedance when bridging. Connect the speaker to the FL+ and FR- terminals for one bridged channel, and RL+ and RR- for the other.
4.3. Input Connections (RCA)
உங்கள் ஹெட் யூனிட்டின் முன்-ல் இருந்து RCA கேபிள்களை இணைக்கவும்.amp outputs to the corresponding RCA input jacks on the amplifier (FRONT, REAR, SUBWOOFER). Ensure a secure connection.
5. இயக்கம் மற்றும் சரிசெய்தல்
After installation, carefully adjust the ampஉகந்த ஒலி செயல்திறனுக்கான லிஃபையர் அமைப்புகள்.
5.1. சரிசெய்தலைப் பெறுங்கள்
GAIN கட்டுப்பாடு இதனுடன் பொருந்துகிறது ampஉங்கள் ஹெட் யூனிட்டின் வெளியீட்டிற்கு லிஃபையரின் உள்ளீட்டு உணர்திறன். அது இல்லை ஒரு ஒலி அளவு கட்டுப்பாடு.
- திருப்பு amplifier's GAIN controls to their minimum (counter-clockwise) position.
- உங்கள் ஹெட் யூனிட்டின் ஒலியளவை அதன் அதிகபட்சத்தில் 75-80% ஆக அமைக்கவும்.
- மெதுவாக அதிகரிக்கவும் amplifier's GAIN control until you hear slight distortion, then back it off slightly until the sound is clear.
- Repeat for FRONT, REAR, and SUBWOOFER channels independently.
5.2. Crossover Settings (LPF/HPF)
உள்ளமைக்கப்பட்ட குறுக்குவழிகள் உங்கள் ஸ்பீக்கர்களுக்கு குறிப்பிட்ட அதிர்வெண் வரம்புகளை இயக்க அனுமதிக்கின்றன.
- LPF (குறைந்த பாஸ் வடிகட்டி): Used for subwoofers. This allows frequencies கீழே the set point to pass through. Adjust the LPF for the subwoofer channel (typically 80Hz-120Hz) to blend with your main speakers.
- HPF (உயர் பாஸ் வடிகட்டி): Used for full-range speakers. This allows frequencies மேலே the set point to pass through. Adjust the HPF for the FRONT and REAR channels (typically 80Hz-100Hz) to prevent low frequencies from distorting smaller speakers.
5.3. பாஸ் பூஸ்ட்
The BASS BOOST control (on the subwoofer channel) provides an increase in output at a specific low frequency. Use sparingly, as excessive bass boost can lead to distortion and potential speaker damage.
6. பராமரிப்பு
வழக்கமான பராமரிப்பு உங்கள் நீண்ட ஆயுளையும் செயல்திறனையும் உறுதி செய்கிறது ampஆயுள்.
- சுத்தம்: அவ்வப்போது துடைக்கவும் ampலிஃபையரின் வெளிப்புறத்தை மென்மையான, உலர்ந்த துணியால் துடைக்கவும். கடுமையான இரசாயனங்கள் அல்லது சிராய்ப்பு கிளீனர்களைப் பயன்படுத்த வேண்டாம். காற்றோட்டத் துடுப்புகள் தூசி மற்றும் குப்பைகள் இல்லாமல் இருப்பதை உறுதி செய்யவும்.
- இணைப்புகள்: அவ்வப்போது அனைத்து மின்சாரம், தரை, ரிமோட் மற்றும் ஸ்பீக்கர் இணைப்புகளையும் சரிபார்த்து, அவை பாதுகாப்பாகவும் அரிப்பிலிருந்து விடுபட்டதாகவும் இருப்பதை உறுதிசெய்யவும்.
- சுற்றுச்சூழல்: உறுதி செய்யவும் amplifier remains in a dry, well-ventilated environment. Avoid exposing it to extreme temperatures or moisture.
7. சரிசெய்தல்
உங்களுடன் பிரச்சனைகளை நீங்கள் சந்தித்தால் amplifier, பின்வரும் பொதுவான சிக்கல்கள் மற்றும் தீர்வுகளைப் பார்க்கவும்:
| பிரச்சனை | சாத்தியமான காரணம் | தீர்வு |
|---|---|---|
| மின்சாரம் இல்லை / மின்சாரம் இல்லை LED ஆஃப் | ஊதப்பட்ட உருகி Poor power/ground connection ரிமோட் டர்ன்-ஆன் சிக்னல் இல்லை | ஃபியூஸை சரிபார்த்து மாற்றவும் அனைத்து மின்சாரம் மற்றும் தரை இணைப்புகளும் பாதுகாப்பானவை என்பதை சரிபார்க்கவும். ரிமோட் வயர் இணைப்பு மற்றும் ஹெட் யூனிட் வெளியீட்டைச் சரிபார்க்கவும். |
| No Sound / Protection LED On | ஸ்பீக்கர் ஷார்ட் சர்க்யூட் அதிக வெப்பம் குறைந்த தொகுதிtage | Check speaker wiring for shorts போதுமான காற்றோட்டத்தை உறுதி செய்யுங்கள்; அனுமதிக்கவும். amplifier to cool Check battery and charging system |
| சிதைந்த ஒலி | ஆதாயம் மிக அதிகமாக அமைக்கப்பட்டுள்ளது தவறான குறுக்குவழி அமைப்புகள் ஸ்பீக்கர் மின்மறுப்பு பொருந்தவில்லை | ஆதாய அமைப்பைக் குறைத்தல் Adjust LPF/HPF settings ஸ்பீக்கர் மின்மறுப்பு உள்ளதா என சரிபார்க்கவும் amplifier's limits |
| Engine Noise (Whine) | மோசமான தரை இணைப்பு RCA cables routed near power wires Faulty RCA cables | Improve ground connection Reroute RCA cables away from power wires Replace RCA cables |
8. விவரக்குறிப்புகள்
Key technical specifications for the JCPOWER JC1800.5 ampஆயுள்:
- சேனல்கள்: 5
- RMS Power Output (4 ohm): 35 W x 4 CH + 250 W x 1 CH
- RMS Power Output (2 ohm): 50 W x 4 CH + 500 W x 1 CH
- Bridged Power Output (4 ohm): 100 W x 2 CH (for channels 1-4)
- மொத்த வெளியீட்டு சக்தி: 250 Watts (as per product data, likely peak or combined)
- மவுண்டிங் வகை: Independent Mount
- தயாரிப்பு எடை: 3 கிலோகிராம்
- தொகுப்பு அளவுகள்: 47.6 x 22.2 x 7 செ.மீ
- மாதிரி எண்: JC1800.5
9. உத்தரவாதம் மற்றும் ஆதரவு
JCPOWER products are designed and manufactured to the highest quality standards. This product is covered by a limited warranty against defects in materials and workmanship. The specific terms and duration of the warranty may vary by region and retailer.
For warranty service, technical support, or further inquiries, please contact your authorized JCPOWER dealer or visit the official JCPOWER webதொடர்பு தகவலுக்கான தளம்.
உத்திரவாதக் கோரிக்கைகளுக்காக உங்கள் வாங்கியதற்கான ஆதாரத்தை வைத்துக் கொள்ளவும்.