Auronic AU3129 12L
Auronic Electric Air Dehumidifier
Model: AU3129 12L
அறிமுகம்
Thank you for choosing the Auronic Electric Air Dehumidifier. This appliance is designed to effectively remove excess moisture from the air, creating a more comfortable and healthier indoor environment. It is ideal for use in various spaces such as bathrooms, basements, and living areas, helping to prevent issues like mold, mildew, and dampness. Please read this manual thoroughly before operation to ensure proper use, maintenance, and safety.

Figure 1: Auronic Electric Air Dehumidifier (Model AU3129 12L)
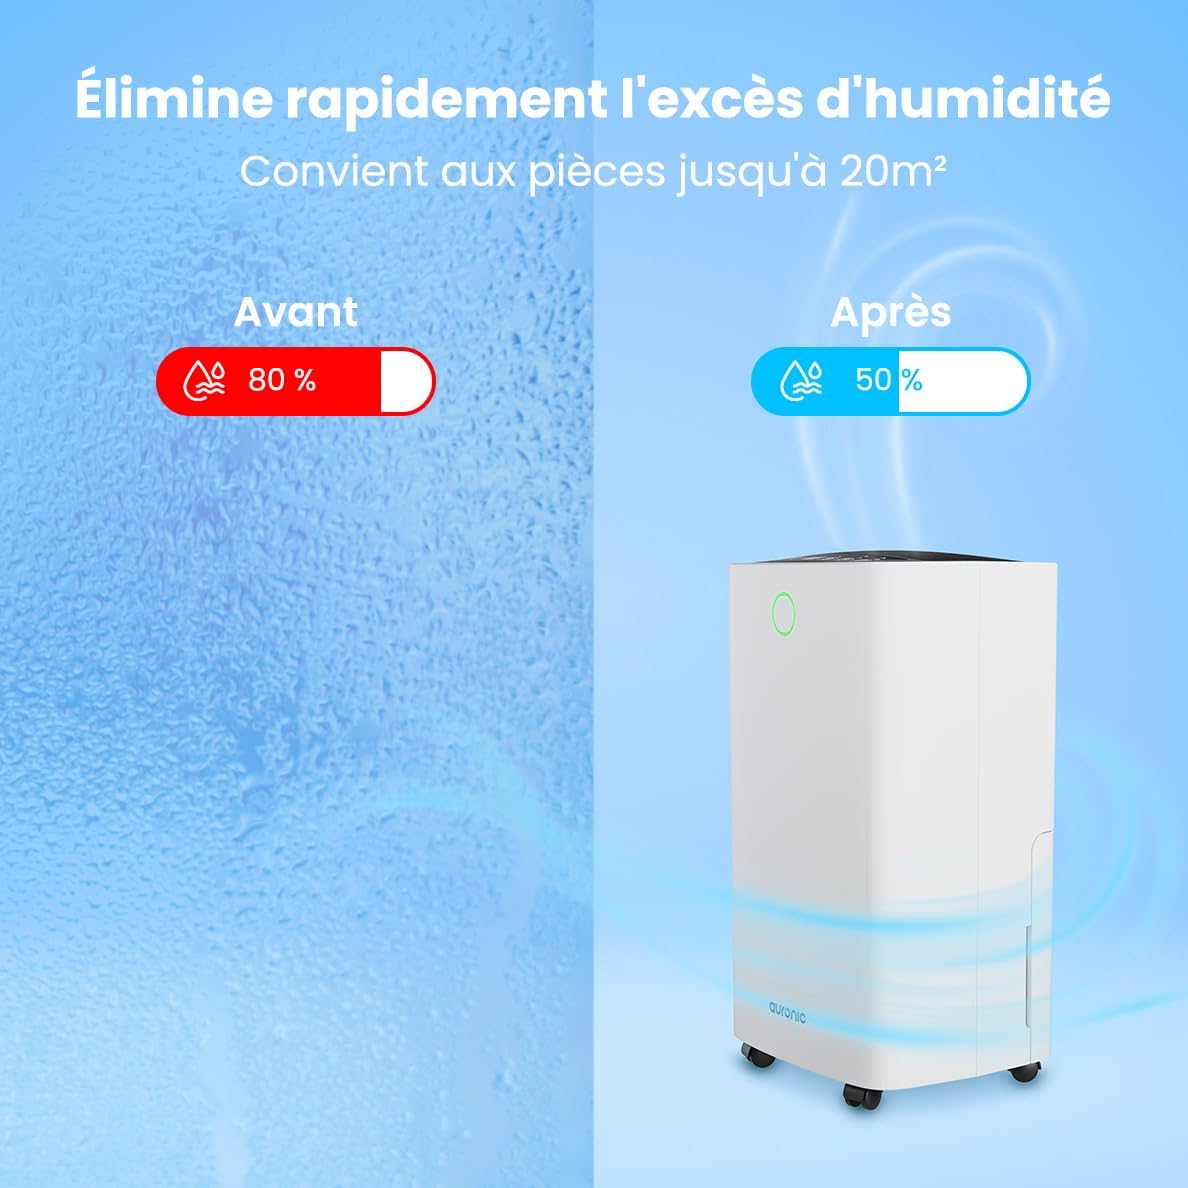
Figure 2: Humidity Reduction Effectiveness
பாதுகாப்பு தகவல்
தீ, மின்சார அதிர்ச்சி அல்லது காயம் ஏற்படும் அபாயத்தைக் குறைக்க, எப்போதும் இந்த அடிப்படை பாதுகாப்பு முன்னெச்சரிக்கை நடவடிக்கைகளைப் பின்பற்றவும்:
- சாதனத்தைப் பயன்படுத்துவதற்கு முன் அனைத்து வழிமுறைகளையும் படிக்கவும்.
- மின்வழங்கல் தொகுதியுடன் பொருந்துகிறது என்பதை உறுதிப்படுத்தவும்tage ரேட்டிங் லேபிளில் குறிப்பிடப்பட்டுள்ளது.
- மின் கம்பி அல்லது பிளக் சேதமடைந்தால் ஈரப்பதமூட்டியை இயக்க வேண்டாம்.
- அலகு எப்போதும் ஒரு நிலையான, சமமான மேற்பரப்பில் வைக்கவும்.
- Keep the appliance at least 20 cm away from walls or other objects to ensure proper airflow.
- காற்று நுழைவாயில் அல்லது கடையில் விரல்கள் அல்லது வெளிநாட்டு பொருட்களை செருக வேண்டாம்.
- சுத்தம் செய்வதற்கு முன், நகர்த்துவதற்கு முன் அல்லது பராமரிப்பைச் செய்வதற்கு முன் ஈரப்பதமூட்டியை அவிழ்த்து விடுங்கள்.
- சாதனத்தை ஈரமான அல்லது d இல் பயன்படுத்த வேண்டாம்amp தண்ணீர் தெறிக்கக்கூடிய சூழல்கள்.
- குழந்தைகளுக்கு எட்டாத இடத்தில் வைக்கவும்.
- If the unit has been tilted, allow it to stand upright for at least 24 hours before plugging it in.
தயாரிப்பு முடிந்துவிட்டதுview
Familiarize yourself with the components of your Auronic Dehumidifier.

Figure 3: Dehumidifier Dimensions and Included Accessories

Figure 4: Easy Portability with Wheels and Handle
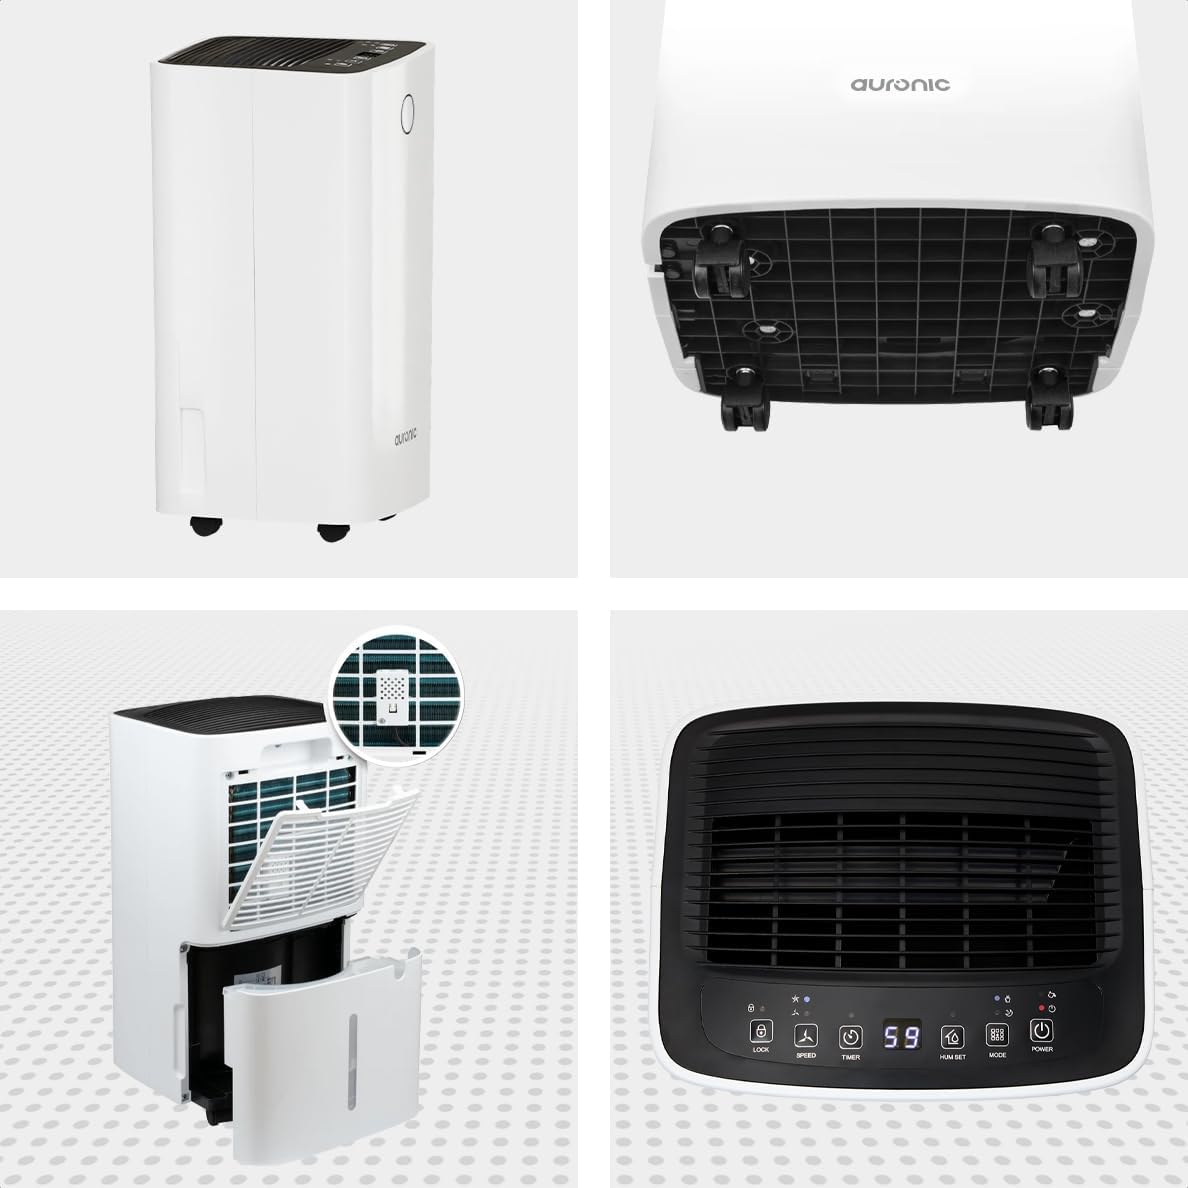
Figure 5: Multi-Angle View of the Dehumidifier

படம் 6: கட்டுப்பாட்டுப் பலகம் முடிந்ததுview
முக்கிய கூறுகள்:
- கண்ட்ரோல் பேனல்: முறைகள், ஈரப்பத அளவுகள் மற்றும் டைமரை அமைப்பதற்கான உள்ளுணர்வு இடைமுகம்.
- ஏர் இன்லெட்/அவுட்லெட்: Where air enters and exits the unit. Ensure these are not obstructed.
- தண்ணீர் தொட்டி: அமுக்கப்பட்ட தண்ணீரை சேகரிக்க நீக்கக்கூடிய 2 லிட்டர் தொட்டி.
- தொடர்ச்சியான வடிகால் வெளியீடு: Port for attaching a hose for continuous drainage.
- சக்கரங்கள் மற்றும் கைப்பிடி: எளிதான பெயர்வுத்திறனுக்காக.
- காற்று வடிகட்டி: Located at the back, helps filter dust from the air.
அமைவு
- பேக்கிங்: Carefully remove the dehumidifier from its packaging. Retain packaging for future storage or transport.
- இடம்: Place the unit upright on a firm, level surface in the desired location. Ensure there is at least 20 cm of clear space around all sides for proper air circulation.
- ஆரம்ப காத்திருப்பு: If the unit was tilted during transport, let it stand upright for a minimum of 24 hours before plugging it in. This allows the refrigerant to settle.
- மின் இணைப்பு: மின் கம்பியை தரையிறக்கப்பட்ட மின் நிலையத்தில் செருகவும்.
- தண்ணீர் தொட்டி: Ensure the water tank is correctly inserted into the unit. The dehumidifier will not operate if the tank is full or improperly seated.
இயக்க வழிமுறைகள்
கண்ட்ரோல் பேனல் செயல்பாடுகள்:
| பொத்தான்/காட்டி | செயல்பாடு |
|---|---|
| பவர் பட்டன் | யூனிட்டை ஆன் அல்லது ஆஃப் செய்கிறது. |
| பயன்முறை பொத்தான் | Cycles through operating modes (e.g., Dehumidify, Laundry Drying, Sleep). |
| Hum Set Button | Adjusts the desired humidity level (e.g., 40% - 80% RH). |
| டைமர் பட்டன் | தானியங்கி ஆன் அல்லது தானியங்கி ஆஃப் டைமரை அமைக்கிறது (12 மணிநேரம் வரை). |
| வேக பொத்தான் | Adjusts fan speed (e.g., High, Low). |
| பூட்டு பொத்தான் | தற்செயலான மாற்றங்களைத் தடுக்க கட்டுப்பாட்டுப் பலகத்தைப் பூட்டுகிறது. |
| Humidity Indicator LED | Changes color based on current humidity level (e.g., Blue: <45%, Green: 45-65%, Red: >65%). Figure 7: Humidity Indicator LED Explained |
பொது செயல்பாடு:
- இயக்கு: அழுத்தவும் சக்தி button. The display will show the current room humidity.
- தேவையான ஈரப்பதத்தை அமைக்கவும்: அழுத்தவும் Hum Set button repeatedly to select your desired humidity level. The unit will operate until this level is reached, then cycle on and off to maintain it.
- பயன்முறையைத் தேர்ந்தெடுக்கவும்: அழுத்தவும் பயன்முறை button to choose between different operating modes.
- ஈரப்பதமாக்குதல் பயன்முறை: Standard operation to reduce ambient humidity.
- சலவை உலர்த்தும் முறை: Increases fan speed and continuous operation to assist in drying clothes.

Figure 8: Using the Dehumidifier for Laundry Drying
- தூக்க முறை: Operates at a lower fan speed and reduced noise level for quiet nighttime use.

Figure 9: Silent Operation for Nighttime Use
- டைமரை அமைக்கவும்: அழுத்தவும் டைமர் button to set an auto-off time (when the unit is on) or an auto-on time (when the unit is off).

Figure 10: Integrated Timer Function
- மின்விசிறி வேகம்: பயன்படுத்தவும் வேகம் button to adjust the fan speed as desired.
- குழந்தை பூட்டு: அழுத்திப் பிடிக்கவும் பூட்டு button for 3 seconds to activate/deactivate the child lock function.
தொடர் வடிகால்:
For continuous operation without emptying the water tank, you can connect the included drain hose to the continuous drain outlet. Ensure the hose is sloped downwards to allow gravity drainage into a suitable receptacle or drain.

Figure 11: Continuous Drainage Setup
பராமரிப்பு
வழக்கமான பராமரிப்பு உகந்த செயல்திறனை உறுதிசெய்து உங்கள் ஈரப்பதமூட்டியின் ஆயுளை நீட்டிக்கிறது.
தண்ணீர் தொட்டியை காலி செய்தல்:
When the water tank is full, the unit will automatically stop operating and an indicator light will illuminate. Carefully remove the tank, empty the collected water, and reinsert it firmly until it clicks into place.

Figure 12: Removing the 2-Liter Water Tank
காற்று வடிகட்டியை சுத்தம் செய்தல்:
பயன்பாடு மற்றும் காற்றின் தரத்தைப் பொறுத்து, காற்று வடிகட்டியை ஒவ்வொரு இரண்டு வாரங்களுக்கு ஒருமுறை அல்லது அதற்கு மேற்பட்ட முறை சுத்தம் செய்ய வேண்டும்.
- டிஹைமிடிஃபையரை அணைத்து, அவிழ்த்து விடுங்கள்.
- அலகு பின்புறத்திலிருந்து காற்று வடிகட்டியைக் கண்டுபிடித்து அகற்றவும்.
- வடிகட்டியை வெதுவெதுப்பான, சோப்பு நீரில் சுத்தம் செய்யவும் அல்லது தூசியை அகற்ற ஒரு வெற்றிட கிளீனரைப் பயன்படுத்தவும்.
- வடிகட்டியை நன்கு துவைத்து, மீண்டும் செருகுவதற்கு முன் காற்றில் முழுமையாக உலர விடவும்.
அலகு வெளிப்புறத்தை சுத்தம் செய்தல்:
டிஹைமிடிஃபையரின் வெளிப்புறத்தை மென்மையான, டி மூலம் துடைக்கவும்amp துணி. கடுமையான இரசாயனங்கள் அல்லது சிராய்ப்பு கிளீனர்களைப் பயன்படுத்த வேண்டாம்.
சரிசெய்தல்
வாடிக்கையாளர் ஆதரவைத் தொடர்புகொள்வதற்கு முன், பின்வரும் பொதுவான சிக்கல்கள் மற்றும் தீர்வுகளைப் பார்க்கவும்:
| பிரச்சனை | சாத்தியமான காரணம் | தீர்வு |
|---|---|---|
| ஈரப்பதமூட்டி இயக்கப்படவில்லை. | No power, power cord loose, water tank full or improperly seated. | Check power connection, empty and reinsert water tank correctly. |
| தண்ணீர் சேகரிக்கப்படவில்லை. | Room humidity too low, temperature too low, air filter clogged, continuous drain hose connected. | Check room humidity/temperature, clean air filter, ensure continuous drain hose is not connected if tank collection is desired. |
| அலகு சத்தமாக உள்ளது. | Unit not on a level surface, air filter clogged, internal component issue. | Place on a level surface, clean air filter. If noise persists, contact support. |
| Dehumidification is slow or ineffective. | Room size too large, doors/windows open, air inlets/outlets blocked, air filter dirty. | Ensure room is sealed, clear obstructions, clean air filter. |
விவரக்குறிப்புகள்
| அம்சம் | விவரம் |
|---|---|
| பிராண்ட் | ஆரோனிக் |
| மாதிரி பெயர் | Auronic Silent Low Consumption Dehumidifier |
| தயாரிப்பு பரிமாணங்கள் (L x W x H) | 21.5 x 47 x 25.5 செ.மீ |
| பொருளின் எடை | 11 கிலோகிராம் |
| கொள்ளளவு (ஈரப்பத நீக்கம்) | ஒரு நாளைக்கு 12 லிட்டர் |
| தண்ணீர் தொட்டியின் அளவு | 2 லிட்டர் |
| சக்தி | 185 வாட்ஸ் |
| நிறம் | வெள்ளை |
| சிறப்பு அம்சங்கள் | Easy to use, Laundry Drying function, Prevents and effectively eliminates humidity, 2-liter tank, Automatic shut-off. |
| பரிந்துரைக்கப்பட்ட பயன்பாடு | உள்நாட்டு |
உத்தரவாதம் மற்றும் ஆதரவு
Auronic products are manufactured to the highest quality standards. For warranty information, technical support, or service inquiries, please refer to the contact details provided on your purchase receipt or visit the official Auronic website. Please have your model number (AU3129 12L) and purchase date ready when contacting support.
Ask a question about this manual
Ask about setup, troubleshooting, compatibility, parts, safety, or missing instructions. Manuals+ will review the question and use this page’s manual context to help answer it.