1. அறிமுகம்
Thank you for choosing the Conentool 21V Cordless Impact Drill/Driver Kit. This tool is designed for various drilling and screwdriving tasks in wood, metal, plastics, and masonry. Please read this manual carefully before operating the tool to ensure safe and efficient use. Keep this manual for future reference.

Image 1.1: The Conentool 21V Cordless Impact Drill/Driver Kit, including the drill, two 2500mAh batteries, charger, and a variety of drill bits and accessories in a carrying case.
2. பொது பாதுகாப்பு வழிமுறைகள்
எச்சரிக்கை: இந்த ஆற்றல் கருவியில் வழங்கப்பட்ட அனைத்து பாதுகாப்பு எச்சரிக்கைகள், அறிவுறுத்தல்கள், விளக்கப்படங்கள் மற்றும் விவரக்குறிப்புகளைப் படிக்கவும். கீழே பட்டியலிடப்பட்டுள்ள அனைத்து வழிமுறைகளையும் பின்பற்றத் தவறினால் மின்சார அதிர்ச்சி, தீ மற்றும்/அல்லது கடுமையான காயம் ஏற்படலாம்.
2.1 வேலை பகுதி பாதுகாப்பு
- பணியிடத்தை சுத்தமாகவும், வெளிச்சமாகவும் வைத்திருங்கள். இரைச்சலான அல்லது இருண்ட பகுதிகள் விபத்துக்களை அழைக்கின்றன.
- எரியக்கூடிய திரவங்கள், வாயுக்கள் அல்லது தூசி போன்ற வெடிக்கும் வளிமண்டலங்களில் சக்தி கருவிகளை இயக்க வேண்டாம். ஆற்றல் கருவிகள் தூசி அல்லது புகையை பற்றவைக்கக்கூடிய தீப்பொறிகளை உருவாக்குகின்றன.
- பவர் டூலை இயக்கும் போது குழந்தைகளையும் பார்வையாளர்களையும் தூரத்தில் வைத்திருங்கள். கவனச்சிதறல்கள் உங்கள் கட்டுப்பாட்டை இழக்கச் செய்யலாம்.
2.2 மின் பாதுகாப்பு
- பவர் டூல் பிளக்குகள் அவுட்லெட்டுடன் பொருந்த வேண்டும். பிளக்கை எந்த வகையிலும் மாற்ற வேண்டாம்.
- குழாய்கள், ரேடியேட்டர்கள், வரம்புகள் மற்றும் குளிர்சாதனப் பெட்டிகள் போன்ற பூமி அல்லது தரையிறக்கப்பட்ட மேற்பரப்புகளுடன் உடல் தொடர்பைத் தவிர்க்கவும். உங்கள் உடல் மண்ணிலோ அல்லது தரையிலோ இருந்தால் மின்சார அதிர்ச்சி ஏற்படும் அபாயம் அதிகம்.
- மின் கருவிகளை மழை அல்லது ஈரமான நிலையில் வெளிப்படுத்த வேண்டாம். மின் கருவியில் தண்ணீர் நுழைவது மின்சார அதிர்ச்சியின் அபாயத்தை அதிகரிக்கும்.
2.3 தனிப்பட்ட பாதுகாப்பு
- எப்போதும் கண் பாதுகாப்பு அணியுங்கள். பாதுகாப்பு கண்ணாடிகள், கண்ணாடிகள் அல்லது முகக் கவசத்தைப் பயன்படுத்துங்கள்.
- நீண்ட நேரம் கருவியை இயக்கும்போது காது பாதுகாப்பு அணியுங்கள்.
- ஒழுங்காக உடை அணியுங்கள். தளர்வான ஆடைகள் அல்லது நகைகளை அணிய வேண்டாம். உங்கள் முடி மற்றும் ஆடைகளை நகரும் பகுதிகளிலிருந்து விலக்கி வைக்கவும்.
- விழிப்புடன் இருங்கள், நீங்கள் என்ன செய்கிறீர்கள் என்பதைப் பார்க்கவும் மற்றும் ஒரு சக்தி கருவியை இயக்கும்போது பொது அறிவைப் பயன்படுத்தவும்.
3. தொகுப்பு உள்ளடக்கங்கள்
கீழே பட்டியலிடப்பட்டுள்ள அனைத்து பொருட்களும் உங்கள் தொகுப்பில் சேர்க்கப்பட்டுள்ளதா என்பதைச் சரிபார்க்கவும். ஏதேனும் பொருட்கள் காணவில்லை அல்லது சேதமடைந்திருந்தால், வாடிக்கையாளர் ஆதரவைத் தொடர்பு கொள்ளவும்.
- 1 x Conentool 21V Cordless Impact Drill/Driver
- 2 x 2500mAh Lithium-ion Batteries
- 1 x பேட்டரி சார்ஜர்
- 1 x Flexible Shaft Extension
- Various Drill Bits (for wood, metal, masonry)
- Various Screwdriver Bits
- சாக்கெட் அடாப்டர்கள்
- கேரிங் கேஸ்
- பயனர் கையேடு

Image 3.1: A complete overview of the kit contents, including the drill, two batteries, charger, flexible shaft, various drill bits, screwdriver bits, and socket adapters, all neatly arranged.
4. தயாரிப்பு முடிந்துவிட்டதுview
Familiarize yourself with the main components of your drill/driver:
- சக்: Holds drill bits and screwdriver bits.
- முறுக்கு சரிசெய்தல் வளையம்: Selects the desired torque setting.
- Mode Selector Ring: Switches between screwdriving, drilling, and impact drilling modes.
- வேகத் தேர்வி சுவிட்ச்: Changes between high and low-speed gears.
- தூண்டுதல் சுவிட்ச்: Activates the tool and controls speed (variable speed).
- முன்னோக்கி/தலைகீழ் தேர்வி: சுழற்சி திசையை மாற்றுகிறது.
- LED வேலை விளக்கு: வேலைப் பகுதியை ஒளிரச் செய்கிறது.
- பேட்டரி பேக்: கருவிக்கு சக்தியை வழங்குகிறது.
- பேட்டரி வெளியீட்டு பொத்தான்: பேட்டரியை அகற்றுவதற்காக.
- கைப்பிடி: வசதியான பயன்பாட்டிற்கான பணிச்சூழலியல் பிடிப்பு.

படம் 4.1: ஒரு உள் view highlighting the brushless motor, which provides increased power, efficiency, and a quieter operation with no sparks.
5 அமைவு
5.1 பேட்டரியை சார்ஜ் செய்தல்
வாங்கும் போது பேட்டரி பேக் முழுமையாக சார்ஜ் செய்யப்படவில்லை. முதல் பயன்பாட்டிற்கு முன் பேட்டரியை முழுமையாக சார்ஜ் செய்ய பரிந்துரைக்கப்படுகிறது.
- சார்ஜரை ஒரு நிலையான மின் நிலையத்துடன் இணைக்கவும்.
- Slide the battery pack onto the charger base. Ensure it clicks into place.
- The charger indicator light will show the charging status. A red light typically indicates charging, and a green light indicates a full charge.
- முழுமையாக சார்ஜ் ஆனதும், மின் நிலையத்திலிருந்து சார்ஜரைத் துண்டித்து, பேட்டரியை அகற்றவும்.

Image 5.1: The battery charger connected to a wall outlet, with a battery pack inserted for charging. The red light indicates charging, and the green light indicates a completed charge.
5.2 பேட்டரியை நிறுவுதல் மற்றும் நீக்குதல்
- நிறுவ: பேட்டரி பேக்கை கருவி கைப்பிடியின் அடிப்பகுதியுடன் சீரமைத்து, அது பாதுகாப்பாக இடத்தில் கிளிக் செய்யும் வரை உள்ளே ஸ்லைடு செய்யவும்.
- அகற்ற: Press the battery release button (usually located at the front of the battery) and slide the battery pack out of the tool.

படம் 5.2: ஒரு வெட்டுப்பாதை view of the 2500mAh battery pack, illustrating its internal lithium-ion cells and power management system, designed for up to 90 minutes of use per battery.
5.3 Installing and Removing Drill/Screwdriver Bits
- நிறுவ: Rotate the chuck counter-clockwise to open the jaws. Insert the desired bit into the chuck as far as it will go. Rotate the chuck clockwise to tighten the jaws firmly around the bit.
- அகற்ற: Rotate the chuck counter-clockwise to loosen the jaws and pull the bit out.
Ensure the bit is securely fastened to prevent it from slipping during operation.
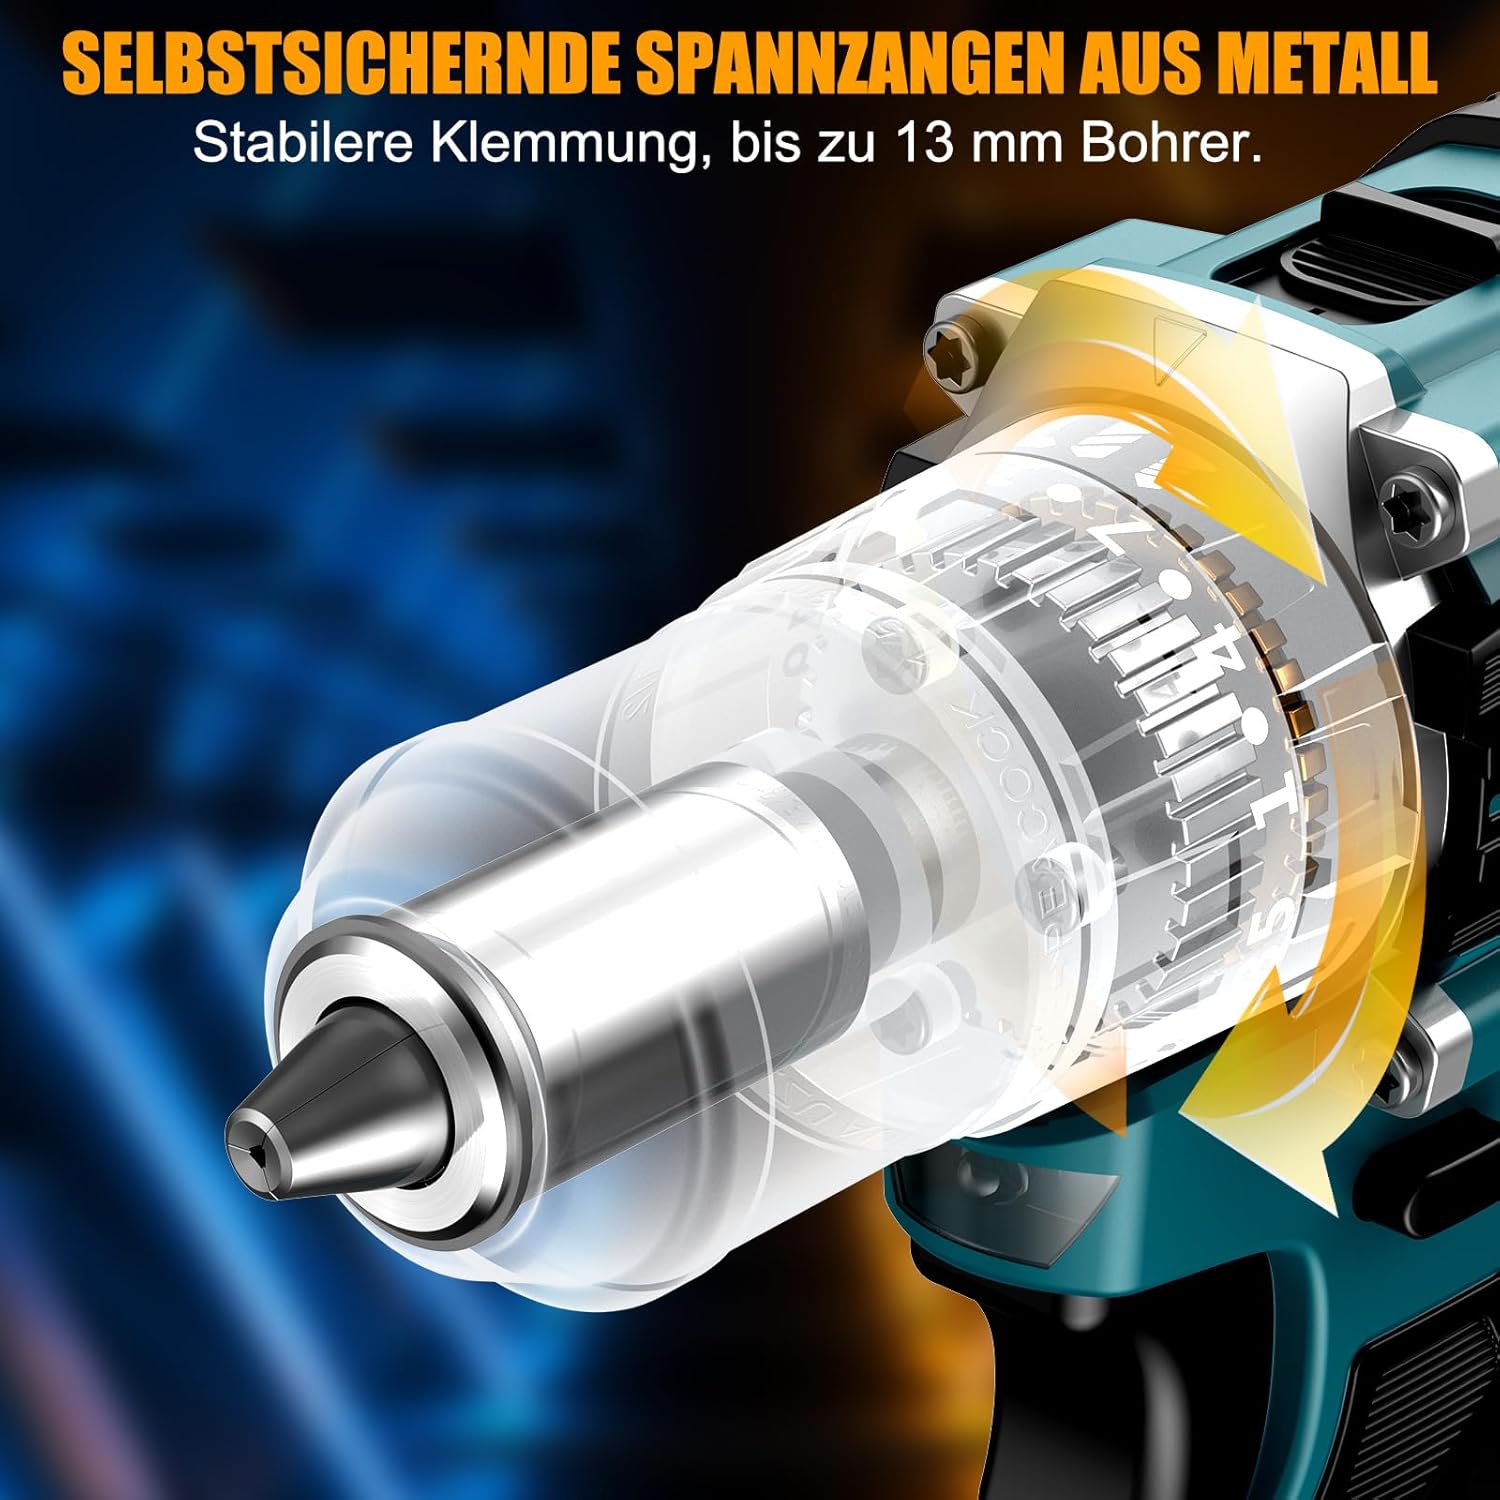
படம் 5.3: ஒரு விரிவான view of the self-locking metal chuck, demonstrating its stable clamping mechanism capable of holding drill bits up to 13mm securely.
6. இயக்க வழிமுறைகள்
6.1 பவர் ஆன்/ஆஃப் மற்றும் வேகக் கட்டுப்பாடு
- To turn the tool ON, press the trigger switch. The speed is variable; press the trigger further for higher speed.
- கருவியை அணைக்க, தூண்டுதல் சுவிட்சை விடுங்கள்.
- The integrated LED work light will illuminate when the trigger is pressed, providing visibility in dimly lit areas.
6.2 முன்னோக்கி/தலைகீழ் சுழற்சி
The forward/reverse selector switch is located above the trigger. Push it to the left for forward rotation (for screwdriving and drilling) and to the right for reverse rotation (for removing screws or freeing jammed bits). Ensure the tool is stopped before changing direction.
6.3 Speed Gear Selection
The drill features a 2-speed gear selector switch on top of the tool:
- Gear 1 (Low Speed, 0-650 RPM): Ideal for high-torque applications like driving large screws or drilling large holes.
- Gear 2 (High Speed, 0-1850 RPM): Suitable for fast drilling in softer materials and smaller diameter holes.
Always select the appropriate gear for the task. Change gears only when the tool is completely stopped.
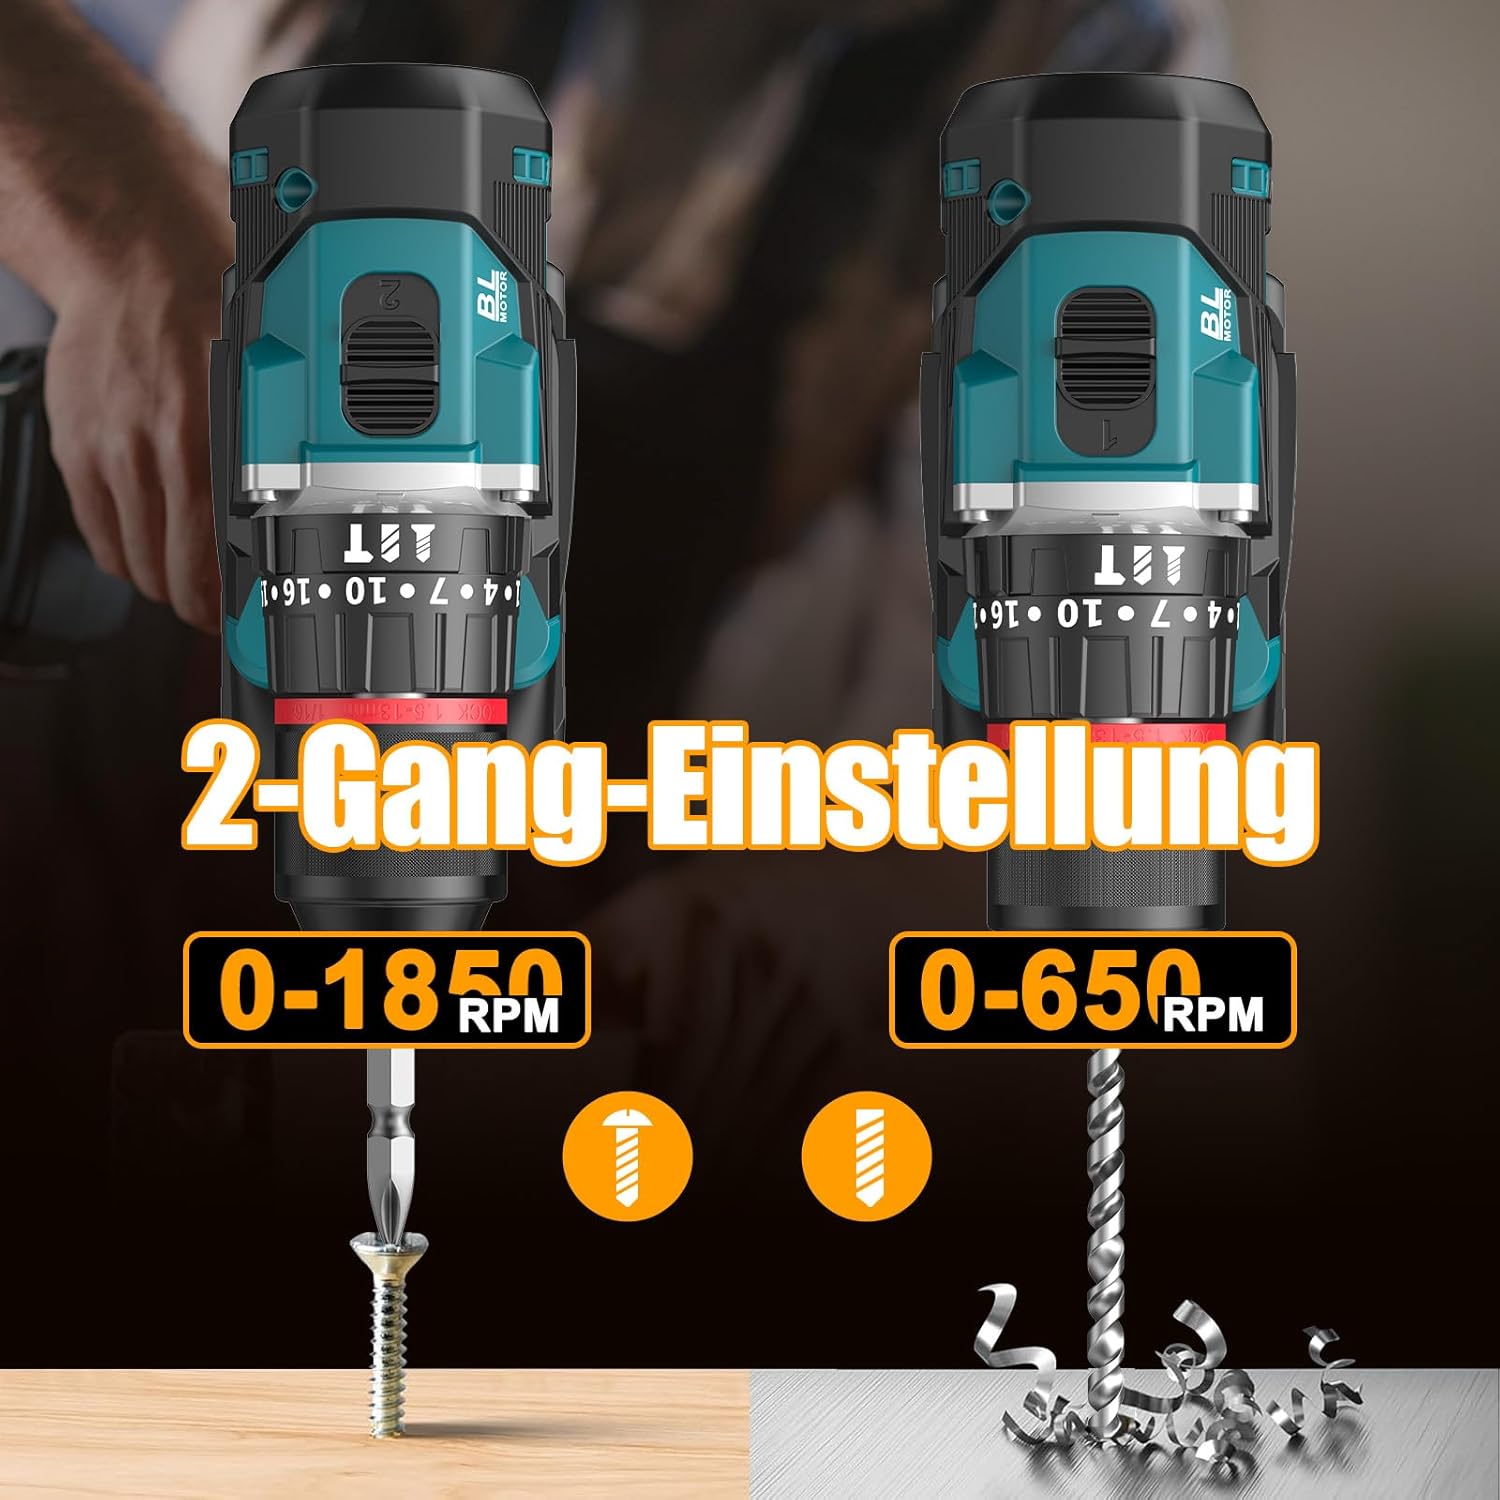
Image 6.1: An illustration demonstrating the two-speed gear settings: Gear 1 (0-650 RPM) for screwdriving and Gear 2 (0-1850 RPM) for drilling, allowing for optimal performance based on the application.
6.4 Torque Adjustment and Mode Selection
The torque adjustment ring allows you to set the desired torque for screwdriving applications, preventing overtightening or stripping screws. The mode selector ring allows you to switch between different operating modes.
- Screwdriving Mode (Torque Settings 1-35): Use these settings to match the torque to the screw size and material. Lower numbers for smaller screws/softer materials, higher numbers for larger screws/harder materials.
- துளையிடும் முறை (டிரில் பிட் ஐகான்): For general drilling without impact. The clutch is disengaged, providing maximum torque.
- தாக்க துளையிடும் முறை (சுத்தியல் ஐகான்): For drilling into masonry or concrete, providing a hammering action in addition to rotation.
The drill offers 35+3 settings, including 35 torque settings for screwdriving and 3 modes (screwdriving, drilling, impact drilling).

Image 6.2: A visual representation of the 35+3 torque and mode settings, indicating precise power control and a maximum torque of 55 N.m, suitable for various materials like wood, brick, plastic, and metal.
7. பராமரிப்பு
7.1 சுத்தம் செய்தல்
- எந்தவொரு சுத்தம் அல்லது பராமரிப்பையும் செய்வதற்கு முன் எப்போதும் பேட்டரி பேக்கைத் துண்டிக்கவும்.
- அதிக வெப்பமடைவதைத் தடுக்க கருவியின் காற்றோட்ட திறப்புகளை சுத்தமாக வைத்திருங்கள்.
- ஒரு மென்மையான, டி பயன்படுத்தவும்amp கருவியை சுத்தம் செய்வதற்கான துணி casing. கடுமையான இரசாயனங்கள் அல்லது சிராய்ப்பு கிளீனர்களைப் பயன்படுத்த வேண்டாம்.
7.2 சேமிப்பு
- Store the tool and batteries in a cool, dry place, away from direct sunlight and moisture.
- Store the tool in its carrying case to protect it from dust and damage.
- குழந்தைகளுக்கு எட்டாத இடத்தில் வைக்கவும்.

Image 7.1: A person carrying the Conentool drill kit in its durable black carrying case, designed for convenient storage and transport of the tool and its accessories.
7.3 பேட்டரி பராமரிப்பு
- Do not store batteries in a discharged state. Recharge them regularly, especially if not used for extended periods.
- பேட்டரிகளை அதிக வெப்பநிலைக்கு வெளிப்படுத்துவதைத் தவிர்க்கவும்.
- பேட்டரி பேக்கை பிரிக்கவோ அல்லது மாற்றவோ முயற்சிக்காதீர்கள்.
8. சரிசெய்தல்
| பிரச்சனை | சாத்தியமான காரணம் | தீர்வு |
|---|---|---|
| கருவி தொடங்கவில்லை | பேட்டரி சார்ஜ் செய்யப்படவில்லை அல்லது தவறாக நிறுவப்படவில்லை. | பேட்டரி முழுமையாக சார்ஜ் செய்யப்பட்டு சரியாக செருகப்பட்டுள்ளதா என்பதை உறுதிப்படுத்தவும். |
| குறைக்கப்பட்ட சக்தி அல்லது வேகம் | பேட்டரி சார்ஜ் குறைவு. | பேட்டரியை ரீசார்ஜ் செய்யவும். |
| சக்கில் பிட் நழுவுகிறது | சக் போதுமான அளவு இறுக்கப்படவில்லை. | Tighten the chuck firmly around the bit. Ensure the bit shank is clean. |
| அதிக வெப்பம் | அடைபட்ட காற்றோட்ட இடங்கள்; தொடர்ச்சியான அதிக பயன்பாடு. | காற்றோட்ட இடங்களை சுத்தம் செய்யவும். நீண்ட நேரம் பயன்படுத்தும் போது கருவியை குளிர்விக்க அனுமதிக்கவும். |
9. விவரக்குறிப்புகள்
| அம்சம் | விவரக்குறிப்பு |
|---|---|
| மாதிரி எண் | ebvc-sd-de |
| தொகுதிtage | 21 வோல்ட் |
| பேட்டரி வகை | லித்தியம்-அயன் |
| பேட்டரி திறன் | 2500 mAh (ஒவ்வொன்றும்) |
| மேக்ஸ் முறுக்கு | 55 என்எம் |
| முறுக்கு அமைப்புகள் | 35 + 3 Modes (Screwdriving, Drilling, Impact Drilling) |
| சுமை இல்லாத வேகம் (கியர் 1) | 0-650 ஆர்பிஎம் |
| சுமை இல்லாத வேகம் (கியர் 2) | 0-1850 ஆர்பிஎம் |
| சக் அளவு | 13 mm (3/8 inch) Keyless |
| தயாரிப்பு பரிமாணங்கள் | 35 x 31 x 10 செ.மீ |
| எடை (பேட்டரியுடன்) | 1.5 கிலோகிராம் |
10. உத்தரவாதம் மற்றும் ஆதரவு
Conentool products are manufactured to high-quality standards. In the unlikely event of a defect due to material or manufacturing fault, please contact your retailer or Conentool customer service. Please retain your proof of purchase for warranty claims.
For further assistance, technical support, or to inquire about spare parts, please refer to the contact information provided with your purchase or visit the official Conentool webதளம்.