1. அறிமுகம்
Thank you for choosing the Baseus AeQur G10 TWS Earphones. This manual provides detailed instructions on how to set up, operate, maintain, and troubleshoot your new earphones. Please read this manual thoroughly before using the product to ensure optimal performance and longevity.
2. தொகுப்பு உள்ளடக்கங்கள்
பெட்டியை கவனமாக பிரித்து, கீழே பட்டியலிடப்பட்டுள்ள அனைத்து பொருட்களும் நல்ல நிலையில் இருப்பதை உறுதிசெய்து கொள்ளுங்கள். ஏதேனும் பொருட்கள் காணாமல் போயிருந்தாலோ அல்லது சேதமடைந்திருந்தாலோ, உங்கள் சில்லறை விற்பனையாளரைத் தொடர்பு கொள்ளவும்.
- Baseus AeQur G10 TWS Earphones (Left and Right)
- சார்ஜிங் கேஸ்
- USB-A/USB-C Wireless Dongle
- USB-C சார்ஜிங் கேபிள்
- பல அளவு காது முனைகள்
- பயனர் கையேடு (இந்த ஆவணம்)

Image 2.1: Complete package contents of the Baseus AeQur G10 TWS Earphones.
3. தயாரிப்பு முடிந்துவிட்டதுview
Familiarize yourself with the components of your Baseus AeQur G10 TWS Earphones.
3.1 இயர்போன்கள்
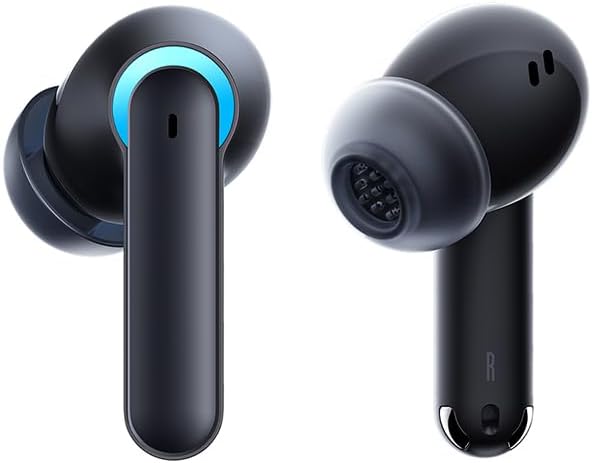
Image 3.1: Left and Right Baseus AeQur G10 Earphones. Each earphone features a touch control area, microphone, and charging contacts.
3.2 சார்ஜிங் வழக்கு

Image 3.2: Baseus AeQur G10 Earphones in their charging case with the lid open. The case has charging slots for each earphone and an LED indicator for battery status.
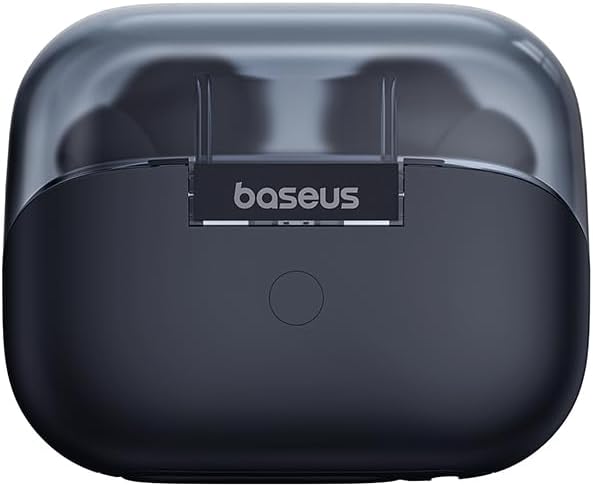
படம் 3.3: பின்புறம் view of the Baseus AeQur G10 charging case, displaying the Baseus brand logo and a USB-C charging port (not explicitly visible but implied by common design).
3.3 USB-A/USB-C Wireless Dongle
The included wireless dongle allows for low-latency connection to various devices, including PCs, laptops, gaming consoles, and mobile devices.

Image 3.4: Compatibility diagram for the Baseus AeQur G10, illustrating connections to Type-C Androids & Tablets, Type-C/USB-A PCs & Laptops, PS5/PS4/Switch, Steam Deck, and VR devices.
4 அமைவு
4.1 ஆரம்ப சார்ஜிங்
- இரண்டு இயர்போன்களையும் சார்ஜிங் கேஸில் வைக்கவும்.
- Connect the USB-C charging cable to the charging port on the case and the other end to a USB power source (e.g., computer USB port, wall adapter).
- The LED indicator on the case will show charging status. A full charge typically takes approximately 1.5 hours for the earphones and 2 hours for the case.
4.2 Pairing with Bluetooth Devices
- Ensure the earphones are in the charging case and the case has sufficient charge.
- Open the charging case lid. The earphones will automatically enter pairing mode (indicated by a flashing LED on the earphones or case).
- உங்கள் சாதனத்தில் (ஸ்மார்ட்போன், டேப்லெட், மடிக்கணினி), புளூடூத்தை இயக்கி புதிய சாதனங்களைத் தேடுங்கள்.
- Select "Baseus AeQur G10" from the list of available devices.
- இணைக்கப்பட்டதும், LED காட்டி ஒளிர்வதை நிறுத்திவிடும், மேலும் நீங்கள் உறுதிப்படுத்தல் தொனியைக் கேட்பீர்கள்.
4.3 Connecting via USB Wireless Dongle
- Insert the USB-A or USB-C end of the wireless dongle into the corresponding port on your device (PC, laptop, gaming console).
- இயர்போன்கள் சார்ஜிங் கேஸில் இருப்பதையும் மூடி திறந்திருப்பதையும் உறுதிசெய்யவும்.
- The earphones will automatically attempt to connect to the dongle. The dongle's LED indicator will show connection status.
- Once connected, the LED on the dongle will become solid, and you will hear a confirmation tone from the earphones.
5. இயக்க வழிமுறைகள்
5.1 பவர் ஆன்/ஆஃப்
- பவர் ஆன்: Open the charging case lid, or take the earphones out of the case. They will power on automatically.
- பவர் ஆஃப்: Place the earphones back into the charging case and close the lid. They will power off automatically and begin charging.
5.2 இயர்போன்களை அணிதல்
- Identify the 'L' (left) and 'R' (right) markings on each earphone.
- Gently insert the earphones into your ear canals.
- Rotate them slightly to find a comfortable and secure fit. Choose the appropriate ear tip size for optimal sound quality and comfort.
5.3 தொடு கட்டுப்பாடுகள்
The Baseus AeQur G10 earphones feature touch-sensitive controls on each earbud. The specific functions may vary slightly depending on the device and application.
| செயல் | செயல்பாடு |
|---|---|
| ஒற்றைத் தட்டு (L/R) | இசையை இயக்கவும்/இடைநிறுத்தவும், பதில்/அழைப்பை முடிக்கவும் |
| இரட்டைத் தட்டு (L) | முந்தைய ட்ராக் |
| இரட்டைத் தட்டல் (R) | அடுத்த ட்ராக் |
| டிரிபிள் டேப் (எல்/ஆர்) | குரல் உதவியாளரை இயக்கவும் |
| நீண்ட நேரம் அழுத்தவும் (L/R, 2s) | அழைப்பை நிராகரி |
| நீண்ட நேரம் அழுத்தவும் (L/R, 3s) | Toggle Gaming/Music Mode (if applicable) |
6. பராமரிப்பு
6.1 சுத்தம் செய்தல்
- இயர்போன்கள் மற்றும் சார்ஜிங் கேஸை சுத்தம் செய்ய மென்மையான, உலர்ந்த, பஞ்சு இல்லாத துணியைப் பயன்படுத்தவும்.
- For earwax or debris in the ear tips, gently remove the ear tips and clean them with a cotton swab lightly dampened with rubbing alcohol. Ensure they are completely dry before reattaching.
- சிராய்ப்பு கிளீனர்கள், கரைப்பான்கள் அல்லது ஏரோசல் ஸ்ப்ரேக்களைப் பயன்படுத்த வேண்டாம்.
6.2 சேமிப்பு
- பயன்பாட்டில் இல்லாதபோது எப்போதும் இயர்போன்களைப் பாதுகாக்கவும், சார்ஜ் செய்து வைத்திருக்கவும், அவற்றை அவற்றின் சார்ஜிங் கேஸில் வைக்கவும்.
- தீவிர வெப்பநிலை மற்றும் நேரடி சூரிய ஒளியில் இருந்து விலகி, குளிர்ந்த, உலர்ந்த இடத்தில் சேமிக்கவும்.
6.3 பேட்டரி பராமரிப்பு
- பேட்டரியின் ஆயுளைப் பராமரிக்க, அடிக்கடி பயன்படுத்தப்படாவிட்டாலும், இயர்போன்கள் மற்றும் கேஸைத் தொடர்ந்து சார்ஜ் செய்யவும்.
- நீண்ட நேரம் பேட்டரிகளை முழுமையாக சார்ஜ் செய்வதைத் தவிர்க்கவும்.
7. சரிசெய்தல்
If you encounter issues with your Baseus AeQur G10 earphones, refer to the following common solutions:
7.1 ஒலி அல்லது இடைப்பட்ட இணைப்பு இல்லை.
- Ensure earphones are charged and properly connected to your device (Bluetooth or dongle).
- இயர்போன்கள் மற்றும் இணைக்கப்பட்ட சாதனம் இரண்டிலும் ஒலி அளவைச் சரிபார்க்கவும்.
- குறுக்கீடு அல்லது வரம்பு சிக்கல்களைத் தவிர்க்க உங்கள் சாதனத்திற்கு அருகில் செல்லவும்.
- Try disconnecting and re-connecting the earphones.
- For Bluetooth, forget the device on your phone and re-pair.
- For dongle, unplug and re-plug the dongle.
7.2 இயர்போன்கள் சார்ஜ் ஆகவில்லை
- சார்ஜிங் கேபிள் கேஸ் மற்றும் பவர் சோர்ஸ் இரண்டிலும் பாதுகாப்பாக இணைக்கப்பட்டுள்ளதா என்பதை உறுதிப்படுத்தவும்.
- மின்சாரம் இயக்கத்தில் உள்ளதா என சரிபார்க்கவும்.
- இரண்டு இயர்போன்களிலும் கேஸின் உள்ளேயும் உள்ள சார்ஜிங் காண்டாக்ட்களை உலர்ந்த பருத்தி துணியால் சுத்தம் செய்யவும்.
- வேறு சார்ஜிங் கேபிள் அல்லது பவர் அடாப்டரை முயற்சிக்கவும்.
7.3 Only One Earphone Working
- Place both earphones back into the charging case, close the lid, wait a few seconds, then open the lid and take them out again.
- இரண்டு இயர்போன்களும் சார்ஜ் செய்யப்பட்டுள்ளதா என்பதை உறுதிப்படுத்திக் கொள்ளுங்கள்.
- இயர்போன்களை மீட்டமைக்க முயற்சிக்கவும் (உற்பத்தியாளரின் webதேவைப்பட்டால் குறிப்பிட்ட மீட்டமைப்பு வழிமுறைகளுக்கான தளம்).
8. விவரக்குறிப்புகள்
Key technical specifications for the Baseus AeQur G10 TWS Earphones:
| அம்சம் | விவரக்குறிப்பு |
|---|---|
| மாதிரி பெயர் | A00055400111-00 |
| பிராண்ட் | பேசியஸ் |
| நிறம் | கருப்பு |
| காது வைப்பு | காதில் |
| படிவம் காரணி | காதில் |
| இணைப்பு தொழில்நுட்பம் | வயர்லெஸ் (புளூடூத்) |
| வயர்லெஸ் கம்யூனிகேஷன் டெக்னாலஜி | புளூடூத் |
| பேட்டரிகள் | 1 லித்தியம் அயன் பேட்டரிகள் தேவை (சேர்க்கப்பட்டுள்ளது) |
| தயாரிப்பு பரிமாணங்கள் | 10 x 5 x 1.27 செ.மீ |
| பொருளின் எடை | 220 கிராம் |
| உற்பத்தியாளர் | பேசியஸ் |
| குறிப்பிட்ட பயன்கள் | பயணம் |
9. உத்தரவாதம் மற்றும் ஆதரவு
Baseus products are designed and manufactured to the highest quality standards. For information regarding warranty coverage, technical support, or service, please refer to the warranty card included with your product or visit the official Baseus webஉத்தரவாதக் கோரிக்கைகளுக்கு உங்கள் வாங்கியதற்கான ஆதாரத்தை வைத்திருங்கள்.
For further assistance, you may contact Baseus customer support through their official channels.