1. அறிமுகம்
This manual provides instructions for the safe and effective use of your LLAVETOR Digital Torque Adapter. This device converts any standard ratchet wrench into a precise digital torque wrench, suitable for various applications including bicycles, motorcycles, automotive repair, and industrial use.
முக்கிய அம்சங்கள் அடங்கும்:
- High-definition LED backlight display for easy reading in dark environments.
- Accuracy of ±2% clockwise and ±3% counter-clockwise.
- Four selectable torque units: N.m, ft-lb, in-lb, kg.cm.
- பெயர்வுத்திறனுக்கான சிறிய மற்றும் இலகுரக வடிவமைப்பு.
- Includes 1/2", 3/8", and 1/4" adapters for versatility.
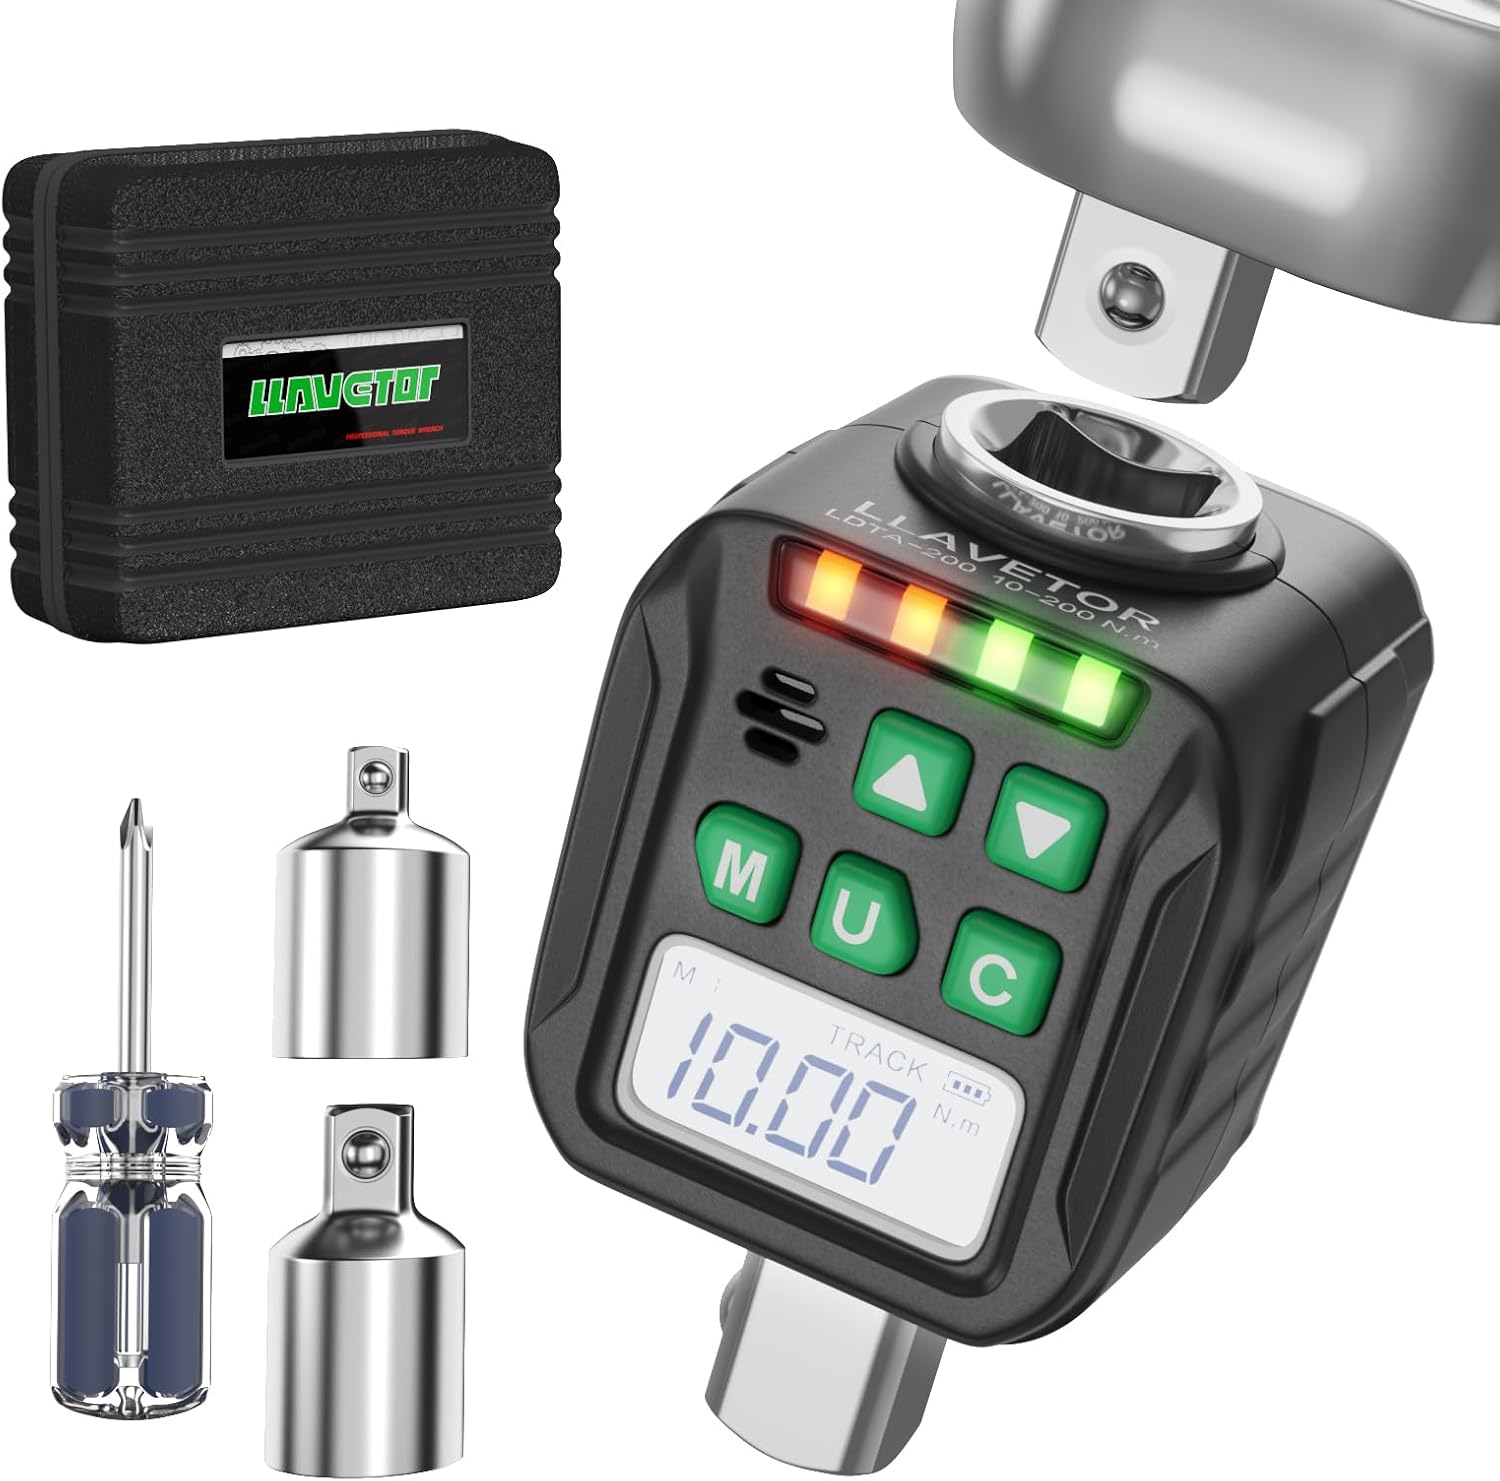
Image 1: LLAVETOR Digital Torque Adapter. This image shows the compact design of the digital torque adapter, ready for use with a ratchet.
2 அமைவு
2.1 தொகுப்பு உள்ளடக்கம்
தொகுப்பில் அனைத்து பொருட்களும் உள்ளதா என சரிபார்க்கவும்:
- 1 x 1/2" Digital Torque Adapter
- 1 x 3/8" Adapter
- 1 x 1/4" Adapter
- 2 x AA பேட்டரிகள்
- 1 x ஸ்க்ரூடிரைவர்
2.2 பேட்டரி நிறுவல்
The digital torque adapter requires two AA batteries for operation.
- சாதனத்தின் பின்புறத்தில் பேட்டரி பெட்டியின் அட்டையைக் கண்டறியவும்.
- பேட்டரி பெட்டியைத் திறக்க வழங்கப்பட்ட ஸ்க்ரூடிரைவரைப் பயன்படுத்தவும்.
- இரண்டு AA பேட்டரிகளைச் செருகவும், சரியான துருவமுனைப்பை உறுதி செய்யவும் (+/-).
- பேட்டரி பெட்டியின் அட்டையை மூடி, திருகு மூலம் பாதுகாக்கவும்.
2.3 அடாப்டர்களை இணைத்தல்
The digital torque adapter comes with 1/2", 3/8", and 1/4" adapters to fit various drive sizes.
- Select the appropriate adapter (e.g., 3/8" or 1/4") if your ratchet or socket is not 1/2".
- Insert the adapter into the 1/2" square drive of the digital torque adapter.
- Attach your ratchet wrench to the input square drive of the digital torque adapter.
- Attach the desired socket to the output square drive of the digital torque adapter (or the attached adapter).
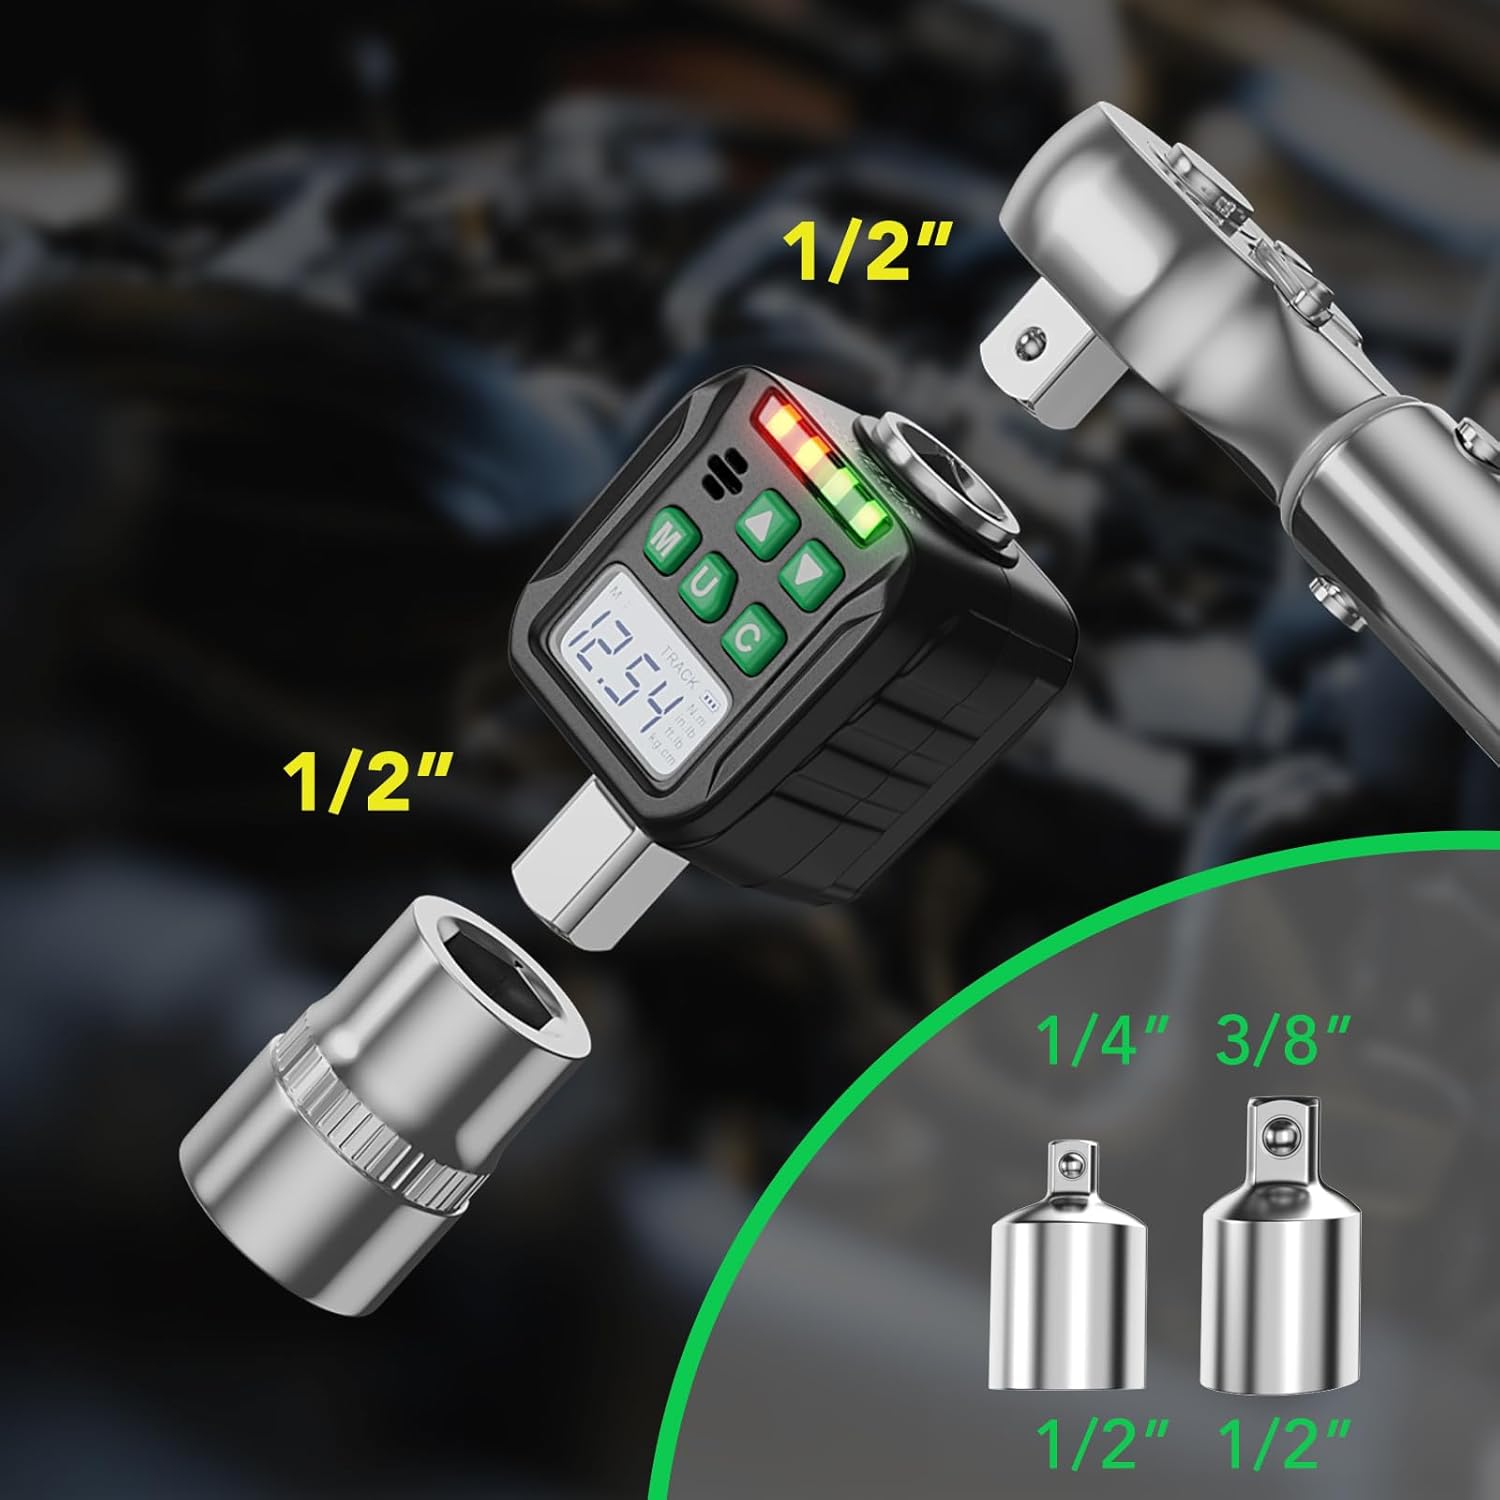
Image 2: Adapter Connections. This image illustrates how to connect the digital torque adapter to a ratchet and how to use the included 3/8" and 1/4" adapters for different socket sizes.
3. இயக்க வழிமுறைகள்
3.1 பவர் ஆன்/ஆஃப்
- அழுத்தவும் M button to power on the device. The LED display will illuminate.
- அணைக்க, அழுத்தவும் M button for 3 seconds. The device will also automatically power off after a period of inactivity to conserve battery.
3.2 அலகு தேர்வு
The device supports four torque units: N.m, ft-lb, in-lb, and kg.cm.
- அழுத்தவும் U button to cycle through the available units. The selected unit will be displayed on the screen.

Image 3: Four Measurement Modes. This image displays the digital torque adapter's screen, highlighting the four selectable measurement units: Newton-meters (N.m), foot-pounds (ft-lb), inch-pounds (in-lb), and kilogram-centimeters (kg.cm).
3.3 Mode Selection (Track Mode / Peak Mode)
The adapter features two operating modes: Track Mode and Peak Mode.
- பயன்முறைகளுக்கு இடையில் மாற, அழுத்திப் பிடிக்கவும் U button for 3 seconds. Use the Up (▲) and Down (▼) buttons to select the desired mode.
ட்ராக் பயன்முறை
In Track Mode, the device displays the torque value in real-time as force is applied. This is useful for monitoring torque during tightening.
பீக் பயன்முறை
In Peak Mode, the device captures and displays the maximum torque value achieved during the tightening process. This value remains on the screen until reset or a higher peak is reached.

Image 4: Track and Peak Modes. This image illustrates the difference between Track Mode, which shows real-time torque, and Peak Mode, which displays the maximum torque applied.
3.4 Setting Target Torque (Preset Value Mode)
The device allows you to set a target torque value. When the applied torque approaches the target, the device will provide visual and audible alerts.
- அழுத்தவும் M button to enter the preset value setting mode.
- Use the Up (▲) and Down (▼) buttons to adjust the target torque value.
- அழுத்தவும் M அமைப்பை உறுதிப்படுத்தி சேமிக்க மீண்டும் பொத்தானை அழுத்தவும்.
The device can store up to 6 groups of preset values and 500 groups of stored data.

Image 5: Preset Values and Data Storage. This image highlights the device's ability to store 6 groups of preset torque values and up to 500 groups of measurement data.
3.5 Torque Application and Indication
As torque is applied, the LED indicator lights will illuminate, and a buzzer will sound to indicate proximity to the target torque.
- பச்சை விளக்குகள்: Indicate that the applied torque is approaching the target value.
- சிவப்பு விளக்குகள்: Indicate that the target torque has been reached or exceeded.
- பஸர்: Sounds when the target torque is reached.

Image 6: LED Indicators and Buzzer. This image shows the digital torque adapter in use, with its LED indicator lights and an icon representing the audible buzzer, which alert the user when the target torque is reached.
3.6 Clockwise and Counter-Clockwise Torque
The adapter can measure torque in both clockwise and counter-clockwise directions with specified accuracy.

Image 7: Accuracy and Mode Switching. This image emphasizes the device's accuracy of ±3% and visually differentiates between Peak Mode and Track Mode displays, which can be switched by holding the 'U' button.
4. பராமரிப்பு
4.1 சுத்தம் செய்தல்
- மென்மையான, உலர்ந்த துணியால் சாதனத்தைத் துடைக்கவும். சிராய்ப்பு கிளீனர்கள் அல்லது கரைப்பான்களைப் பயன்படுத்த வேண்டாம்.
4.2 சேமிப்பு
- Store the digital torque adapter in a dry place, away from direct sunlight and extreme temperatures.
- சாதனம் நீண்ட காலத்திற்குப் பயன்படுத்தப்படாவிட்டால், கசிவைத் தடுக்க பேட்டரிகளை அகற்றவும்.
4.3 அளவுத்திருத்தம்
- For optimal accuracy, periodic calibration by a qualified technician is recommended.
5. சரிசெய்தல்
5.1 Device does not power on
- பேட்டரி நிறுவல் மற்றும் துருவமுனைப்பைச் சரிபார்க்கவும்.
- புதிய AA பேட்டரிகளுடன் மாற்றவும்.
5.2 Inaccurate readings
- Ensure the adapter is securely attached to the ratchet and socket.
- Verify the correct unit of measurement is selected.
- சிக்கல்கள் தொடர்ந்தால் தொழில்முறை அளவுத்திருத்தத்தைக் கருத்தில் கொள்ளுங்கள்.
5.3 Display is dim or unreadable
- பேட்டரிகளை மாற்றவும்.
- சாதனம் தீவிர வெப்பநிலைக்கு ஆளாகவில்லை என்பதை உறுதிப்படுத்திக் கொள்ளுங்கள்.
6. விவரக்குறிப்புகள்
| அம்சம் | விவரம் |
|---|---|
| மாதிரி | LDTA |
| இயக்கி அளவு | 1/2 inch (includes 3/8" and 1/4" adapters) |
| முறுக்கு வீச்சு | 10-200 Nm (7.38-147.5 Ft-lb) |
| துல்லியம் | ±2% Clockwise, ±3% Counter-clockwise |
| முறுக்கு அலகுகள் | N.m, ft-lb, in-lb, kg.cm |
| காட்சி | எல்.ஈ.டி பின்னொளி |
| தரவு சேமிப்பு | 500 குழுக்கள் |
| Preset Values | 6 குழுக்கள் |
| சக்தி ஆதாரம் | 2 x AA பேட்டரிகள் |
| பொருள் | இரும்பு |
| நிறம் | குரோம் |
| செயல்பாட்டு முறை | Mechanical (Digital Readout) |
குறிப்பு: அறிவிப்புகள் இல்லாமல் விவரக்குறிப்புகள் மாற்றத்திற்கு உட்பட்டவை.
7. உத்தரவாதம் மற்றும் ஆதரவு
7.1 உத்தரவாதத் தகவல்
This product is covered by a standard manufacturer's warranty against defects in materials and workmanship. Please refer to the packaging or contact LLAVETOR customer service for specific warranty terms and duration.
7.2 வாடிக்கையாளர் ஆதரவு
For technical assistance, troubleshooting, or warranty claims, please contact LLAVETOR customer support.
Visit the official LLAVETOR webதொடர்புத் தகவல் மற்றும் கூடுதல் ஆதாரங்களுக்கான தளம்.