Pisichen QTH-16INTS
பிசிசென் போர்ட்டபிள் டச்ஸ்கிரீன் மானிட்டர் பயனர் கையேடு
Model: QTH-16INTS
1. அறிமுகம்
This manual provides comprehensive instructions for the setup, operation, and maintenance of your Pisichen Portable Touchscreen Monitor. Please read this manual thoroughly before using the product to ensure proper functionality and to maximize your user experience.
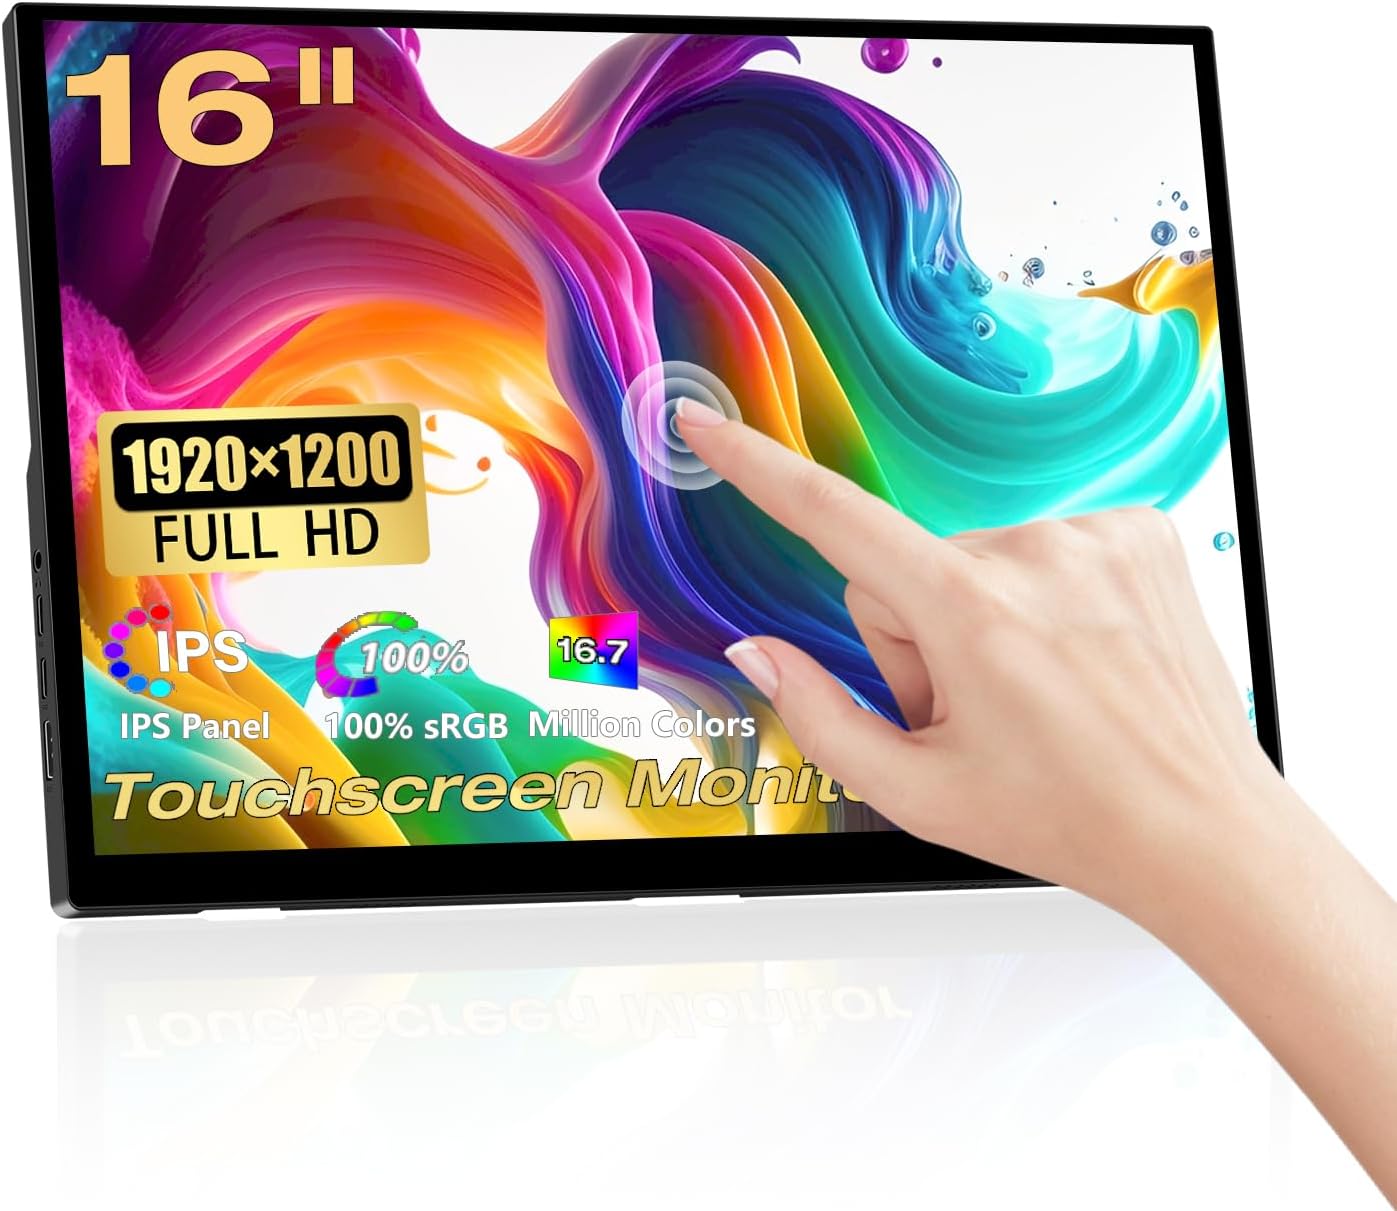
Image: Pisichen 16 Inch Portable Touchscreen Monitor, showcasing its sleek design and touch capabilities.
2 முக்கிய அம்சங்கள்
- FHD Portable Display: 16-inch Full HD (1920x1200P) IPS panel with 178° full viewing angle, 60Hz refresh rate, 1000:1 contrast, and 300 cd/m² brightness. Supports 100% sRGB and 16.7 million colors for accurate and vibrant visuals. Features blue light reduction and flicker-free technology for eye comfort.
- Responsive 10-Point Capacitive Touchscreen: Offers smooth and natural interaction with 10-point multi-touch capability, allowing for intuitive control without a mouse or keyboard.
- HDR Technology & Integrated Kickstand: High Dynamic Range (HDR) mode provides deeper and more realistic colors. The built-in adjustable kickstand (0-90°) and VESA compatibility (75x75mm) offer flexible placement options.
- பல்துறை இணைப்பு: Equipped with a standard HDMI port, two full-featured USB-C 3.1 ports, and an OTG USB-A port (for mouse/keyboard). Supports single Type-C cable for video and power transmission.
- பல காட்சி முறைகள்: Supports duplicate mode, extend mode, and second screen mode for various applications with laptops, PCs, smartphones (USB Type-C 3.1 version), PS4/PS5, and other compatible devices.
- Built-in Dual Speakers: Features 1.5W dual speakers for audio output.

Image: The monitor displaying vibrant colors, highlighting its IPS panel for immersive visual enjoyment.

Image: Two monitors demonstrating the 178-degree ultra-wide viewing angle of the IPS panel, showing consistent color from different perspectives.

படம்: நெருக்கமான படம் views of the monitor's design details, including the 90-degree integrated adjustable stand, VESA mount holes, and non-slip rubber mat.
3. தொகுப்பு உள்ளடக்கங்கள்
கீழே பட்டியலிடப்பட்டுள்ள அனைத்து பொருட்களும் உங்கள் தொகுப்பில் சேர்க்கப்பட்டுள்ளதா என்பதைச் சரிபார்க்கவும். ஏதேனும் பொருட்கள் காணவில்லை அல்லது சேதமடைந்திருந்தால், வாடிக்கையாளர் ஆதரவைத் தொடர்பு கொள்ளவும்.
- Pisichen Portable Touchscreen Monitor (QTH-16INTS)
- பவர் அடாப்டர்
- USB-A இலிருந்து USB-C கேபிள் (x2)
- HDMI முதல் HDMI கேபிள் வரை
- USB-C முதல் USB-C கேபிள்
- பயனர் கையேடு

Image: An illustration showing the monitor and its included accessories: Power Adapter, two USB-A to USB-C cables, one HDMI to HDMI cable, one USB-C to USB-C cable, and the User Manual.
4. அமைப்பு மற்றும் இணைப்புகள்
Your Pisichen Portable Touchscreen Monitor offers flexible connectivity options to suit various devices. Ensure your device supports the necessary video output and power delivery for optimal performance.
4.1. கிடைக்கும் போர்ட்கள்

Image: A diagram illustrating the various ports on the monitor: 3.5mm audio port, USB C port 1, USB C port 2, HDMI port, Brightness/Up button, Menu/OK button, Volume/Down button, and USB-A port.
- 3.5மிமீ ஆடியோ போர்ட்: ஹெட்ஃபோன்கள் அல்லது வெளிப்புற ஸ்பீக்கர்களை இணைப்பதற்கு.
- USB C Port 1 (Full-featured): Supports video, audio, touch, and power delivery.
- USB C Port 2 (Full-featured): Supports video, audio, touch, and power delivery.
- HDMI போர்ட்: For video and audio input from devices with HDMI output.
- USB-A போர்ட்: For connecting peripherals like a mouse or keyboard (OTG function).
- கட்டுப்பாட்டு பொத்தான்கள்: Brightness/Up, Menu/OK, Volume/Down for OSD navigation.
4.2. இணைப்பு முறைகள்

Image: A visual guide demonstrating two primary connection methods: single USB-C cable connection for video, audio, touch, and power, and two-cable connection using HDMI for video/audio and USB-C for power and touch data.
- Single Cable Connection (USB-C):
If your device (laptop, smartphone, etc.) has a full-featured USB-C 3.1 port (which supports DisplayPort Alternate Mode and Power Delivery), you can connect the monitor using a single USB-C to USB-C cable. This cable will transmit video, audio, touch signals, and power to the monitor.
Note: If the power supplied by the single USB-C cable is insufficient, the monitor may require additional power via the included power adapter connected to one of the USB-C ports.
- Two Cable Connection (HDMI + USB-C):
For devices with an HDMI output (e.g., PC, game console, older laptops), connect the HDMI port on your device to the monitor's HDMI port using the provided HDMI cable. For touch functionality and power, connect a USB-A to USB-C cable from your device's USB-A port to one of the monitor's USB-C ports. The power adapter can also be used for dedicated power if needed.
Note: For touch functionality to work with HDMI, the USB-A to USB-C cable must be connected from your device to the monitor.
5. இயக்க வழிமுறைகள்
5.1. பவர் ஆன்/ஆஃப்
The monitor will typically power on automatically when connected to a powered device via USB-C or HDMI. To manually power off, disconnect the power source. The monitor does not have a dedicated power button.
5.2. ஆன்-ஸ்கிரீன் டிஸ்ப்ளே (OSD) மெனு
Use the control buttons on the side of the monitor to navigate the OSD menu. The buttons are typically labeled or intuitively positioned for Brightness/Up, Menu/OK, and Volume/Down.
- அழுத்தவும் பட்டி / சரி OSD மெனுவைத் திறக்க பொத்தானை அழுத்தவும்.
- பயன்படுத்தவும் பிரகாசம்/மேல் மற்றும் தொகுதி/குறைவு மெனு விருப்பங்கள் வழியாக செல்ல பொத்தான்கள்.
- அழுத்தவும் பட்டி / சரி again to select an option or confirm a setting.
- To exit the menu, navigate to the 'Exit' option or wait for the menu to time out.
Common OSD settings include: Brightness, Contrast, Color Temperature, HDR Mode, Aspect Ratio, Input Source, and Volume.
5.3. Touchscreen Functionality
The monitor supports 10-point capacitive touch. Ensure the USB-C cable (for single-cable connection) or the USB-A to USB-C cable (for HDMI connection) is properly connected to your device for touch input to function.

Image: A laptop and the portable monitor side-by-side, demonstrating the 10-point capacitive touch functionality for responsive interaction.

Image: A close-up showing the upgraded bezel-less touch panel, emphasizing its seamless design for accurate clicking and interaction.
இணக்கத்தன்மை: Touch functionality is generally supported by Windows, Chrome OS, and Android devices. macOS typically requires third-party drivers for full touch support, and basic touch (like mouse movement) might be recognized as a trackpad.
5.4. காட்சி முறைகள்
Depending on your connected device and operating system, you can configure the monitor for various display modes:
- Duplicate Mode (Mirror Mode): Displays the same content on both your primary screen and the portable monitor.
- நீட்டிப்பு பயன்முறை: உங்கள் டெஸ்க்டாப்பை இரண்டு திரைகளிலும் நீட்டி, அதிக பணியிடத்தை வழங்குகிறது.
- Second Screen Only Mode: Displays content only on the portable monitor, with your primary screen turned off.
These settings are typically adjusted within your operating system's display settings (e.g., Windows Display Settings, macOS System Preferences).
5.5. Adaptive Image Ratios
The monitor is designed to automatically recognize the input image ratio and adjust the display accordingly. However, some devices or content might require manual adjustment through the OSD menu or your device's display settings to prevent distortion.

Image: A comparison showing how the monitor adjusts to correct display ratios versus a distorted image when the ratio is not properly matched.
6. பராமரிப்பு
சரியான பராமரிப்பு மற்றும் பராமரிப்பு உங்கள் கையடக்க மானிட்டரின் ஆயுளை நீட்டிக்கும்.
- திரையை சுத்தம் செய்தல்: மென்மையான, பஞ்சு இல்லாத துணியால் திரையை மெதுவாகத் துடைக்கவும். பிடிவாதமான கறைகளுக்கு, சிறிது dampen the cloth with water or a screen-specific cleaning solution. Avoid using harsh chemicals, alcohol, or abrasive materials.
- C-ஐ சுத்தம் செய்தல்asing: மானிட்டரின் திரையைத் துடைக்க மென்மையான, உலர்ந்த துணியைப் பயன்படுத்தவும்.asing.
- சேமிப்பு: When not in use, store the monitor in a cool, dry place, away from direct sunlight and extreme temperatures. It is recommended to use a protective sleeve or case to prevent scratches during transport.
- திரவங்களை தவிர்க்கவும்: Keep the monitor away from liquids and excessive moisture.
- கவனத்துடன் கையாளவும்: மானிட்டரை கீழே போடுவதையோ அல்லது வலுவான தாக்கங்களுக்கு உட்படுத்துவதையோ தவிர்க்கவும்.
7. சரிசெய்தல்
If you encounter issues with your Pisichen Portable Touchscreen Monitor, please refer to the following common problems and solutions:
| பிரச்சனை | சாத்தியமான காரணம் / தீர்வு |
|---|---|
| காட்சி இல்லை / கருப்புத் திரை |
|
| Touchscreen Not Responding or Slow |
|
| Flickering Display / Visual Artifacts |
|
| Image is Distorted or Cut Off |
|
| ஸ்பீக்கர்களில் இருந்து ஆடியோ இல்லை. |
|
If the problem persists after trying these solutions, please contact Pisichen customer support for further assistance.
8. விவரக்குறிப்புகள்
| அம்சம் | விவரம் |
|---|---|
| மாதிரி எண் | QTH-16INTS |
| திரை அளவு | 16 அங்குலம் |
| பேனல் வகை | ஐ.பி.எஸ் |
| தீர்மானம் | 1920 x 1200 பிக்சல்கள் (FHD) |
| தோற்ற விகிதம் | 16:10 |
| பிரகாசம் | 300 cd/m² |
| மாறுபாடு விகிதம் | 1000:1 |
| Viewing கோணம் | 178° (IPS) |
| புதுப்பிப்பு விகிதம் | 60 ஹெர்ட்ஸ் |
| வண்ண வரம்பு | 100% sRGB |
| காட்சி நிறங்கள் | 16.7 மில்லியன் |
| தொடுதிரை | 10-point Capacitive Touch |
| துறைமுகங்கள் | 2x Full-featured USB-C 3.1, 1x HDMI, 1x USB-A (OTG), 1x 3.5mm Audio Jack |
| பேச்சாளர்கள் | Built-in Dual 1.5W Speakers |
| வெசா மவுண்ட் | 75x75mm Compatible |
| தயாரிப்பு பரிமாணங்கள் | 0.39 x 14 x 9.2 அங்குலம் |
| பொருளின் எடை | 3.52 பவுண்டுகள் |
| உற்பத்தியாளர் | Shenzhen Konowa Electronics Co., LTD |
9. உத்தரவாதம் மற்றும் ஆதரவு
For warranty information, technical support, or any inquiries regarding your Pisichen Portable Touchscreen Monitor, please contact the manufacturer or seller directly.
You can visit the official Pisichen store on Amazon for more information and contact options: Pisichen Store.
Protection plans may also be available for purchase separately to extend coverage beyond the standard warranty period. Please refer to the product listing for details on available protection plans.
Ask a question about this manual
Ask about setup, troubleshooting, compatibility, parts, safety, or missing instructions. Manuals+ will review the question and use this page’s manual context to help answer it.