FunFlix
Mini Outdoor Projector 852WH Instruction Manual
பிராண்ட்: ஃபன்ஃபிளிக்ஸ்
தயாரிப்பு முடிந்துவிட்டதுview
This FunFlix 852WH Mini Outdoor Projector is designed for portable entertainment, supporting 1080P resolution and offering 9500 lumens brightness. Its compact design allows for easy setup and use in various environments, from home theaters to outdoor movie nights. It features multiple connectivity options including HDMI, USB, and AV, making it compatible with a wide range of devices.
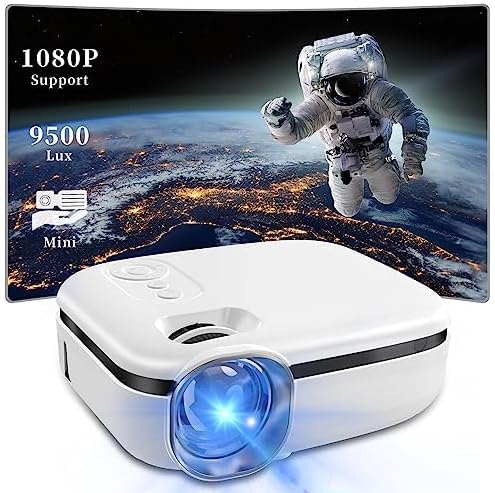
Image: The FunFlix Mini Outdoor Projector, showcasing its compact size and a vibrant projected image with 1080P support and 9500 Lux brightness.
அமைவு வழிகாட்டி
1. அன்பாக்சிங் மற்றும் வேலை வாய்ப்பு
Carefully remove all components from the packaging. Place the projector on a stable, flat surface. Ensure there is adequate ventilation around the projector to prevent overheating.
2. மின் இணைப்பு
- பவர் அடாப்டரை ப்ரொஜெக்டரின் பவர் உள்ளீட்டு போர்ட்டுடன் இணைக்கவும்.
- பவர் அடாப்டரை ஒரு நிலையான மின் கடையில் செருகவும்.
3. Connecting Input Devices
The projector supports multiple input sources. Choose the appropriate cable for your device (HDMI, USB, or AV).

Image: The projector highlighting its versatile connectivity options, including AV, USB, and HDMI ports, for connecting various devices like laptops, gaming consoles, and smartphones.
- , HDMI: Connect your laptop, game console, TV stick, or other HDMI-enabled device to the projector's HDMI port.
- USB: மீடியாவை இயக்க USB போர்ட்டில் USB டிரைவைச் செருகவும். fileநேரடியாக கள்.
- ஏ.வி: டிவிடி பிளேயர்கள் போன்ற பழைய சாதனங்களை இணைக்க, வழங்கப்பட்ட AV கேபிளைப் பயன்படுத்தவும்.
4. Initial Power On and Focus Adjustment
- அதை இயக்க ப்ரொஜெக்டர் அல்லது ரிமோட் கண்ட்ரோலில் உள்ள பவர் பட்டனை அழுத்தவும்.
- Adjust the focus ring on the lens until the projected image appears clear and sharp.
5. கீஸ்டோன் திருத்தம்
If the projected image appears trapezoidal (wider at the top or bottom), use the keystone correction dial to adjust it to a rectangular shape.

Image: Illustration of the projector's ±15° vertical keystone correction feature, showing how to adjust the image shape using a dedicated dial for a perfectly rectangular display.
6. Adjusting Projection Size
The projection size can be adjusted by moving the projector closer to or further from the screen/wall. The projector supports screen sizes from 35 to 270 inches.
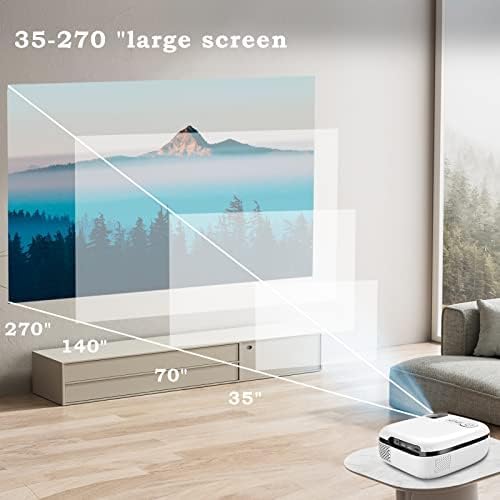
Image: A visual representation demonstrating the projector's capability to produce large screen sizes, ranging from 35 inches up to 270 inches, depending on the projection distance.
இயக்க வழிமுறைகள்
1. பவர் ஆன்/ஆஃப்
- பவர் ஆன்: ப்ரொஜெக்டர் அல்லது ரிமோட் கண்ட்ரோலில் உள்ள ஆற்றல் பொத்தானை அழுத்தவும்.
- பவர் ஆஃப்: மீண்டும் பவர் பட்டனை அழுத்தவும். கேட்கப்பட்டால், ஷட் டவுனை உறுதிப்படுத்தவும்.
2. மூல தேர்வு
Use the "Source" button on the projector or remote control to cycle through available input sources (HDMI, USB, AV).
3. தொகுதி கட்டுப்பாடு
Adjust the volume using the volume buttons on the remote control. The projector features a built-in Hi-Fi speaker for audio output.

Image: The projector positioned in a living room setting, illustrating its integrated Hi-Fi speaker system providing immersive audio for a home cinema experience.
4. மெனு வழிசெலுத்தல்
Use the arrow keys and OK button on the remote control to navigate through the projector's on-screen menu for advanced settings like picture mode, aspect ratio, and sound settings.
பராமரிப்பு
1. லென்ஸை சுத்தம் செய்தல்
Gently wipe the projector lens with a soft, lint-free cloth specifically designed for optical surfaces. Do not use abrasive cleaners or excessive force, as this can scratch the lens.
2. தூசி தடுப்பு
The projector features an enclosed optical system designed to be super dustproof, minimizing dust accumulation on internal components. However, regularly clean the exterior of the projector with a soft, dry cloth to prevent dust from entering ventilation openings.
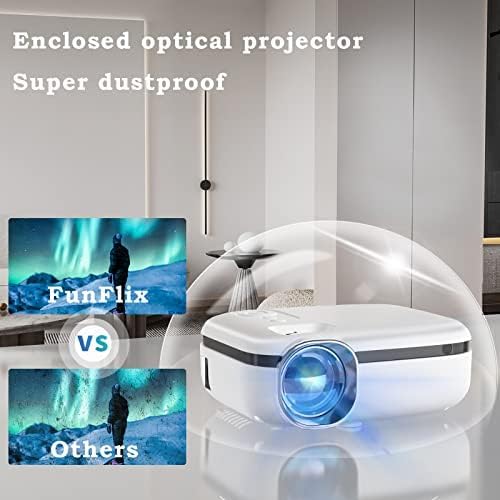
Image: The projector encased in a protective, transparent dome, visually representing its "Super dustproof" enclosed optical design, which helps maintain image clarity by preventing dust ingress.
3. சேமிப்பு
When not in use for extended periods, store the projector in a cool, dry place, away from direct sunlight and extreme temperatures. Consider using the original packaging or a protective case.
சரிசெய்தல் வழிகாட்டி
| பிரச்சனை | சாத்தியமான காரணம் | தீர்வு |
|---|---|---|
| எந்தப் படமும் வெளியிடப்படவில்லை. |
|
|
| படம் மங்கலாக உள்ளது |
|
|
| ஒலி இல்லை |
|
|
| புரொஜெக்டர் இயக்கப்படவில்லை |
|
|
தயாரிப்பு விவரக்குறிப்புகள்
| அம்சம் | விவரம் |
|---|---|
| பிராண்ட் | FunFlix |
| மாதிரி எண் | 852WH |
| பிரகாசம் | 9500 லுமன்ஸ் |
| ஆதரிக்கப்படும் தீர்மானம் | 1080P HD |
| படிவம் காரணி | போர்ட்டபிள் |
| நிறம் | வெள்ளை |
| தயாரிப்பு பரிமாணங்கள் | 2.36 x 1.56 x 1.6 அங்குலம் |
| பொருளின் எடை | 2.2 பவுண்டுகள் |
| இணக்கமான சாதனங்கள் | Laptop, Gaming Console, Smartphone, TV Stick |
| இணைப்பு | HDMI, USB, AV |
உத்தரவாத தகவல்
This product comes with a standard manufacturer's warranty. Please refer to the warranty card included in your product packaging for specific terms, conditions, and duration. Retain your proof of purchase for warranty claims.
வாடிக்கையாளர் ஆதரவு
For technical assistance, troubleshooting beyond this guide, or warranty inquiries, please contact FunFlix customer support. Contact details can typically be found on the product packaging, the official FunFlix website, or the purchase platform.
Ask a question about this manual
Ask about setup, troubleshooting, compatibility, parts, safety, or missing instructions. Manuals+ will review the question and use this page’s manual context to help answer it.