
BlitzWolf BW-VT2EU
BlitzWolf BW-VT2 Mini Projector User Manual
Your comprehensive guide to setting up, operating, and maintaining your BlitzWolf BW-VT2 Mini Projector.
1. தயாரிப்பு முடிந்துவிட்டதுview
1.1 தொகுப்பு உள்ளடக்கம்
உங்கள் தொகுப்பில் அனைத்து பொருட்களும் உள்ளதா என்பதை சரிபார்க்கவும்:
- BlitzWolf BW-VT2 Mini Projector
- ரிமோட் கண்ட்ரோல்
- பவர் அடாப்டர்
- HDMI கேபிள்
- பயனர் கையேடு (இந்த ஆவணம்)
1.2 சாதன அமைப்பு
Familiarize yourself with the various parts and ports of your projector.
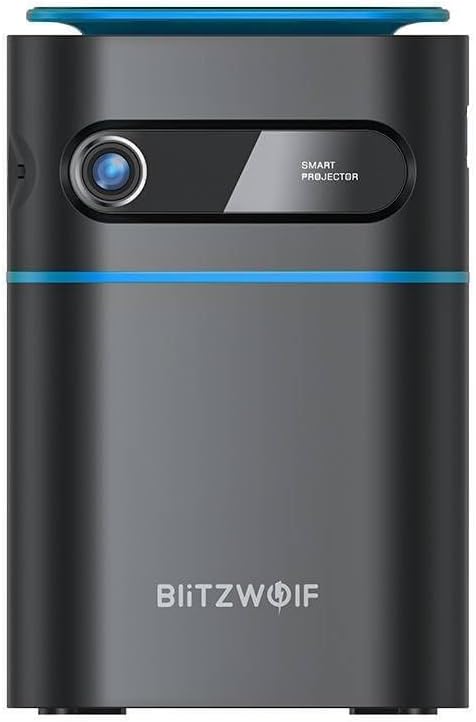
படம் 1.1: முன் View. This image displays the front of the BlitzWolf BW-VT2 Mini Projector, highlighting the projection lens and the 'SMART PROJECTOR' branding.

Figure 1.2: Projector with Remote Control. This image shows the BlitzWolf BW-VT2 Mini Projector alongside its dedicated remote control, illustrating the compact size of both devices.
படம் 1.3: பின்புறம் View. The rear of the projector is shown, featuring ventilation grilles and various input/output ports.

படம் 1.4: பக்கம் View. This image highlights the side of the projector where additional connectivity options such as USB and HDMI ports are located.

படம் 1.5: மேல் View. The top surface of the projector is visible, featuring the integrated touch control panel for direct interaction.
1.3 போர்ட்கள் மற்றும் கட்டுப்பாடுகள்
- HDMI போர்ட்: Connect to laptops, game consoles, Blu-ray players, etc.
- USB போர்ட்: மீடியா பிளேபேக்கிற்கு USB ஃபிளாஷ் டிரைவ்களை இணைக்கவும்.
- Audio Out (3.5mm) Port: வெளிப்புற ஸ்பீக்கர்கள் அல்லது ஹெட்ஃபோன்களை இணைக்கவும்.
- துறைமுகத்தில் DC: பவர் அடாப்டரை இணைக்கவும்.
- பவர் பட்டன்: ப்ரொஜெக்டரை ஆன்/ஆஃப் செய்கிறது.
- ஃபோகஸ் வீல்: பட தெளிவை சரிசெய்கிறது.
- தொடு கட்டுப்பாட்டு குழு: Navigate menus and control playback directly on the device.
2. அமைவு வழிகாட்டி
2.1 பவர் ஆன்
- ப்ரொஜெக்டரில் உள்ள DC IN போர்ட்டுடன் பவர் அடாப்டரை இணைக்கவும்.
- பவர் அடாப்டரை ஒரு சுவர் கடையில் செருகவும்.
- Press and hold the Power Button on the projector or the remote control until the device powers on.
2.2 ஆரம்ப வேலை வாய்ப்பு
உகந்தது viewing experience, consider the following:
- ப்ரொஜெக்டரை ஒரு நிலையான, தட்டையான மேற்பரப்பில் வைக்கவும்.
- Ensure there is adequate ventilation around the projector to prevent overheating.
- Position the projector perpendicular to the projection surface (wall or screen) for a rectangular image.
- Adjust the distance to achieve your desired screen size.
2.3 கவனம் சரிசெய்தல்
After powering on, adjust the focus to ensure a clear image:
- Rotate the focus wheel located near the lens until the projected image appears sharp and clear.
2.4 ரிமோட் கண்ட்ரோல் அமைப்பு
Insert batteries into the remote control before first use:
- ரிமோட் கண்ட்ரோலின் பின்புறத்தில் உள்ள பேட்டரி பெட்டியின் அட்டையைத் திறக்கவும்.
- இரண்டு AAA பேட்டரிகளைச் செருகவும் (சேர்க்கப்படவில்லை), சரியான துருவமுனைப்பை உறுதி செய்யவும் (+/-).
- பேட்டரி பெட்டியின் அட்டையை மூடு.
3. இயக்க வழிமுறைகள்
3.1 வழிசெலுத்தல்
You can navigate the projector's interface using either the remote control or the touch control panel on top of the device.
- ரிமோட் கண்ட்ரோல்: Use the directional buttons (up, down, left, right) to move through menus and the 'OK' button to select.
- தொடு கட்டுப்பாட்டு குழு: Swipe and tap on the touch-sensitive surface to navigate.
3.2 இணைக்கும் சாதனங்கள்
The BW-VT2 supports various input sources:
- HDMI உள்ளீடு: Connect your laptop, game console, or other HDMI-enabled devices using an HDMI cable. Select the HDMI input source from the projector's menu.
- யூ.எஸ்.பி உள்ளீடு: Insert a USB flash drive into the USB port. The projector's media player will typically detect the drive automatically, allowing you to browse and play supported media file(வீடியோக்கள், புகைப்படங்கள், இசை).
- வைஃபை இணைப்பு: Navigate to the 'Settings' menu, then 'Network' or 'Wi-Fi'. Select your Wi-Fi network and enter the password to connect the projector to the internet. This enables access to online streaming apps and updates.
3.3 ஆண்ட்ராய்டு ஓஎஸ் அம்சங்கள்
As an Android-powered projector, the BW-VT2 offers smart functionalities:
- பயன்பாட்டு அணுகல்: Download and install various streaming apps (e.g., Netflix, YouTube) directly from the pre-installed app store or by sideloading APKs.
- அமைப்புகள்: Customize display settings, audio output, network configurations, and system preferences through the Android settings menu.
- ஸ்கிரீன் மிரரிங்: Utilize built-in screen mirroring features (e.g., Miracast, AirPlay compatible apps) to project content from your smartphone or tablet wirelessly.
3.4 ஆடியோ வெளியீடு
The projector has built-in speakers, but you can also connect external audio devices:
- 3.5மிமீ ஆடியோ அவுட்: Connect headphones or external speakers via the 3.5mm audio jack for enhanced sound.
4. பராமரிப்பு
சரியான பராமரிப்பு உங்கள் ப்ரொஜெக்டரின் நீண்ட ஆயுளையும் உகந்த செயல்திறனையும் உறுதி செய்கிறது.
4.1 லென்ஸ் சுத்தம் செய்தல்
To maintain clear image quality, clean the projector lens regularly:
- ஆப்டிகல் லென்ஸ்களுக்காக பிரத்யேகமாக வடிவமைக்கப்பட்ட மென்மையான, பஞ்சு இல்லாத துணியைப் பயன்படுத்தவும்.
- லென்ஸை வட்ட இயக்கத்தில் மெதுவாகத் துடைக்கவும்.
- Avoid using abrasive cleaners or excessive force, which can scratch the lens.
4.2 காற்றோட்டம்
Ensure proper airflow to prevent overheating:
- Do not block the ventilation vents on the projector.
- ப்ரொஜெக்டரை நன்கு காற்றோட்டமான பகுதியில் இயக்கவும்.
- Periodically clean dust from the vents using a soft brush or compressed air.
4.3 சேமிப்பு
When not in use, store your projector properly:
- ப்ரொஜெக்டரை நேரடி சூரிய ஒளி மற்றும் தீவிர வெப்பநிலையிலிருந்து விலகி, குளிர்ந்த, உலர்ந்த இடத்தில் சேமிக்கவும்.
- Use the original packaging or a protective case to prevent dust accumulation and physical damage.
5. சரிசெய்தல்
பொதுவான பிரச்சினைகள் மற்றும் அவற்றின் தீர்வுகளுக்கு இந்தப் பகுதியைப் பார்க்கவும்.
| பிரச்சனை | சாத்தியமான காரணம் | தீர்வு |
|---|---|---|
| ப்ரொஜெக்டர் இயக்கப்படவில்லை. | மின் இணைப்பு இல்லை; மின் அடாப்டர் பழுதடைந்துள்ளது. | Ensure power adapter is securely connected to both projector and outlet. Try a different outlet. |
| எந்த படமும் திட்டமிடப்படவில்லை. | Incorrect input source selected; loose HDMI/USB cable. | Verify the correct input source is selected in the menu. Check cable connections. |
| படம் மங்கலாக உள்ளது. | Focus not adjusted; projector too close/far. | Rotate the focus wheel until the image is clear. Adjust projection distance if necessary. |
| ஒலி இல்லை. | Volume too low; external audio device not connected properly. | Increase volume. Check connections to external speakers/headphones. Ensure audio output is set correctly in settings. |
| வைஃபை இணைப்புச் சிக்கல்கள். | தவறான கடவுச்சொல்; ரூட்டர் சிக்கல்கள்; சிக்னல் குறுக்கீடு. | Re-enter Wi-Fi password. Restart router. Move projector closer to router. |
| ரிமோட் கண்ட்ரோல் வேலை செய்யவில்லை. | செயலிழந்த பேட்டரிகள்; அடைப்பு; ரிமோட் இணைக்கப்படவில்லை. | Replace batteries. Ensure no obstruction between remote and projector. |
6. தொழில்நுட்ப விவரக்குறிப்புகள்
Key specifications of the BlitzWolf BW-VT2 Mini Projector:
| அம்சம் | விவரக்குறிப்பு |
|---|---|
| பிராண்ட் | பிளிட்ஸ்வூல்ஃப் |
| மாதிரி எண் | BW-VT2EU |
| நிறம் | கருப்பு |
| இணைப்பு தொழில்நுட்பம் | HDMI, USB, VGA, Wi-Fi |
| காட்சித் தீர்மானம் | 1920 x 1080 (முழு எச்டி) |
| காட்சி வகை | எல்சிடி, எல்இடி |
| படிவம் காரணி | போர்ட்டபிள் |
| சிறப்பு அம்சங்கள் | Portable, Android OS, Wi-Fi, HDMI, USB, VGA |
| இணக்கமான சாதனங்கள் | Laptops, Smartphones, Game Consoles, Blu-ray Players, Media Players, Wi-Fi enabled devices |
| பரிந்துரைக்கப்பட்ட பயன்பாடுகள் | ஹோம் சினிமா |
7. உத்தரவாதம் மற்றும் ஆதரவு
7.1 உற்பத்தியாளரின் உத்தரவாதம்
The BlitzWolf BW-VT2 Mini Projector comes with a 2 வருட உற்பத்தியாளரின் உத்தரவாதம். இந்த உத்தரவாதமானது சாதாரண பயன்பாட்டின் கீழ் பொருட்கள் மற்றும் வேலைப்பாடுகளில் உள்ள குறைபாடுகளை உள்ளடக்கும். உத்தரவாதக் கோரிக்கைகளுக்கு உங்கள் வாங்கியதற்கான ஆதாரத்தை வைத்திருங்கள்.
7.2 வாடிக்கையாளர் ஆதரவு
If you encounter issues not covered in the troubleshooting section or require further assistance, please contact BlitzWolf customer support. Refer to the product packaging or the official BlitzWolf webமிகவும் புதுப்பித்த தொடர்புத் தகவலுக்கான தளம்.
Ask a question about this manual
Ask about setup, troubleshooting, compatibility, parts, safety, or missing instructions. Manuals+ will review the question and use this page’s manual context to help answer it.