1. அறிமுகம்
This manual provides detailed instructions for the installation, operation, and maintenance of your autoabc 12.3 Inch Wireless CarPlay/Android Auto Multimedia Linux Touchscreen. This device is designed to enhance your in-car experience by integrating modern connectivity features while retaining your vehicle's original functionalities.
2. இணக்கத்தன்மை
This product is compatible with specific Mercedes Benz models equipped with NTG5.0, NTG5.1, and NTG5.2 systems. Please verify your vehicle's system before installation.
- Mercedes Benz GLC Class X253 (2015-2018)
- Mercedes Benz GLA Class X156 (2016-2018)
- Mercedes Benz CLA Class C117 (2016-2018)
- Mercedes Benz A Class (2016-2018)
- Mercedes Benz C Class W205 (C180, C200, C220, C250, C320, C43 AMG, C63 AMG, C63 GLS, C650)
முக்கிய குறிப்பு:
இந்த சாதனம் பொருந்தாது with NTG4.0, NTG4.5, or NTG4.7 systems. Please ensure your original car system matches the compatible versions. If unsure, consult a professional or contact customer support.

Image: Compatibility chart for Mercedes Benz NTG systems. The image displays examples of NTG5.0/5.1/5.2 as compatible and NTG4.5/4.7 and NTG4.0 as incompatible, with corresponding screen visuals.
3. தயாரிப்பு முடிந்துவிட்டதுview மற்றும் அம்சங்கள்
The autoabc 12.3 Inch Multimedia Linux Touchscreen upgrades your vehicle's display with a high-definition screen and integrated smart features.
- வயர்லெஸ் கார்ப்ளே/ஆண்ட்ராய்டு ஆட்டோ: Seamlessly integrate your smartphone for navigation, calls, messages, and music via voice assistant.
- HD 12.3 Inch Screen: Features a 1920x720 resolution LED display for an enhanced visual experience. Supports screen projection for photos and videos.
- Original Car Function Retention: Maintains all original vehicle functions, including radio, booster, joystick controls, rear view camera, and display of speed, fuel level, oil pressure, and safety warnings.
- கேமரா செயல்பாடு: Supports factory original reverse camera parking radar, aftermarket reverse cameras, and 360-degree cameras. Includes support for front view கேமரா DVR (CVBS உள்ளீடு).

Image: Comparison of the car's dashboard before and after installing the autoabc 12.3-inch touchscreen, highlighting the larger display and new interface.

Image: Four-panel display showing the screen's capabilities with CarPlay, Android Auto, Airplay, and Autolink, demonstrating smartphone integration.

Image: Illustration of the camera functions, including front camera view, parking assist lines, and a 360-degree overhead view of a car, indicating support for various camera systems.

Image: Six panels demonstrating the retention of original car functions: car system, CD/DVD player, steering wheel control, horn speaker sound output, reversing camera, and iDrive rotation button.
4. அமைவு மற்றும் நிறுவல்
Installation of this unit typically involves replacing the original screen and connecting the provided cables. While designed for ease of installation, professional assistance is recommended if you are unfamiliar with car electronics.
4.1. முன்-நிறுவல் சரிபார்ப்பு
- Confirm your vehicle's NTG system version (NTG5.0, NTG5.1, or NTG5.2).
- "பெட்டியில் என்ன இருக்கிறது" பிரிவில் பட்டியலிடப்பட்டுள்ள அனைத்து கூறுகளும் இருப்பதை உறுதிசெய்யவும்.
- நிறுவலைத் தொடங்குவதற்கு முன் வாகனத்தின் பேட்டரியைத் துண்டிக்கவும்.
4.2. General Installation Steps (Consult a professional or installation video for detailed steps)
- Carefully remove the original car screen and trim panels.
- Connect the provided power cable and LVDS/USB cable to the new unit and the vehicle's wiring harness.
- If applicable, install the bracket for the new screen.
- Route all cables neatly to avoid interference.
- Mount the new 12.3-inch touchscreen in place.
- Reconnect the vehicle's battery and test all functions before reassembling the trim.
எச்சரிக்கை:
If you are unsure about the installation process, it is highly recommended to seek assistance from a qualified car workshop or refer to official installation videos provided by the manufacturer.
5. இயக்க வழிமுறைகள்
5.1. அமைப்புகளுக்கு இடையில் மாறுதல்
The unit allows seamless switching between the new Linux system and the original car system.
- To access the Linux system (CarPlay, Android Auto, AirPlay, Autolink), select the corresponding icon on the main interface.
- To return to the original car system, select the "Original car" icon or use the designated button/control as per your vehicle's original setup.
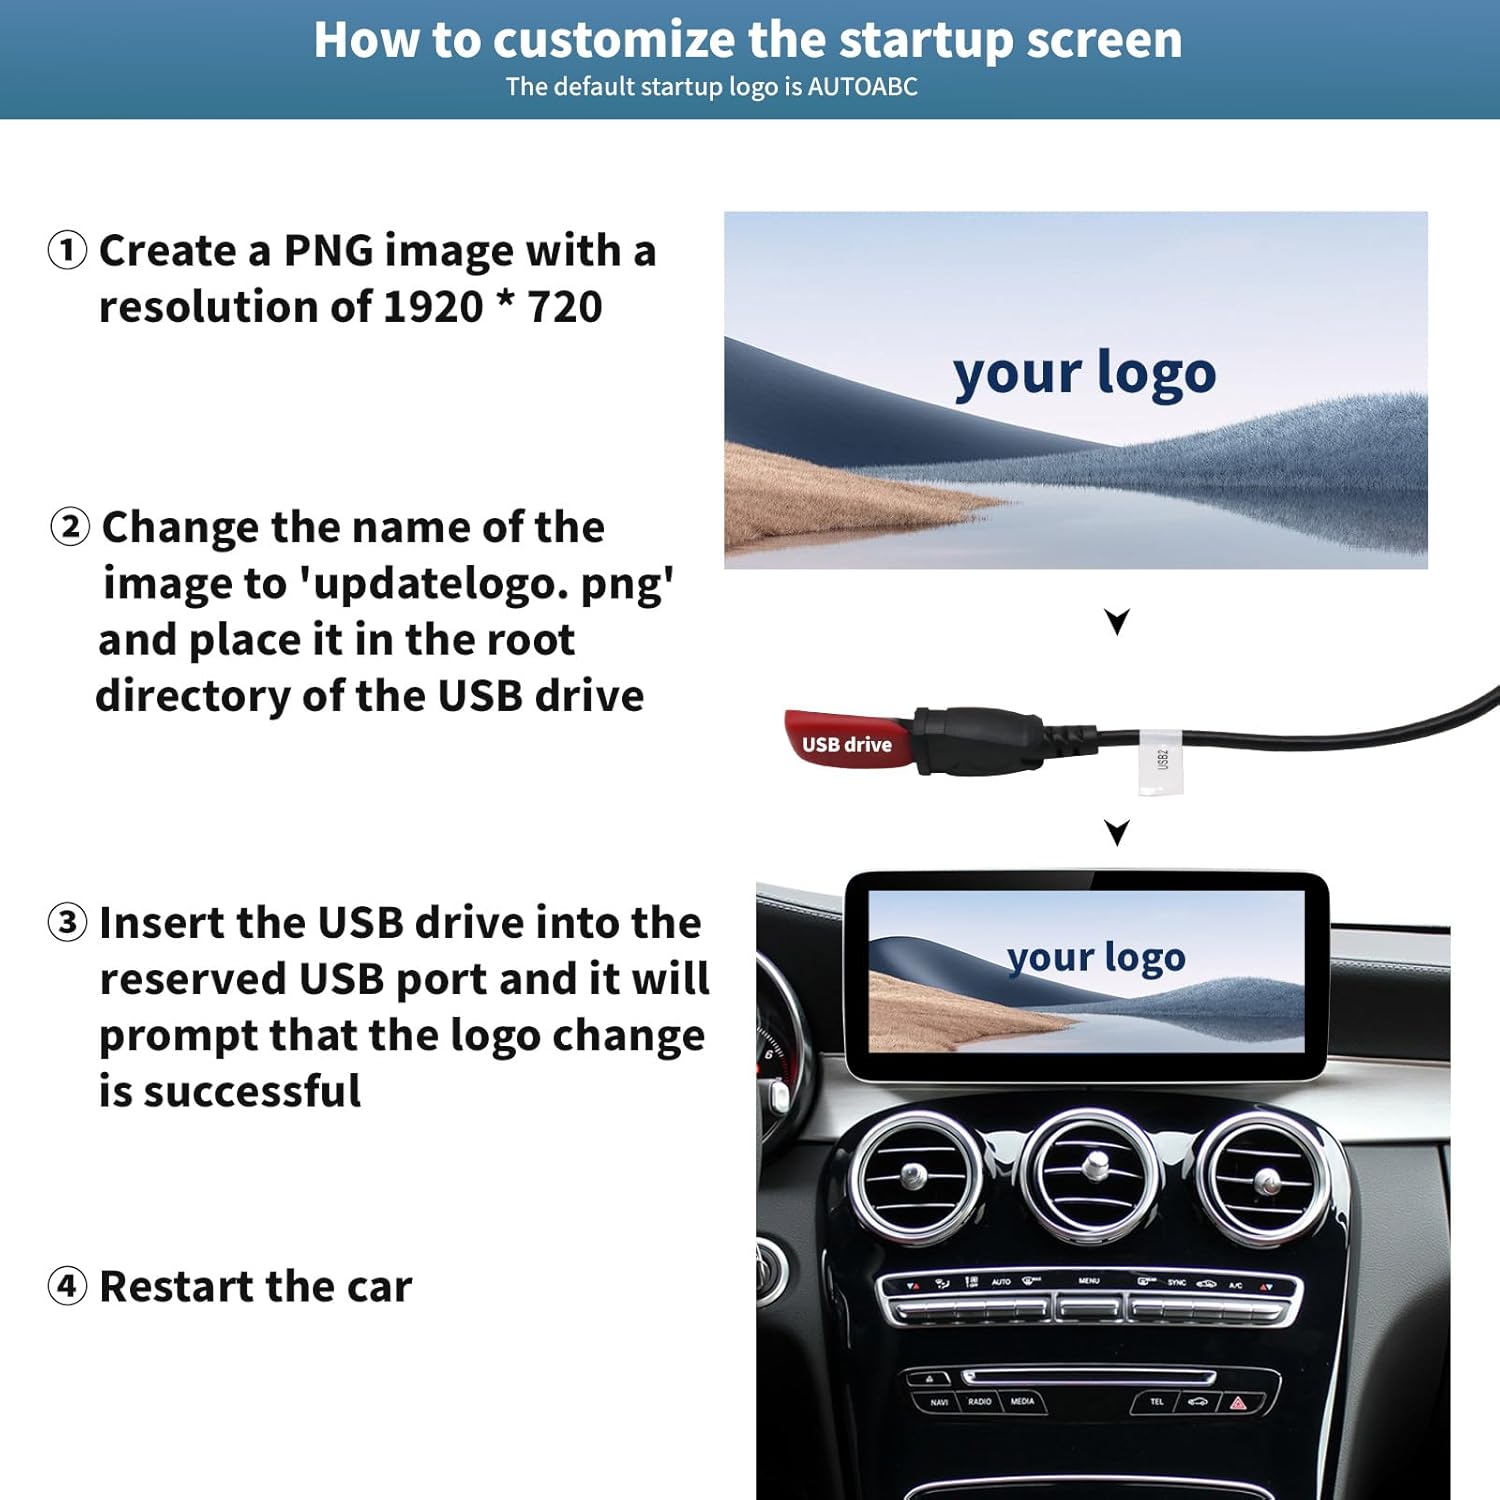
Image: Flowchart illustrating the process of switching between the new Linux system interface (showing CarPlay, Android Auto, AirPlay, Autolink icons) and the original car system interface (showing radio frequencies).
5.2. வயர்லெஸ் கார்ப்ளே / ஆண்ட்ராய்டு ஆட்டோ
To use Wireless CarPlay or Android Auto:
- உங்கள் ஸ்மார்ட்போனில் புளூடூத் இயக்கப்பட்டுள்ளதை உறுதிசெய்யவும்.
- On the car screen, navigate to the CarPlay or Android Auto section.
- தேடுங்கள் and connect to the device's Bluetooth name from your phone's Bluetooth settings.
- Follow any on-screen prompts on both your phone and the car display to establish the connection.
Once connected, you can access navigation, phone contacts, email, notifications, and music directly on the touchscreen.
5.3. கேமரா செயல்பாடுகள்
கணினி தானாகவே பின்புறத்தைக் காட்டுகிறது view when the vehicle is in reverse gear. You can also access front camera or 360-degree camera views if installed and configured.
5.4. கட்டுப்பாட்டு முறைகள்
The system supports multiple control methods:
- தொடுதிரை: Directly interact with the 12.3-inch display.
- Original Joystick Controls: Utilize your vehicle's existing joystick or rotary controller.
- ஸ்டீயரிங் வீல் கட்டுப்பாடுகள்: Use your steering wheel buttons for audio control and other functions.
6. தனிப்பயனாக்கம்
6.1. Customizing the Startup Screen Logo
You can personalize the startup screen with a custom logo.
- Create a PNG image with a resolution of 1920 x 720 pixels.
- Rename the image file செய்ய 'updatelogo.png'.
- இதை வைக்கவும் file in the root directory of a USB drive.
- Insert the USB drive into the reserved USB port on the unit. The system will prompt you when the logo change is successful.
- Restart the car to apply the new startup logo.

Image: Step-by-step visual guide on how to customize the startup screen logo using a USB drive with a 1920x720 PNG image named 'updatelogo.png'.
7. தயாரிப்பு தகவல் மற்றும் விவரக்குறிப்புகள்
7.1. பெட்டியில் என்ன இருக்கிறது
- autoabc 12.3 Inch Multimedia Linux Touchscreen
- பவர் கேபிள்
- LVDS/USB Cable
- Bracket (for specific models, if required)
- பயனர் கையேடு (இந்த ஆவணம்)

Image: Display of the product components: the main screen unit (front and back views), power cable, LVDS/USB cable, and mounting bracket.
7.2. தொழில்நுட்ப விவரக்குறிப்புகள்
- மாதிரி எண்: AR-X123
- திரை அளவு: 12.3 அங்குலம்
- தீர்மானம்: 1920 x 720 HD LED
- இயக்க முறைமை: லினக்ஸ்
- இணைப்பு: Wireless CarPlay, Android Auto, AirPlay, Autolink, Bluetooth, USB
- ஆடியோ வெளியீட்டு முறை: ஸ்டீரியோ
- சரவுண்ட் சவுண்ட் சேனல் உள்ளமைவு: 4.0
- Video Encoding Support: H.264, H.265/HEVC, VP9, AV1, MPEG-4
- பொருளின் எடை: 2.2 பவுண்டுகள்
- உற்பத்தியாளர்: autoabc
8. பராமரிப்பு
To ensure the longevity and optimal performance of your autoabc touchscreen, follow these maintenance guidelines:
- சுத்தம்: திரையைச் சுத்தம் செய்ய மென்மையான, பஞ்சு இல்லாத துணியைப் பயன்படுத்தவும். பிடிவாதமான கறைகளுக்கு, லேசாக dampகடுமையான இரசாயனங்கள் அல்லது சிராய்ப்புப் பொருட்களைத் தவிர்க்கவும்.
- வெப்பநிலை: நீண்ட காலத்திற்கு அதிக வெப்பநிலைக்கு அலகு வெளிப்படுவதைத் தவிர்க்கவும்.
- மென்பொருள் புதுப்பிப்புகள்: உற்பத்தியாளரின் website or contact support for any available software updates to ensure optimal performance and compatibility.
- கேபிள் இணைப்புகள்: Ensure all cables remain securely connected. Avoid pulling on cables forcefully.
9. சரிசெய்தல்
If you encounter issues with your autoabc touchscreen, refer to the following common troubleshooting steps:
- சக்தி இல்லை:
- அனைத்து மின் கேபிள் இணைப்புகளும் பாதுகாப்பாக இருப்பதை உறுதிசெய்ய அவற்றைச் சரிபார்க்கவும்.
- வாகனத்தின் பேட்டரி சரியாக இணைக்கப்பட்டு சார்ஜ் செய்யப்பட்டுள்ளதா என்பதைச் சரிபார்க்கவும்.
- Check relevant fuses in your vehicle's fuse box.
- ஒலி இல்லை:
- Ensure the volume on both the unit and your vehicle's original audio system is turned up.
- Confirm the audio input source is correctly selected (e.g., AUX, Bluetooth).
- If using Bluetooth, ensure your phone is properly paired and connected.
- கார்ப்ளே/ஆண்ட்ராய்டு ஆட்டோ இணைக்கப்படவில்லை:
- உங்கள் ஸ்மார்ட்போனில் புளூடூத் மற்றும் வைஃபை இயக்கப்பட்டுள்ளதை உறுதிசெய்யவும்.
- Forget the device from your phone's Bluetooth settings and re-pair.
- Restart both your phone and the car's multimedia system.
- Check for any software updates for your phone's operating system or the car unit.
- தொடுவதற்கு திரை பதிலளிக்கவில்லை:
- அலகு மறுதொடக்கம்.
- திரை சுத்தமாகவும் குப்பைகள் இல்லாமல் இருப்பதையும் உறுதிப்படுத்திக் கொள்ளுங்கள்.
- Original Car Functions Not Working:
- Verify all original wiring harness connections are correctly made.
- Ensure the unit is properly switched to the "Original car" system mode.
If these steps do not resolve the issue, please contact autoabc customer support for further assistance.
10. உத்தரவாதம் மற்றும் ஆதரவு
autoabc provides a one-year global warranty for this product, covering manufacturing defects and malfunctions under normal use. Additionally, lifetime technical service support is available.
- உத்தரவாதக் காலம்: வாங்கிய தேதியிலிருந்து 1 வருடம்.
- தொழில்நுட்ப ஆதரவு: Lifetime online technical support via Amazon email.
For any questions, problems, or technical assistance, please contact autoabc customer support through Amazon's messaging system. Please have your product model number (AR-X123) and purchase details ready when contacting support.

Image: Graphic detailing customer support availability, including 24-hour response, 60-day return policy, 12-month replacement, and lifetime technical support.