1. அறிமுகம்
This manual provides essential information for setting up, operating, and maintaining your NIMO Mini-PC MPL2R. Please read it thoroughly before use to ensure optimal performance and longevity of your device.

படம் 1.1: முன் மற்றும் பின் view of the NIMO Mini-PC MPL2R, showcasinஅதன் சிறிய வடிவமைப்பு மற்றும் பல்வேறு துறைமுகங்கள்.
The NIMO Mini-PC MPL2R is a compact and powerful computing solution, equipped with a 12th Gen Intel N100 processor, 16GB DDR5 RAM, and 768GB storage (512GB M.2 SSD + 256GB Micro SD). It supports triple 4K display output, WiFi 6, and Bluetooth 5.2, making it suitable for a variety of applications from home entertainment to business and educational tasks.

படம் 1.2: முடிந்ததுview of key features including Intel 12th Gen N100 processor, 4K triple-screen display support, Bluetooth 5.2, LPDDR5 RAM, WiFi 6, and PCIe SSD.
2. பெட்டியில் என்ன இருக்கிறது
தொகுப்பைத் திறந்தவுடன், பின்வரும் அனைத்து பொருட்களும் சேர்க்கப்பட்டுள்ளதா என்பதைச் சரிபார்க்கவும்:
- NIMO Mini-PC MPL2R
- பவர் அடாப்டர்
- வெசா மவுண்ட்
- பயனர் வழிகாட்டி

Image 2.1: Visual representation of the items included in the NIMO Mini-PC MPL2R packaging: the Mini PC unit, power adapter, VESA mount, and user guide.
3. அமைவு வழிகாட்டி
3.1 ஒரு காட்சியுடன் இணைத்தல்
- Connect one end of an HDMI cable to an HDMI port on the NIMO Mini-PC.
- Connect the other end of the HDMI cable to an HDMI input on your monitor or TV.
- For triple display setup, use the second HDMI port and the full-function Type-C port with appropriate adapters/cables.

Image 3.1: The NIMO Mini-PC MPL2R connected to three external monitors, demonstrating its triple 4K display capability.
3.2 பெரிஃபெரல்களை இணைக்கிறது
- USB சாதனங்கள்: உங்கள் விசைப்பலகை, சுட்டி மற்றும் பிற USB சாதனங்களை கிடைக்கக்கூடிய USB 3.0 போர்ட்களுடன் இணைக்கவும்.
- ஆடியோ: Connect speakers or headphones to the 3.5mm audio jack.
- நெட்வொர்க்: For a wired connection, connect an Ethernet cable to the Gigabit Ethernet port.
3.3 மின் இணைப்பு
- Connect the power adapter to the DC input port on the Mini-PC.
- பவர் அடாப்டரை ஒரு சுவர் கடையில் செருகவும்.
3.4 VESA மவுண்ட் நிறுவல் (விரும்பினால்)
The included VESA mount allows you to attach the Mini-PC to the back of a compatible monitor, saving desk space.
- Attach the VESA mount bracket to the back of your monitor using the provided screws.
- Slide the NIMO Mini-PC onto the mounted bracket until it clicks securely into place.
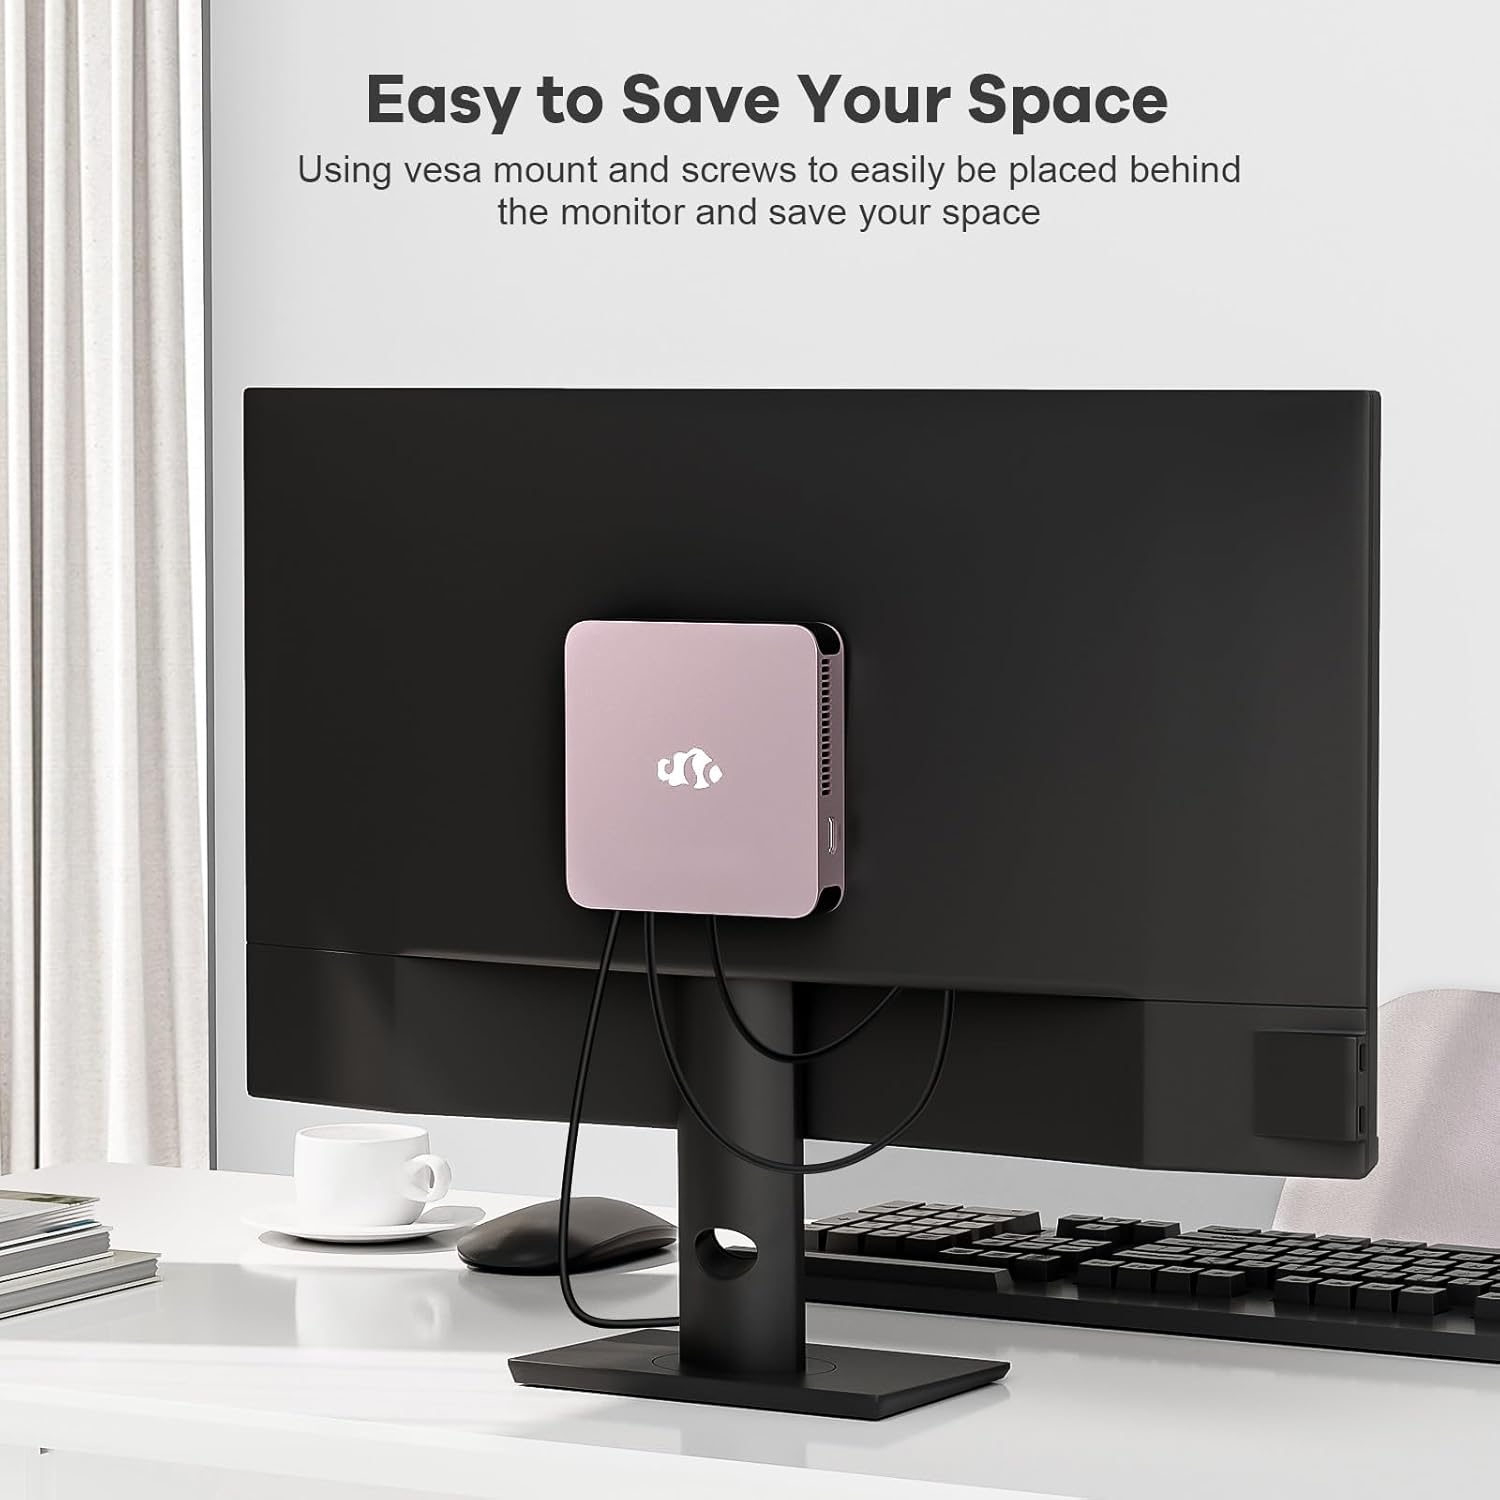
Image 3.2: The NIMO Mini-PC MPL2R shown mounted on the back of a monitor, illustrating its space-saving VESA mount capability.
4. இயக்க வழிமுறைகள்
4.1 பவர் ஆன்/ஆஃப்
- பவர் ஆன்: Press the power button located on the front of the Mini-PC. The power indicator light will illuminate.
- பவர் ஆஃப்: To shut down the system, use the operating system's shutdown function. For a forced shutdown, press and hold the power button for approximately 5 seconds.
4.2 தொடக்க துவக்கம் மற்றும் இயக்க முறைமை
The NIMO Mini-PC comes with a pre-installed operating system. Upon first boot, follow the on-screen instructions to complete the initial setup, including language selection, network configuration, and user account creation.
4.3 வயர்லெஸ் இணைப்பு
- வைஃபை 6: To connect to a wireless network, access the network settings in your operating system, select your desired WiFi network, and enter the password.
- புளூடூத் 5.2: To pair Bluetooth devices (e.g., keyboard, mouse, headphones), enable Bluetooth in your operating system settings and follow the pairing instructions for your specific device.

Image 4.1: The NIMO Mini-PC MPL2R depicted in multiple usage scenarios, including business meetings, graphic design, home theater, and office work, highlighting its versatility.
5. விவரக்குறிப்புகள்
Detailed technical specifications for the NIMO Mini-PC MPL2R:
| அம்சம் | விவரக்குறிப்பு |
|---|---|
| செயலி | Intel N100 (4 Cores, 4 Threads, up to 3.4GHz, 6MB Cache) |
| கிராபிக்ஸ் | Intel UHD Graphics (up to 750MHz) |
| ரேம் | 16GB DDR5 (LPDDR5) |
| சேமிப்பு | 512GB M.2 SSD (PCIe x2) + 256GB Micro SD |
| காட்சி வெளியீடு | 2x HDMI (4K@60Hz), 1x Full-function Type-C (4K@60Hz) - Triple Display Support |
| வயர்லெஸ் இணைப்பு | வைஃபை 6, புளூடூத் 5.2 |
| துறைமுகங்கள் | 4x USB 3.0, 1x Full-function Type-C, 2x HDMI, 1x Gigabit Ethernet, 1x 3.5mm Audio Jack, 1x Micro SD Card Slot |
| இயக்க முறைமை | System (Pre-installed) |
| பரிமாணங்கள் (LxWxH) | 4.72 x 4.72 x 0.91 அங்குலம் |
| பொருளின் எடை | 1.65 பவுண்டுகள் |
| சக்தி ஆதாரம் | DC |

Image 5.1: Dimensions of the NIMO Mini-PC MPL2R, illustrating its compact size relative to common objects like a pen and a coin.

Image 5.2: Diagram illustrating the internal cooling structure of the NIMO Mini-PC MPL2R, featuring a fan with speeds up to 5300 RPM for efficient heat dissipation.
6. பராமரிப்பு
- சுத்தம்: Use a soft, dry cloth to clean the exterior of the Mini-PC. Avoid using liquid cleaners or abrasive materials. Ensure ventilation openings are free from dust and debris.
- மென்பொருள் புதுப்பிப்புகள்: உகந்த செயல்திறன் மற்றும் பாதுகாப்பை உறுதிசெய்ய உங்கள் இயக்க முறைமை மற்றும் இயக்கிகளை தொடர்ந்து புதுப்பிக்கவும்.
- காற்றோட்டம்: Ensure the Mini-PC is placed in a well-ventilated area to prevent overheating. Do not block the air vents.
- சேமிப்பு: Avoid placing heavy objects on the Mini-PC. Store it in a cool, dry environment when not in use.
7. சரிசெய்தல்
This section addresses common issues you might encounter with your NIMO Mini-PC.
7.1 சக்தி இல்லை
- Ensure the power adapter is securely connected to both the Mini-PC and a working power outlet.
- மற்றொரு சாதனத்தை இணைப்பதன் மூலம் மின் நிலையம் செயல்படுகிறதா என்பதை சரிபார்க்கவும்.
7.2 காட்சி வெளியீடு இல்லை
- Check that the HDMI or Type-C cable is firmly connected to both the Mini-PC and the monitor.
- மானிட்டர் இயக்கப்பட்டிருப்பதை உறுதிசெய்து, சரியான உள்ளீட்டு மூலத்திற்கு அமைக்கவும் (எ.கா., HDMI 1, HDMI 2).
- வேறு ஒரு காட்சியுடன் இணைக்க முயற்சிக்கவும் அல்லது வேறு ஒரு கேபிளைப் பயன்படுத்தி பழுதடைந்த கூறுகளை நிராகரிக்கவும்.
7.3 இணைய இணைப்பு இல்லை
- கம்பி: Ensure the Ethernet cable is properly connected and your router is functioning.
- வயர்லெஸ்: Verify that WiFi is enabled in the operating system, you are connected to the correct network, and the password is entered correctly. Restart your router if necessary.
7.4 Peripherals Not Responding
- Try connecting USB devices to different USB ports.
- For Bluetooth devices, ensure they are in pairing mode and Bluetooth is enabled on the Mini-PC.
- Check device drivers in the operating system's device manager.
8. உத்தரவாதம் மற்றும் ஆதரவு
NIMO is committed to providing reliable products and excellent customer service.
8.1 உத்தரவாதத் தகவல்
Your NIMO Mini-PC MPL2R comes with a 2-year technical support warranty. This warranty covers manufacturing defects and technical issues under normal use conditions.
8.2 திரும்பக் கொள்கை
A 90 நாள் ரிட்டர்ன் பாலிசி is offered, allowing for returns or exchanges within 90 days of purchase.
8.3 தொழில்நுட்ப ஆதரவு
If you encounter any problems or have questions regarding your NIMO Mini-PC, please contact our professional after-sales team. Our computer experts are available to provide technical support and repair services.
- தொடர்பு மின்னஞ்சல்: service@nimopc.com
- சேவை கிடைக்கும் தன்மை: 24-hour service

படம் 8.1: முடிந்ததுview of NIMO's customer service, highlighting domestically partial assembly, 90-day returns, and 2-year support.