1. தயாரிப்பு முடிந்துவிட்டதுview
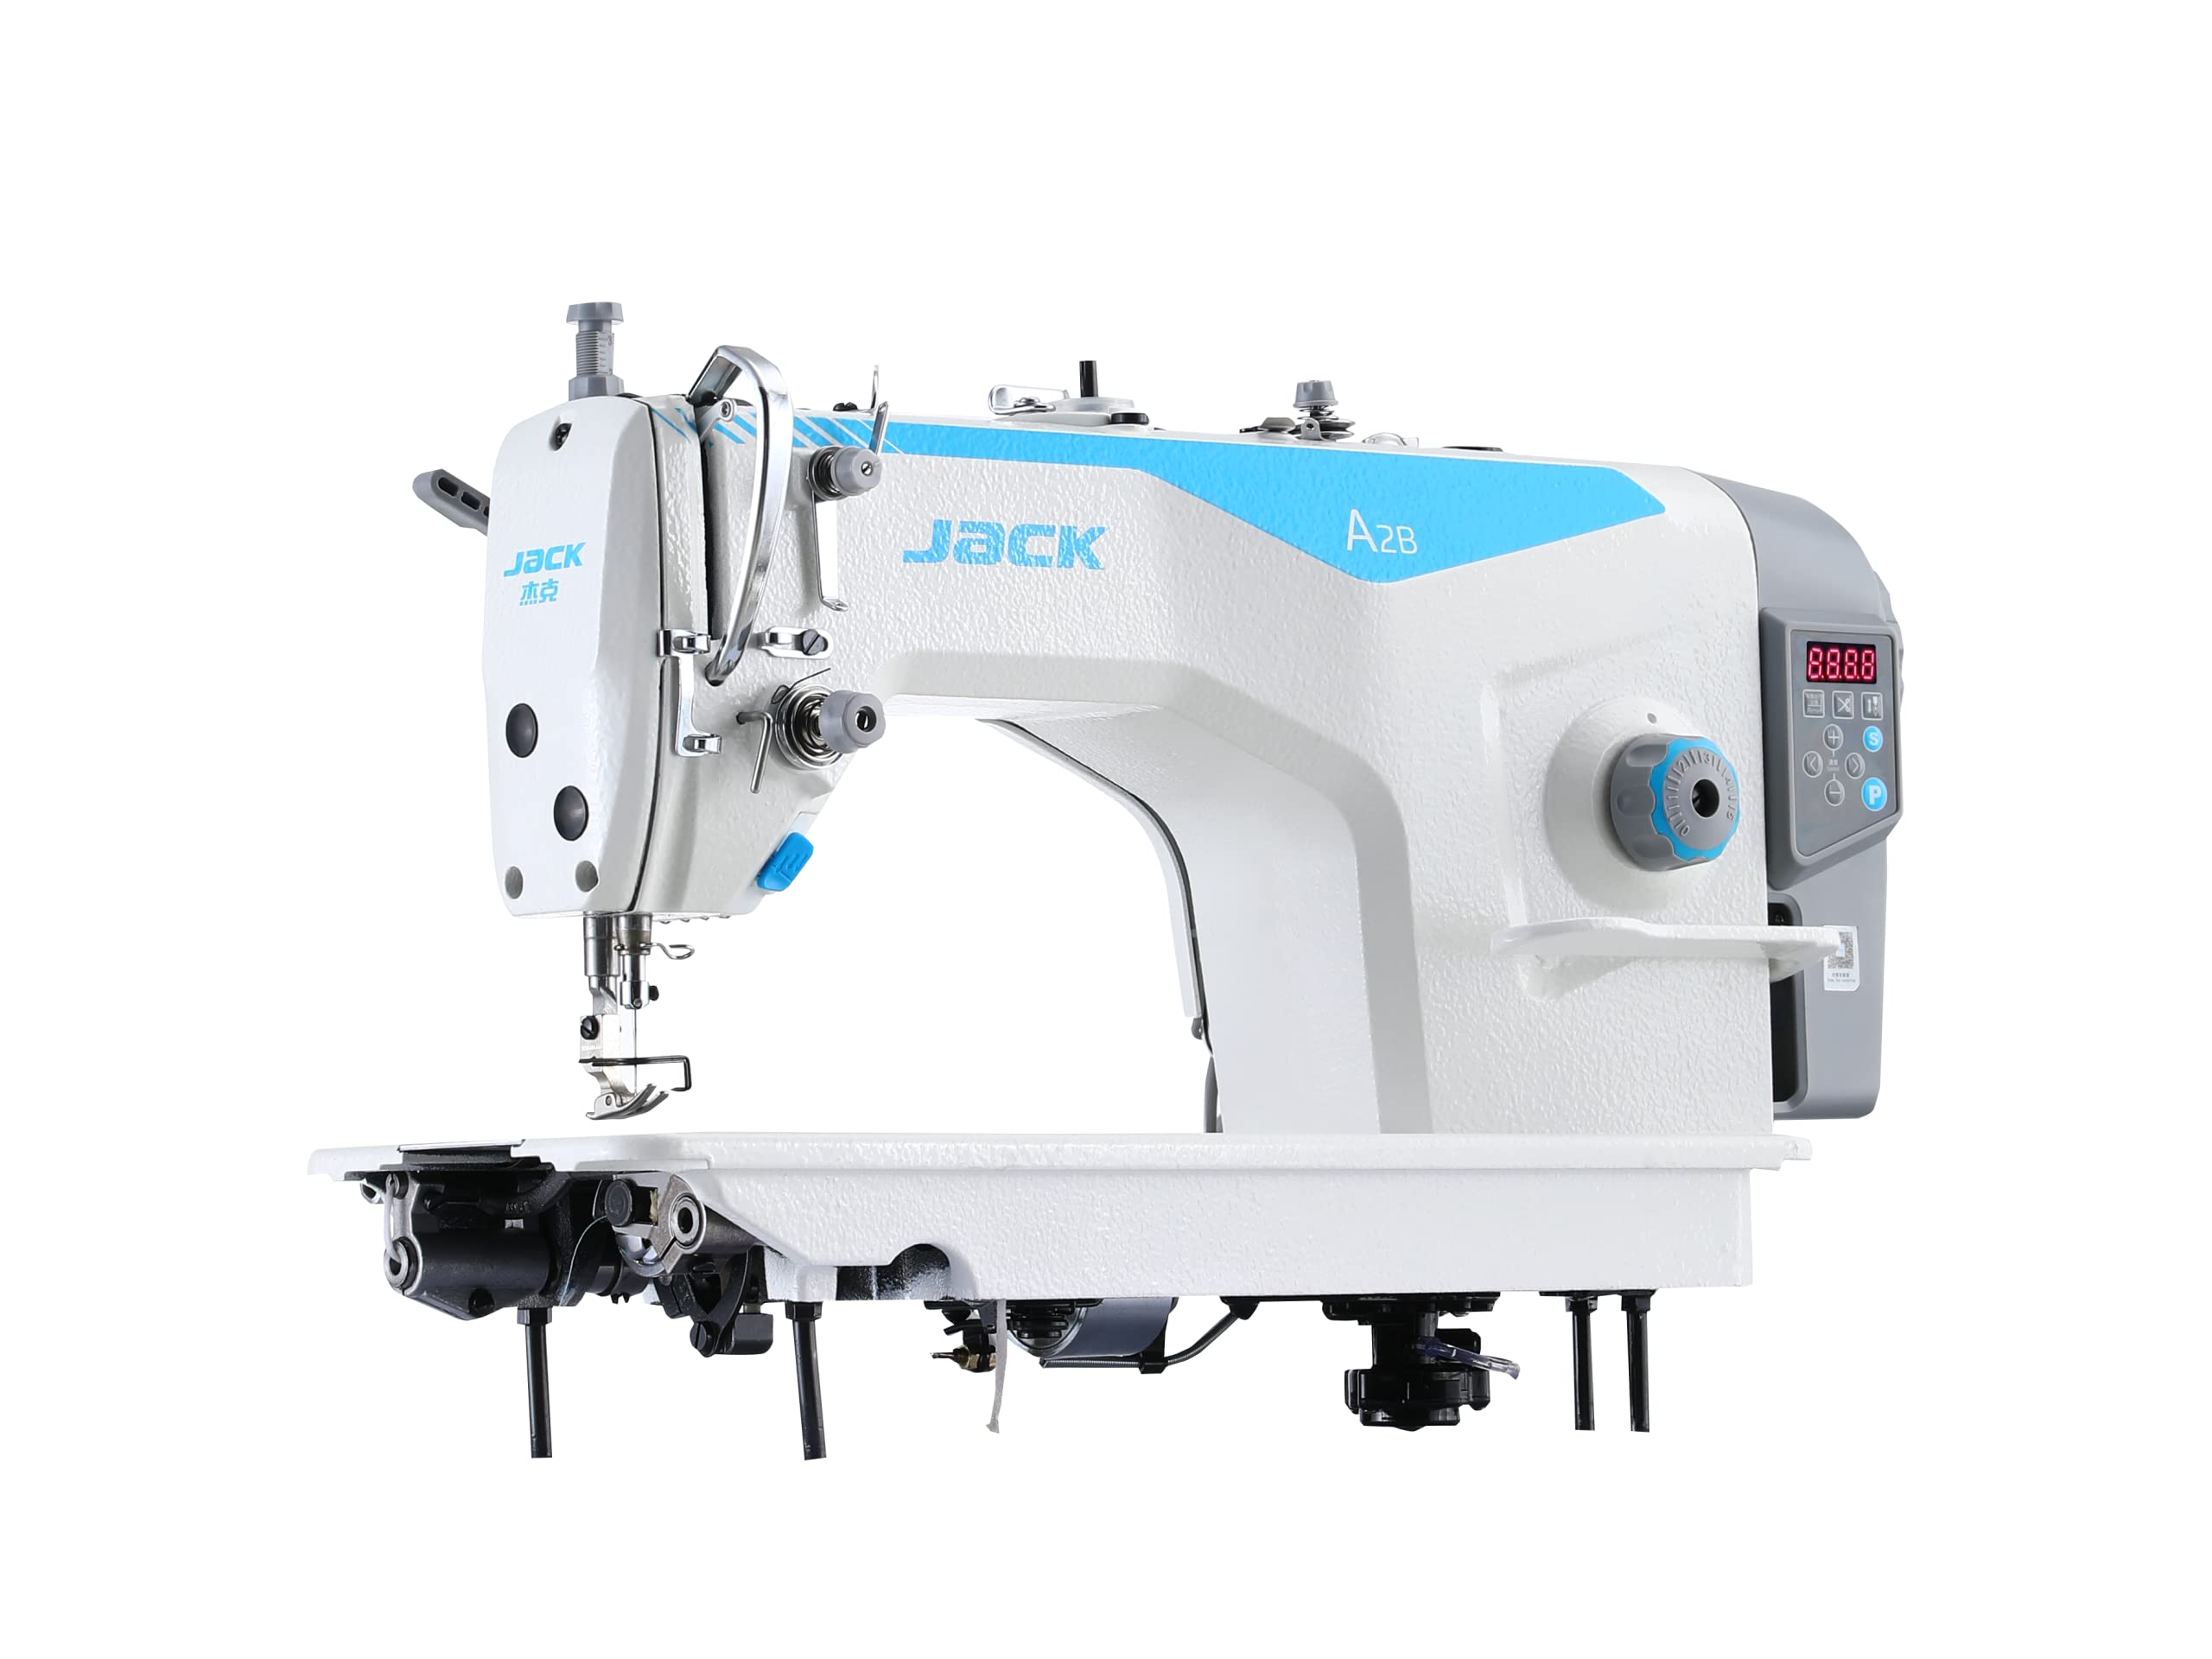
The JACK A2B Digital Industrial Sewing Machine is engineered for high-performance and reliability in professional and manufacturing environments. This machine integrates advanced digital technology with robust construction, making it suitable for a wide range of heavy-duty sewing applications.
முக்கிய அம்சங்கள் அடங்கும்:
- நீடித்த கட்டுமானம்: Built with a cast aluminum frame and stainless steel base for long-term use.
- அதிவேக செயல்பாடு: Capable of up to 5500 stitches per minute, with adjustable stitch length up to 6mm.
- Advanced Digital Features: Includes automatic needle threading, an integrated stitch regulator, and needle up/down functionality for precise control.
- பல்துறை பயன்பாடுகள்: Ideal for apparel manufacturing, quilting, home decor, and heavy fabric sewing.
- மேம்படுத்தப்பட்ட பார்வை: Equipped with a bright LED light to illuminate the work area.

Figure 1: The JACK A2B Digital Industrial Sewing Machine.
2. பாதுகாப்பு தகவல்
Read all instructions before operating the machine. Failure to follow safety guidelines may result in injury or damage to the machine.
- Always disconnect the machine from the power supply before cleaning, servicing, or when not in use.
- Keep fingers and hands away from the needle, presser foot, and other moving parts during operation.
- Do not operate the machine with damaged cords or if it has been dropped or damaged.
- இயந்திரம் ஒரு நிலையான, நிலை மேற்பரப்பில் வைக்கப்பட்டுள்ளதா என்பதை உறுதிப்படுத்தவும்.
- பரிந்துரைக்கப்பட்ட பாகங்கள் மற்றும் இணைப்புகளை மட்டும் பயன்படுத்தவும்.
- செயல்பாட்டின் போது குழந்தைகள் மற்றும் செல்லப்பிராணிகளை இயந்திரத்திலிருந்து விலக்கி வைக்கவும்.
3. அமைவு வழிகாட்டி
3.1 பேக்கிங் மற்றும் பிளேஸ்மெண்ட்
Carefully remove all packaging materials. Place the sewing machine on a sturdy, level table or stand. Ensure adequate space around the machine for comfortable operation and material handling.
3.2 மின் இணைப்பு
Connect the power cord to a grounded electrical outlet. The machine operates on a corded electric power source. Verify that the voltagஇ உங்கள் உள்ளூர் மின்சார விநியோகத்துடன் பொருந்துகிறது.
3.3 ஆரம்ப சரிபார்ப்புகள்
- Check that the needle is correctly installed and not bent.
- Ensure the bobbin is properly wound and inserted.
- Verify that all covers and guards are securely in place.
4. இயக்க வழிமுறைகள்
4.1 கண்ட்ரோல் பேனல் முடிந்துவிட்டதுview
The digital control panel provides access to various machine functions and settings. Refer to the image below for button identification.
படம் 2: டிஜிட்டல் கட்டுப்பாட்டுப் பலகம்.
- டிஜிட்டல் காட்சி: Shows current stitch length, speed, and error codes.
- வேக சரிசெய்தல்: Use '+' and '-' buttons to increase or decrease sewing speed.
- Stitch Length Adjustment: Use dedicated buttons to set stitch length up to 6mm.
- Needle Up/Down: Controls the final resting position of the needle.
- Automatic Thread Trimmer: Activates the automatic thread cutting function.
4.2 இயந்திரத்தில் நூல் பதித்தல்
Follow these steps to thread the upper thread:
- நூல் ஸ்பூலை ஸ்பூல் பின்னில் வைக்கவும்.
- Guide the thread through the thread guides as indicated in the machine's physical markings.
- Pass the thread through the tension discs.
- Thread the take-up lever.
- Use the automatic needle threader or manually thread the needle from front to back.
4.3 பாபினை முறுக்குதல்
The machine features an integrated bobbin winder for convenience.

Figure 3: Bobbin Winder.
- பாபின் வைண்டர் ஸ்பிண்டில் ஒரு காலியான பாபினை வைக்கவும்.
- Guide the thread from the spool through the bobbin winding tension disc.
- Wrap the thread a few times around the bobbin.
- Push the bobbin winder spindle towards the right to engage.
- Start the machine; the bobbin will wind automatically. Stop when full.
4.4 LED ஒளியைப் பயன்படுத்துதல்
The integrated LED light illuminates the sewing area, improving visibility and reducing eye strain.

Figure 4: LED Work Light.
The LED light can typically be turned on or off via a dedicated button on the machine head or control panel, or it may activate automatically when the machine is in operation.
5. பராமரிப்பு
வழக்கமான பராமரிப்பு உங்கள் தையல் இயந்திரத்தின் நீண்ட ஆயுளையும் உகந்த செயல்திறனையும் உறுதி செய்கிறது.
5.1 சுத்தம் செய்தல்
- தினசரி: Remove lint and dust from the bobbin case, feed dogs, and needle plate area using a small brush.
- வாராந்திரம்: Clean the entire machine surface with a soft, dry cloth.
- மாதாந்திர: For thorough cleaning, consult a qualified technician or refer to the detailed cleaning instructions in the full service manual.
5.2 உயவு
Industrial sewing machines require regular lubrication. Refer to the machine's lubrication points diagram in the comprehensive manual. Use only high-quality sewing machine oil. Over-oiling can cause issues.
5.3 ஊசி மாற்று
Replace the needle regularly, especially if it becomes bent, dull, or if you experience skipped stitches. Use the correct needle type (DBx1 11-18#) for your fabric and thread.

Figure 5: Needle and Presser Foot Area.
6. சரிசெய்தல்
இந்தப் பிரிவு நீங்கள் சந்திக்கக்கூடிய பொதுவான சிக்கல்களைக் கையாள்கிறது.
| பிரச்சனை | சாத்தியமான காரணம் | தீர்வு |
|---|---|---|
| தவிர்க்கப்பட்ட தையல்கள் | தவறான ஊசி, வளைந்த ஊசி, தவறான நூல் பின்னல், தவறான இழுவிசை. | ஊசியை மாற்றவும், இயந்திரத்தை மீண்டும் நூல் செய்யவும், இழுவிசையை சரிசெய்யவும். |
| நூல் உடைப்பு | High tension, poor quality thread, burrs on needle plate, incorrect threading. | பதற்றத்தைக் குறைக்கவும், தரமான நூலைப் பயன்படுத்தவும், பர்ர்களைச் சரிபார்க்கவும், மீண்டும் நூலை இணைக்கவும். |
| சீரற்ற தையல்கள் | Incorrect tension, worn feed dogs, inconsistent fabric feeding. | Adjust tension, clean feed dogs, ensure consistent fabric handling. |
| இயந்திரம் தொடங்கவில்லை | No power, safety switch engaged, motor issue. | Check power connection, ensure safety switches are disengaged, consult technician. |
6.1 பிழை குறியீடுகள்
The digital display may show error codes to indicate specific issues.

Figure 6: E-04 High Voltage அலாரம்.
- E-04 (High Voltagஇ அலாரம்): Indicates an issue with the power supply or internal voltage regulation. Disconnect power, wait a few minutes, and reconnect. If the error persists, contact support.
- For other error codes, refer to the comprehensive service manual or contact customer support.
7. விவரக்குறிப்புகள்
Below are the general specifications for the JACK A2B Digital Industrial Sewing Machine.
| அம்சம் | விவரம் |
|---|---|
| பிராண்ட் | ஜாக் |
| மாதிரி | A2B |
| நிறம் | வெள்ளை |
| பொருளின் எடை | 65 கிலோகிராம் |
| பொருள் | Solid Alloy |
| தயாரிப்பு பரிமாணங்கள் (LxWxH) | 60D x 60W x 30H செ.மீ. |
| சக்தி ஆதாரம் | கம்பியூட்டப்பட்ட மின்சாரம் |
| மின்சார செயல்பாடு | ஆம் |
| Max. Stitch Speed | நிமிடத்திற்கு 5500 தையல்கள் |
| Max. Stitch Length | 6 மி.மீ |
| ஊசி வகை | DBx1 11-18# |
| பிரஷர் ஃபுட் லிஃப்ட் | 5-13 மிமீ |

படம் 7: விரிவான மாதிரி விவரக்குறிப்புகள்.
8. உத்தரவாதம் மற்றும் ஆதரவு
8.1 உத்தரவாதத் தகவல்
The JACK A2B Digital Industrial Sewing Machine comes with a 3 வருட உத்தரவாதம். This warranty covers manufacturing defects and ensures ongoing support and maintenance if required. Please retain your proof of purchase for warranty claims.
8.2 வாடிக்கையாளர் ஆதரவு
For technical assistance, troubleshooting beyond this manual, or warranty service, please contact your authorized JACK dealer or the manufacturer's customer support. Contact details can typically be found on the product packaging or the official JACK webதளம்.