
1. அறிமுகம்
Thank you for choosing the BOSGAME P3 Mix Mini PC. This manual provides essential information for setting up, operating, maintaining, and troubleshooting your new mini PC. Please read it carefully before use and retain it for future reference.
2. பெட்டியில் என்ன இருக்கிறது
கீழே பட்டியலிடப்பட்டுள்ள அனைத்து பொருட்களும் உங்கள் தொகுப்பில் சேர்க்கப்பட்டுள்ளதா என்பதை சரிபார்க்கவும்:
- 1x P3 MIX Mini PC
- 1x HDMI கேபிள்
- 1x VESA Mount & Screws
- 1x பவர் அடாப்டர்
- 1x பயனர் கையேடு
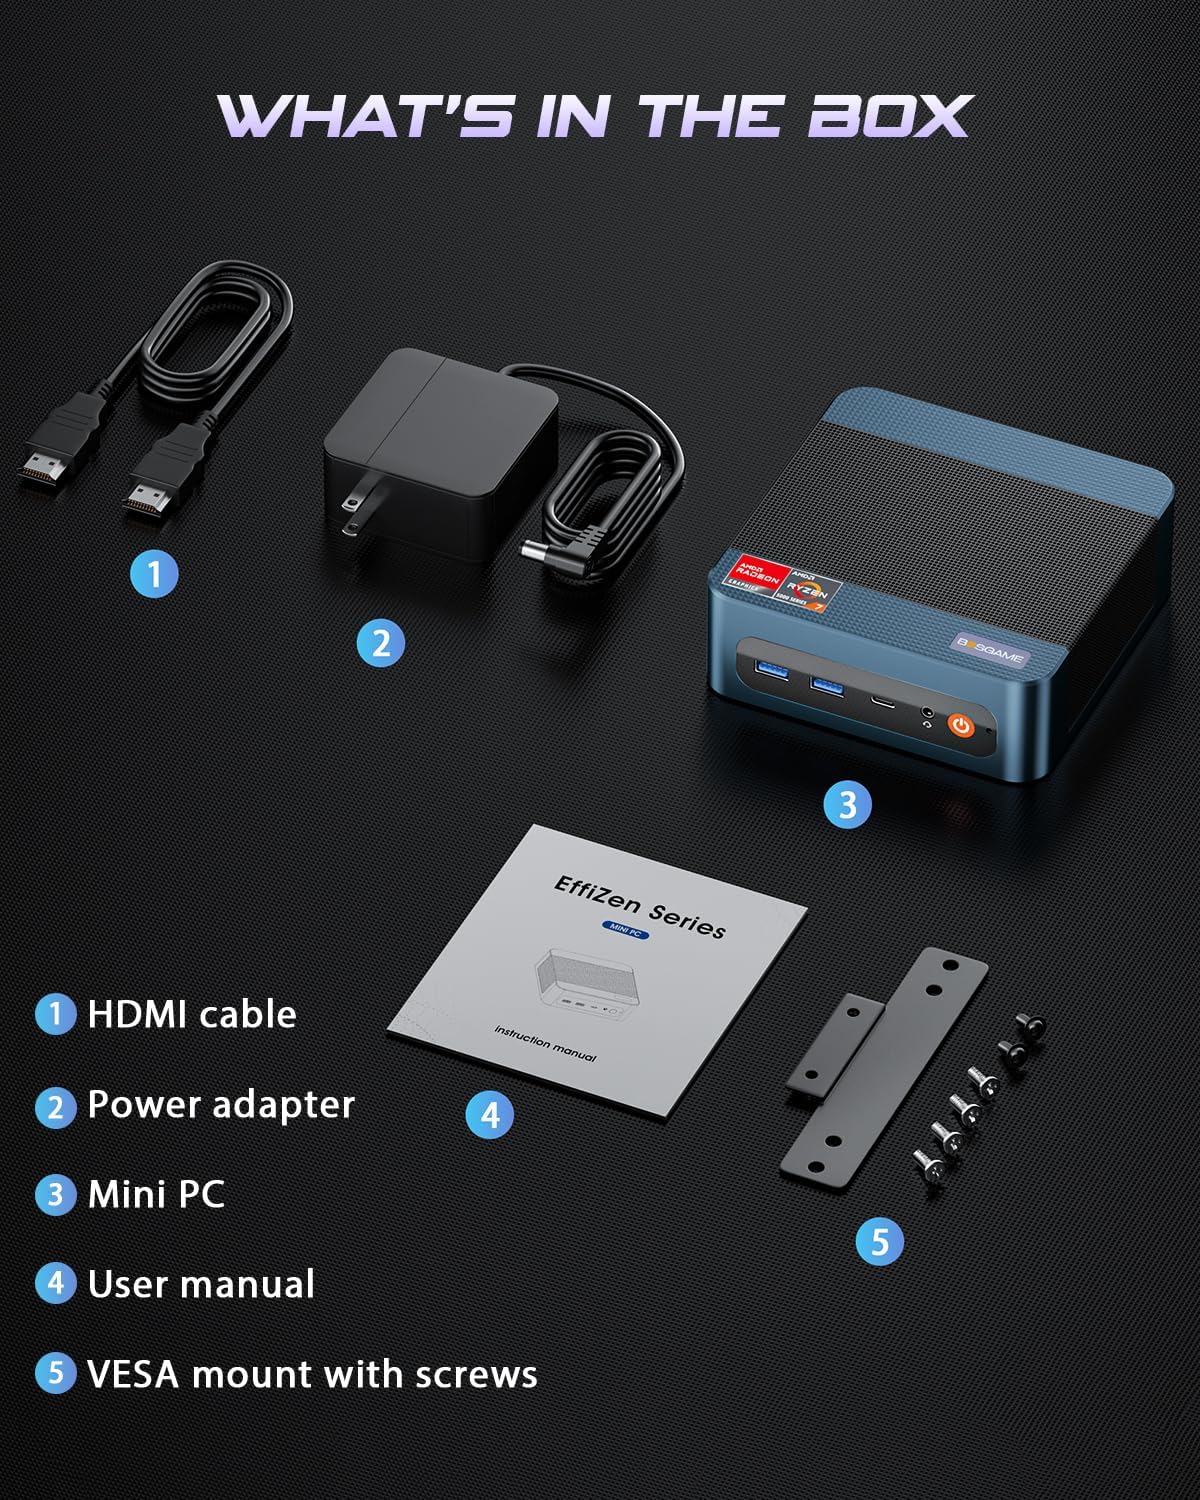
This image displays the BOSGAME P3 Mix Mini PC and its included accessories: an HDMI cable, a power adapter, the mini PC unit, a user manual, and a VESA mount with screws for installation.
3. தயாரிப்பு முடிந்துவிட்டதுview
The BOSGAME P3 Mix Mini PC is a compact desktop computer designed for various applications, from home office tasks to gaming and 4K video editing. It features a powerful AMD Ryzen 7640HS processor and Radeon 760M graphics.

This image highlights the core specifications of the mini PC, including its AMD Ryzen 5 7640HS processor, AMD Radeon 760M GPU, 16GB DDR5 RAM, 512GB M.2 PCIe 3.0 x4 SSD, support for 8K 60Hz display, USB-4 (40Gbps) connectivity, Wi-Fi 6E AX210, and Bluetooth 5.2.
This diagram illustrates the various input/output ports available on the mini PC, including power input, dual 2.5G LAN, HDMI, DisplayPort, USB 2.0, USB 4, USB 3.2 ports, and a 3.5mm audio jack.
Video 3.1: BOSGAME Ryzen 5 7640HS MINI PC Overview. இந்த காணொளி ஒரு காட்சி விளக்கத்தை வழங்குகிறது.view of the BOSGAME P3 Mix Mini PC, showcasing its compact design, internal components, port layout, and connectivity features.
4. அமைவு வழிமுறைகள்
4.1 பவர் அடாப்டரை இணைத்தல்
- Connect the power adapter cable to the DC 19V 6.3 port on the rear of the mini PC.
- பவர் அடாப்டரை ஒரு சுவர் கடையில் செருகவும்.
4.2 ஒரு காட்சியுடன் இணைத்தல்
The P3 Mix Mini PC supports triple display output via HDMI, DisplayPort, and USB4.
- Connect one end of an HDMI cable to the HDMI port on the mini PC and the other end to your monitor.
- For additional displays, connect a DisplayPort cable to the DP port and/or a USB4 cable to the USB4 port, then connect to your respective monitors.
- Ensure your monitors are powered on and set to the correct input source.

This image demonstrates how to set up a triple display configuration with the mini PC, utilizing the DP 1.4, HDMI 2.0, and USB4 ports to connect to multiple monitors.
4.3 பெரிஃபெரல்களை இணைக்கிறது
- Connect your USB keyboard and mouse to any available USB ports (USB 2.0, USB 3.2).
- கம்பி நெட்வொர்க் அணுகலுக்கு, 2.5G LAN போர்ட்களில் ஒன்றிற்கு ஈதர்நெட் கேபிளை இணைக்கவும்.
- For audio output, connect speakers or headphones to the 3.5mm audio jack.
4.4 ஆரம்ப பவர் ஆன்
- After connecting all necessary cables, press the power button located on the front of the mini PC.
- The system will boot up, and you should see the operating system on your connected display(s).
5. இயக்க வழிமுறைகள்
5.1 பவர் ஆன்/ஆஃப்
- பவர் ஆன் செய்ய: ஆற்றல் பொத்தானை ஒரு முறை அழுத்தவும்.
- மூடுவதற்கு: From the operating system, select 'Shut Down'. Alternatively, press and hold the power button for 5 seconds to force a shutdown (use only when necessary).
- மறுதொடக்கம் செய்ய: From the operating system, select 'Restart'.
5.2 நெட்வொர்க் இணைப்பு
- கம்பி இணைப்பு: Connect an Ethernet cable to one of the two 2.5G LAN ports. The system will automatically detect the connection.
- வயர்லெஸ் இணைப்பு (வைஃபை 6E): Navigate to your operating system's network settings, select the desired Wi-Fi network, and enter the password.
5.3 புளூடூத் இணைப்பு
The mini PC supports Bluetooth 5.2 for connecting wireless peripherals.
- உங்கள் புளூடூத் சாதனம் இணைத்தல் பயன்முறையில் இருப்பதை உறுதிசெய்யவும்.
- On your mini PC, go to the operating system's Bluetooth settings.
- தேடுங்கள் and select your device to pair.
6. பராமரிப்பு மற்றும் மேம்பாடுகள்
6.1 RAM and SSD Upgrades
The BOSGAME P3 Mix Mini PC allows for easy upgrades of its DDR5 RAM and M.2 PCIe SSD. Always power off and unplug the device before performing any internal maintenance.

This image provides a visual guide for upgrading the RAM and SSD. The process involves removing screws, carefully opening the base plate, repositioning the system fan, and then replacing the memory modules and SSD.
- பவர் ஆஃப் மற்றும் அன்ப்ளக்: Ensure the mini PC is completely powered off and disconnected from the power source.
- திருகுகளை அகற்று: Locate and remove the screws securing the bottom panel.
- Open Base Plate: Carefully open the base plate to access the internal components.
- அணுகல் கூறுகள்: You may need to gently move the system fan or other components to gain full access to the RAM and SSD slots.
- Replace RAM/SSD: Install new DDR5 SO-DIMM RAM modules into the dual channel slots (up to 64GB supported) or a new M.2 2280 NVMe PCIe 3.0 SSD (up to 4TB per slot, 8TB total capacity).
- மீண்டும் ஒன்று சேர்: Carefully reassemble the mini PC, ensuring all connections are secure and screws are tightened.
6.2 சுத்தம் செய்தல்
- Regularly clean the exterior of the mini PC with a soft, dry cloth.
- Use compressed air to clear dust from ventilation grilles to ensure optimal airflow and prevent overheating. Do not insert objects into the vents.
7. சரிசெய்தல்
7.1 சக்தி இல்லை
- பவர் அடாப்டர் மினி பிசி மற்றும் வேலை செய்யும் பவர் அவுட்லெட் இரண்டிலும் பாதுகாப்பாக இணைக்கப்பட்டுள்ளதா என்பதை உறுதிப்படுத்தவும்.
- மற்றொரு சாதனத்தை இணைப்பதன் மூலம் மின் நிலையம் செயல்படுகிறதா என்பதை சரிபார்க்கவும்.
- கிடைத்தால் மற்றும் இணக்கமாக இருந்தால் வேறு பவர் அடாப்டரை முயற்சிக்கவும்.
7.2 காட்சி வெளியீடு இல்லை
- Check all display cable connections (HDMI, DP, USB4) between the mini PC and the monitor(s).
- Ensure the monitor(s) are powered on and set to the correct input source.
- Try connecting to a single monitor using a different cable or port.
- If you recently reinstalled the operating system, ensure all display drivers are correctly installed. Some users have reported needing specific drivers from the manufacturer for optimal display performance.
7.3 நெட்வொர்க் இணைப்பு சிக்கல்கள்
- கம்பி: ஈதர்நெட் கேபிள் இணைப்பைச் சரிபார்க்கவும். உங்கள் ரூட்டர்/மோடம் சரியாக வேலை செய்கிறதா எனச் சரிபார்க்கவும்.
- வயர்லெஸ்: Ensure Wi-Fi is enabled in your operating system settings. Re-enter the Wi-Fi password. Restart your router/modem.
7.4 செயல்திறன் சிக்கல்கள்
- பின்னணியில் இயங்கும் தேவையற்ற பயன்பாடுகளை மூடு.
- Ensure the mini PC has adequate ventilation and is not overheating.
- Check for operating system updates and driver updates.
- Verify that the RAM and SSD are properly seated if you have performed an upgrade.
8. விவரக்குறிப்புகள்
| அம்சம் | விவரக்குறிப்பு |
|---|---|
| பிராண்ட் | போஸ்கேம் |
| மாதிரி பெயர் | P3 |
| CPU மாதிரி | AMD Ryzen 5 7640HS (6C/12T, up to 5.0 GHz) |
| கிராபிக்ஸ் கோப்ராசசர் | Radeon 760M (Integrated) |
| ரேம் நினைவகம் | 16GB DDR5 4800MHz (2x8GB), Max 64GB |
| நினைவக சேமிப்பு திறன் | 512GB PCIe 3.0 SSD (M.2 2280), Max 8TB (2x4TB) |
| இயக்க முறைமை | OS11 Support Win/Ubuntu/Linux |
| வீடியோ வெளியீடு இடைமுகம் | HDMI 2.0, DisplayPort 1.4, USB4 (8K@60Hz) |
| இணைப்பு தொழில்நுட்பம் | Dual 2.5G LAN, Wi-Fi 6E (802.11ax), Bluetooth 5.2 |
| USB போர்ட்கள் | 3x USB 3.2 (10Gbps), 1x USB 4 (40Gbps), 2x USB 2.0 (480Mbps) |
| ஆடியோ வெளியீடு | 3.5 மிமீ ஆடியோ ஜாக் |
| பொருளின் எடை | 1.26 கிலோகிராம் |
| பவர் பிளக் வகை | வகை A - 2 பின் (வட அமெரிக்கா) |
9. உத்தரவாதம் மற்றும் ஆதரவு
9.1 உத்தரவாதத் தகவல்
BOSGAME offers a 1-year limited warranty for the P3 Mix Mini PC. This warranty covers manufacturing defects and ensures product quality.
9.2 வாடிக்கையாளர் ஆதரவு
For any product-related inquiries, technical assistance, or warranty claims, please contact BOSGAME customer support. You can reach out via the following methods:
- மின்னஞ்சல்: Qingzhuomao@163.com
- ஆன்லைன்: Visit the BOSGAME store on Amazon or their official webஅடிக்கடி கேட்கப்படும் கேள்விகள் மற்றும் ஆதரவு ஆதாரங்களுக்கான தளம்.
A professional after-sales team is available to assist you with your needs.