அறிமுகம்
This manual provides essential information for the setup, operation, maintenance, and troubleshooting of your AWOW Mini PC, Model BA7. Please read these instructions carefully before using the device.

படம்: முடிந்ததுview of the AWOW BA7 Mini PC, highlighting its compact design and key features.
தொகுப்பு உள்ளடக்கங்கள்
தொகுப்பில் அனைத்து பொருட்களும் உள்ளதா என சரிபார்க்கவும்:
- AWOW BA7 Mini PC
- பவர் அடாப்டர்
- பெருகிவரும் திருகுகள்
- VESA மவுண்ட் பிராக்கெட்
- HDMI கேபிள்
- பயனர் கையேடு (இந்த ஆவணம்)

Image: Illustration of the AWOW BA7 Mini PC and its included accessories: power adapter, screws, VESA mount, HDMI cable, and user manual.
அமைவு வழிமுறைகள்
- சாதனங்களை இணைக்கவும்: Connect your keyboard, mouse, and monitor(s) to the appropriate ports on the Mini PC.
படம்: முன்பக்கம் view of the Mini PC showing the Power Button, Type-C port, USB 3.2 ports, and 3.5mm Audio Jack.

படம்: பின்புறம் view of the Mini PC showing the DC IN, DP1.2, HDMI2.0, USB 2.0 ports, and RJ45 LAN port.
- மின் இணைப்பு: மினி பிசியில் உள்ள DC IN போர்ட்டுடன் பவர் அடாப்டரை இணைக்கவும், பின்னர் அடாப்டரை ஒரு பவர் அவுட்லெட்டில் செருகவும்.
- பவர் ஆன்: மினி பிசியின் முன்புறத்தில் அமைந்துள்ள பவர் பட்டனை அழுத்தவும். சிஸ்டம் பூட் ஆகும்.
- ஆரம்ப அமைப்பு: மொழி, பகுதி, நெட்வொர்க் இணைப்பு மற்றும் பயனர் கணக்கு உருவாக்கம் உள்ளிட்ட Windows 11 Pro ஆரம்ப அமைப்பை முடிக்க திரையில் உள்ள வழிமுறைகளைப் பின்பற்றவும்.
- பிணைய இணைப்பு:
- கம்பி: Connect an Ethernet cable to the RJ45 LAN port for a stable wired connection.
- வயர்லெஸ்: During Windows setup or via Windows settings, connect to your Wi-Fi network using the built-in WiFi 6.
இயக்க வழிமுறைகள்
அடிப்படை செயல்பாடு
- பவர் ஆன்/ஆஃப்: Press the power button to turn on the PC. To shut down, use the Windows Start menu options (Shut down, Restart, Sleep). A short press on the power button can put the PC to sleep. A long press (approx. 5 seconds) will force a shutdown.
- காட்சி வெளியீடு: The Mini PC supports up to three 4K displays simultaneously via DP, HDMI, and USB-C. Connect your monitors and configure display settings in Windows.

Image: A user working with a triple monitor setup, demonstrating the Mini PC's multi-display capability.
- USB இணைப்பு: Utilize the USB 2.0 and USB 3.0 ports for connecting external devices such as external hard drives, USB flash drives, printers, and other peripherals. The Type-C port also supports data transfer and display output.
- ஆடியோ: ஹெட்ஃபோன்கள் அல்லது ஸ்பீக்கர்களை 3.5மிமீ ஆடியோ ஜாக்குடன் இணைக்கவும்.
மேம்பட்ட பயன்பாடு
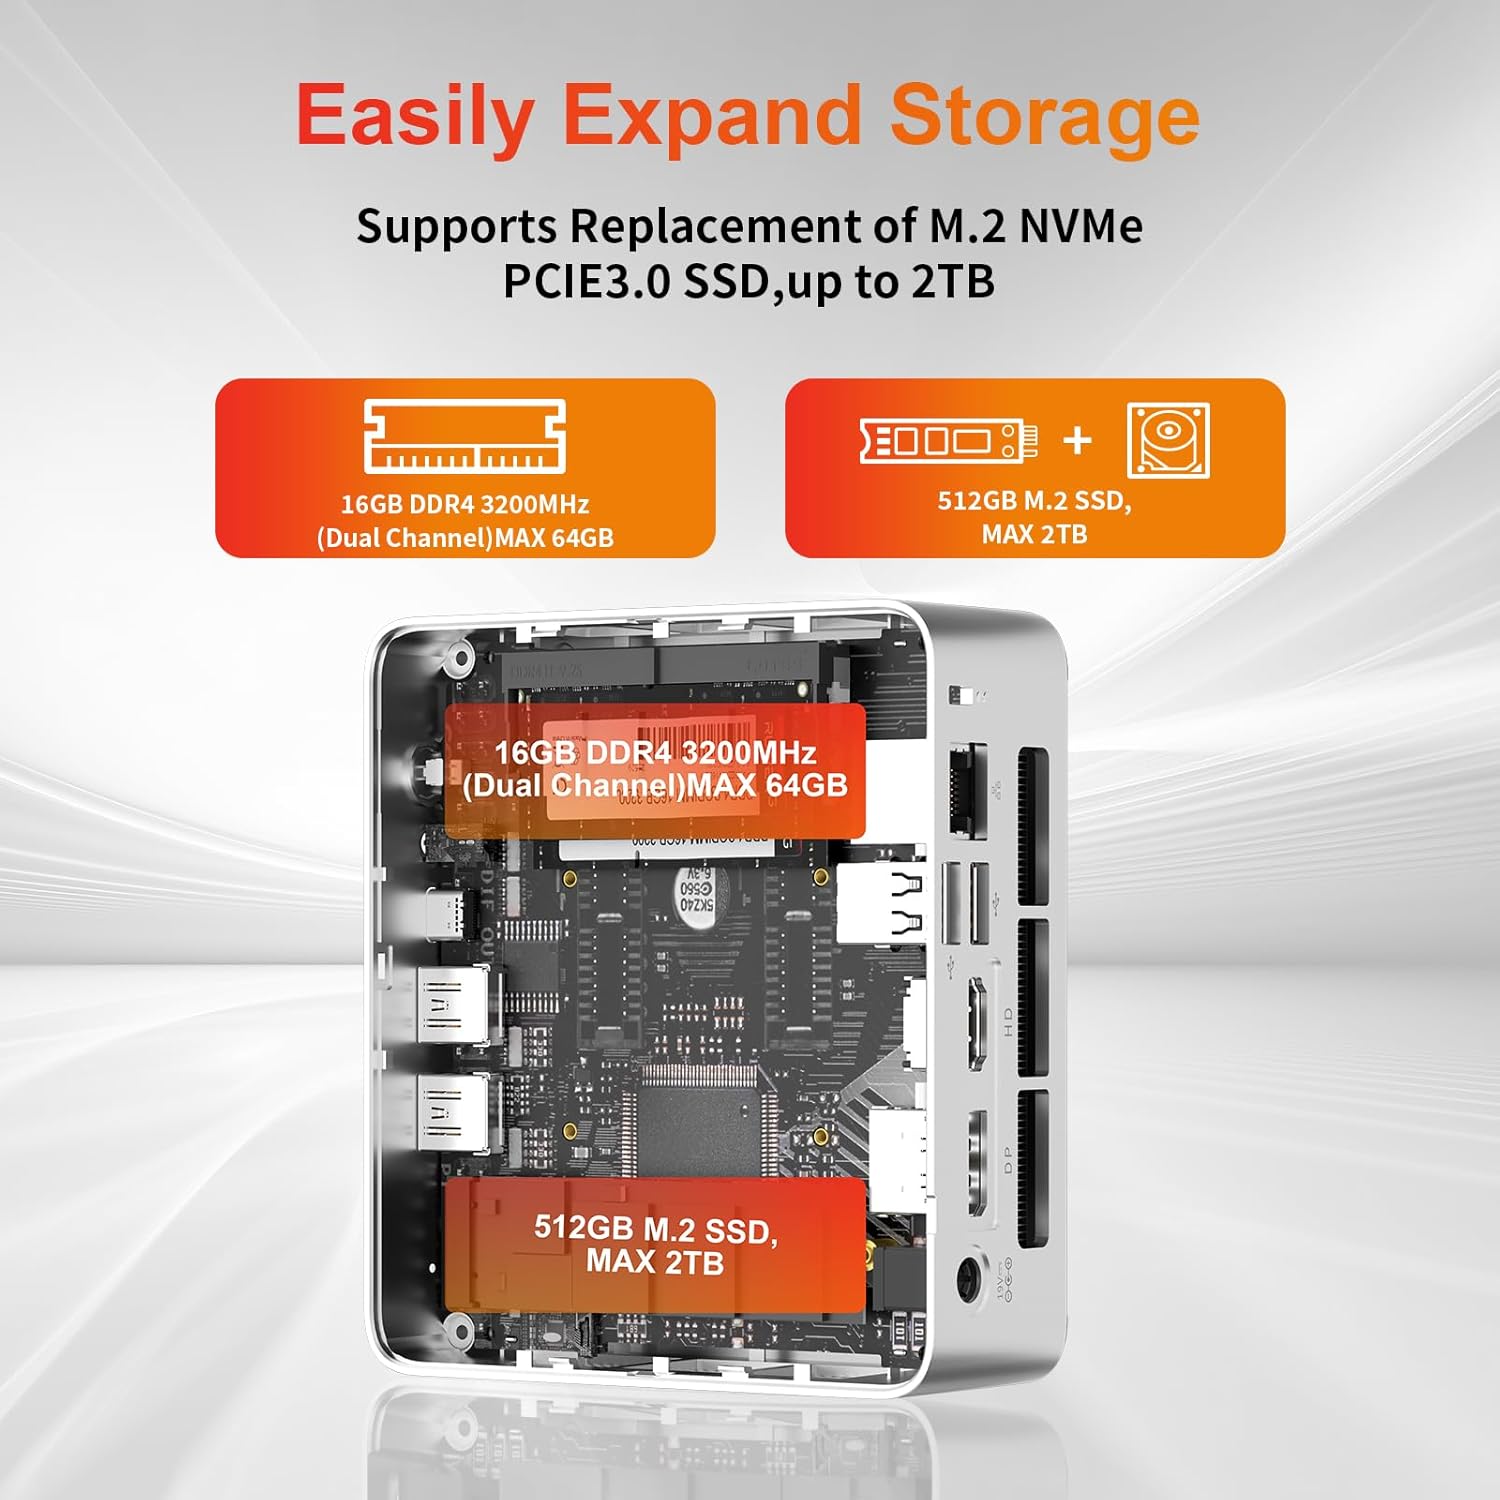
- சேமிப்பு விரிவாக்கம்: The Mini PC supports replacement of the M.2 NVMe PCIe 3.0 SSD up to 2TB. It also supports memory expansion up to 64GB DDR4.

Image: Diagram illustrating the internal components and options for expanding storage (M.2 SSD up to 2TB) and RAM (DDR4 up to 64GB).
- வெசா மவுண்டிங்: Use the included VESA mount bracket to attach the Mini PC to the back of a compatible monitor or to a wall mount, saving desk space.
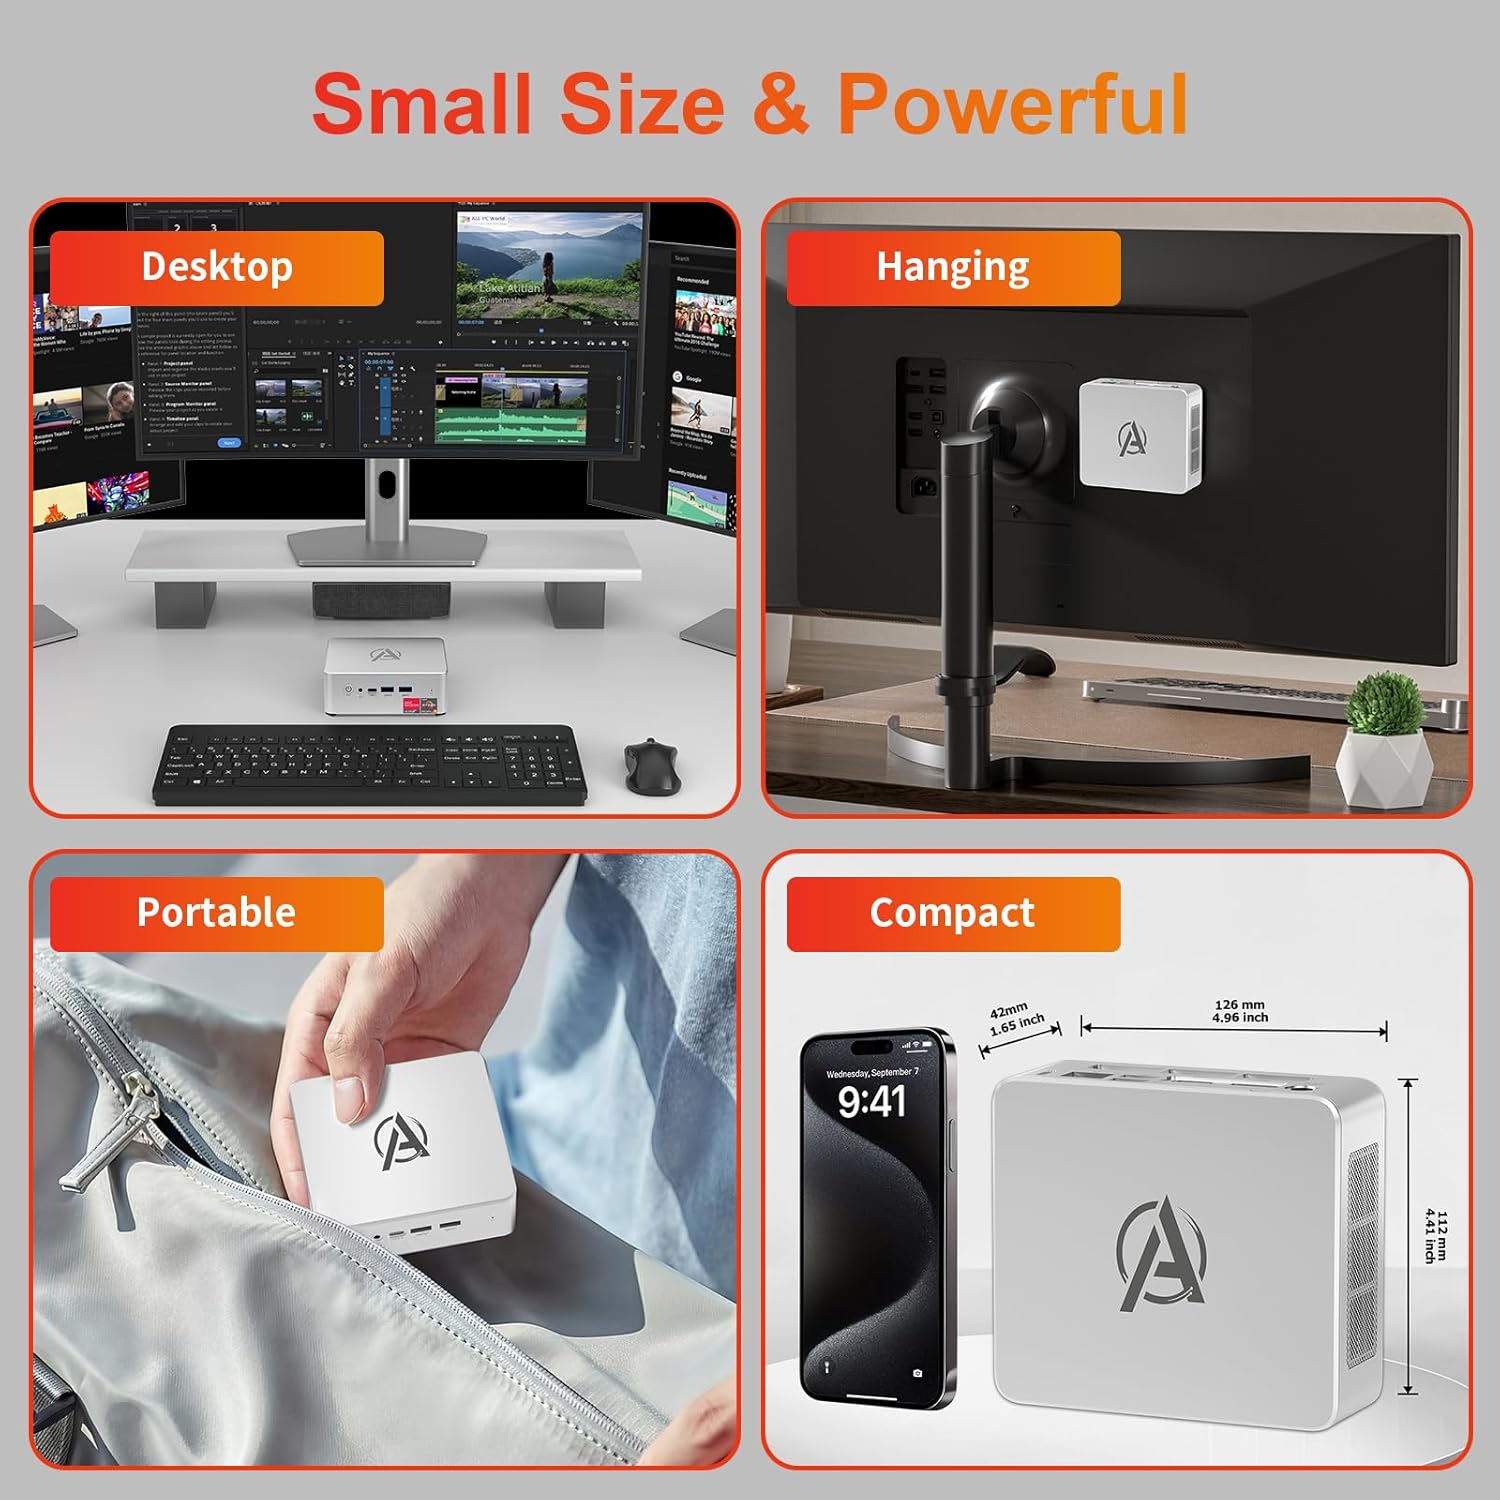
Image: Various usage scenarios for the Mini PC, including desktop, VESA-mounted behind a monitor, portable, and compact size comparison.
பராமரிப்பு
- சுத்தம்: Use a soft, dry cloth to clean the exterior of the Mini PC. Do not use liquid cleaners or aerosols. Ensure ventilation openings are free from dust.
- மென்பொருள் புதுப்பிப்புகள்: உகந்த செயல்திறன் மற்றும் பாதுகாப்பை உறுதிசெய்ய, விண்டோஸ் புதுப்பிப்புகள் மற்றும் இயக்கி புதுப்பிப்புகளை தவறாமல் சரிபார்த்து நிறுவவும்.
- வெப்ப மேலாண்மை: Ensure the Mini PC is placed in a well-ventilated area. Avoid blocking the air vents. The intelligent cooling system is designed for low noise and efficient heat dissipation.

Image: Diagram illustrating the internal cooling fan and heat sink, showing airflow for efficient heat dissipation.
- சேமிப்பு மேலாண்மை: தேவையற்றவற்றை அவ்வப்போது சுத்தம் செய்யுங்கள். files and applications to maintain system performance.
சரிசெய்தல்
- சக்தி இல்லை:
- பவர் அடாப்டர் மினி பிசி மற்றும் பவர் அவுட்லெட் இரண்டுடனும் பாதுகாப்பாக இணைக்கப்பட்டுள்ளதா எனச் சரிபார்க்கவும்.
- மின் நிலையம் செயல்படுவதை உறுதி செய்யவும்.
- வேறு பவர் அவுட்லெட்டை முயற்சிக்கவும்.
- காட்சி இல்லை:
- Verify that the HDMI/DP/USB-C cable is securely connected to both the Mini PC and the monitor.
- மானிட்டர் இயக்கப்பட்டிருப்பதை உறுதிசெய்து, சரியான உள்ளீட்டு மூலத்திற்கு அமைக்கவும்.
- வேறு டிஸ்ப்ளே கேபிள் அல்லது மானிட்டரை முயற்சி செய்து பாருங்கள், கிடைத்தால்.
- மெதுவான செயல்திறன்:
- பின்னணியில் இயங்கும் தேவையற்ற பயன்பாடுகளை மூடு.
- நிலுவையில் உள்ள ஏதேனும் விண்டோஸ் புதுப்பிப்புகள் அல்லது இயக்கி புதுப்பிப்புகளைச் சரிபார்த்து நிறுவவும்.
- SSD-யில் போதுமான இடம் இருப்பதை உறுதிசெய்து கொள்ளுங்கள்.
- Monitor CPU and RAM usage in Task Manager to identify resource-intensive processes.
- நெட்வொர்க் இணைப்பு சிக்கல்கள்:
- For wired connections, ensure the Ethernet cable is properly connected and the router is working.
- For Wi-Fi, check if the Wi-Fi adapter is enabled and connected to the correct network. Restart your router/modem.
- கணினி உறைதல்/செயலிழப்புகள்:
- மினி கணினியை மறுதொடக்கம் செய்யுங்கள்.
- Ensure the system is not overheating (check ventilation).
- Run a system diagnostic or check Windows Event Viewபிழை செய்திகளுக்கு er.
விவரக்குறிப்புகள்
| மாதிரி | AWOW BA7 Mini PC |
| செயலி | AMD Ryzen 5 7430U (6 கோர்கள், 12 த்ரெட்கள், 4.3 GHz வரை) |
| கிராபிக்ஸ் | ஒருங்கிணைந்த AMD ரேடியான் கிராபிக்ஸ் |
| ரேம் | 16 ஜிபி டிடிஆர்4 (64 ஜிபி வரை விரிவாக்கக்கூடியது) |
| சேமிப்பு | 512GB PCIe 3.0 M.2 SSD (Expandable up to 2TB) |
| இயக்க முறைமை | விண்டோஸ் 11 ப்ரோ |
| வீடியோ வெளியீடு | DP1.2 (4K@60Hz), HDMI2.0 (4K@60Hz), USB-C (4K@60Hz) - Supports Triple Display |
| இணைப்பு | WiFi 6, Bluetooth 5.2, 1000Mbps RJ45 LAN |
| துறைமுகங்கள் | 2x USB 3.2, 2x USB 2.0, 1x Type-C (Full Function), 1x DP1.2, 1x HDMI2.0, 1x RJ45 LAN, 1x 3.5mm Audio Jack, 1x DC IN |
| பரிமாணங்கள் | 126மிமீ x 112மிமீ x 42மிமீ (தோராயமாக 4.96 x 4.41 x 1.65 அங்குலம்) |
| எடை | 398 கிராம் (சாதனம் மட்டும்) Image: The Mini PC with its dimensions (126mm x 112mm x 42mm) and weight (398g) labeled. |
உத்தரவாதம் மற்றும் ஆதரவு
AWOW provides comprehensive support for its products.
- உத்தரவாதம்: This product includes a 12-month service period from the date of purchase, covering manufacturing defects.
- தொழில்நுட்ப ஆதரவு: Lifetime technical support is available for all AWOW products.
- தொடர்பு: For technical assistance, warranty claims, or any product-related inquiries, please visit the official AWOW webதளம் அல்லது அவர்களின் வாடிக்கையாளர் சேவையை தொடர்பு கொள்ளவும்.

Image: AWOW brand message emphasizing fulfillment, lifetime technical support, and 12-month service.