Omezizy D450BT
Omezizy D450BT Bluetooth Thermal Label Printer Instruction Manual
Comprehensive instruction manual for the Omezizy D450BT Bluetooth Thermal Label Printer, covering setup, operation, maintenance, troubleshooting, and specifications.
1. அறிமுகம்
This manual provides detailed instructions for the setup, operation, and maintenance of your Omezizy D450BT Bluetooth Thermal Label Printer. Please read this manual carefully before using the printer to ensure optimal performance and longevity.
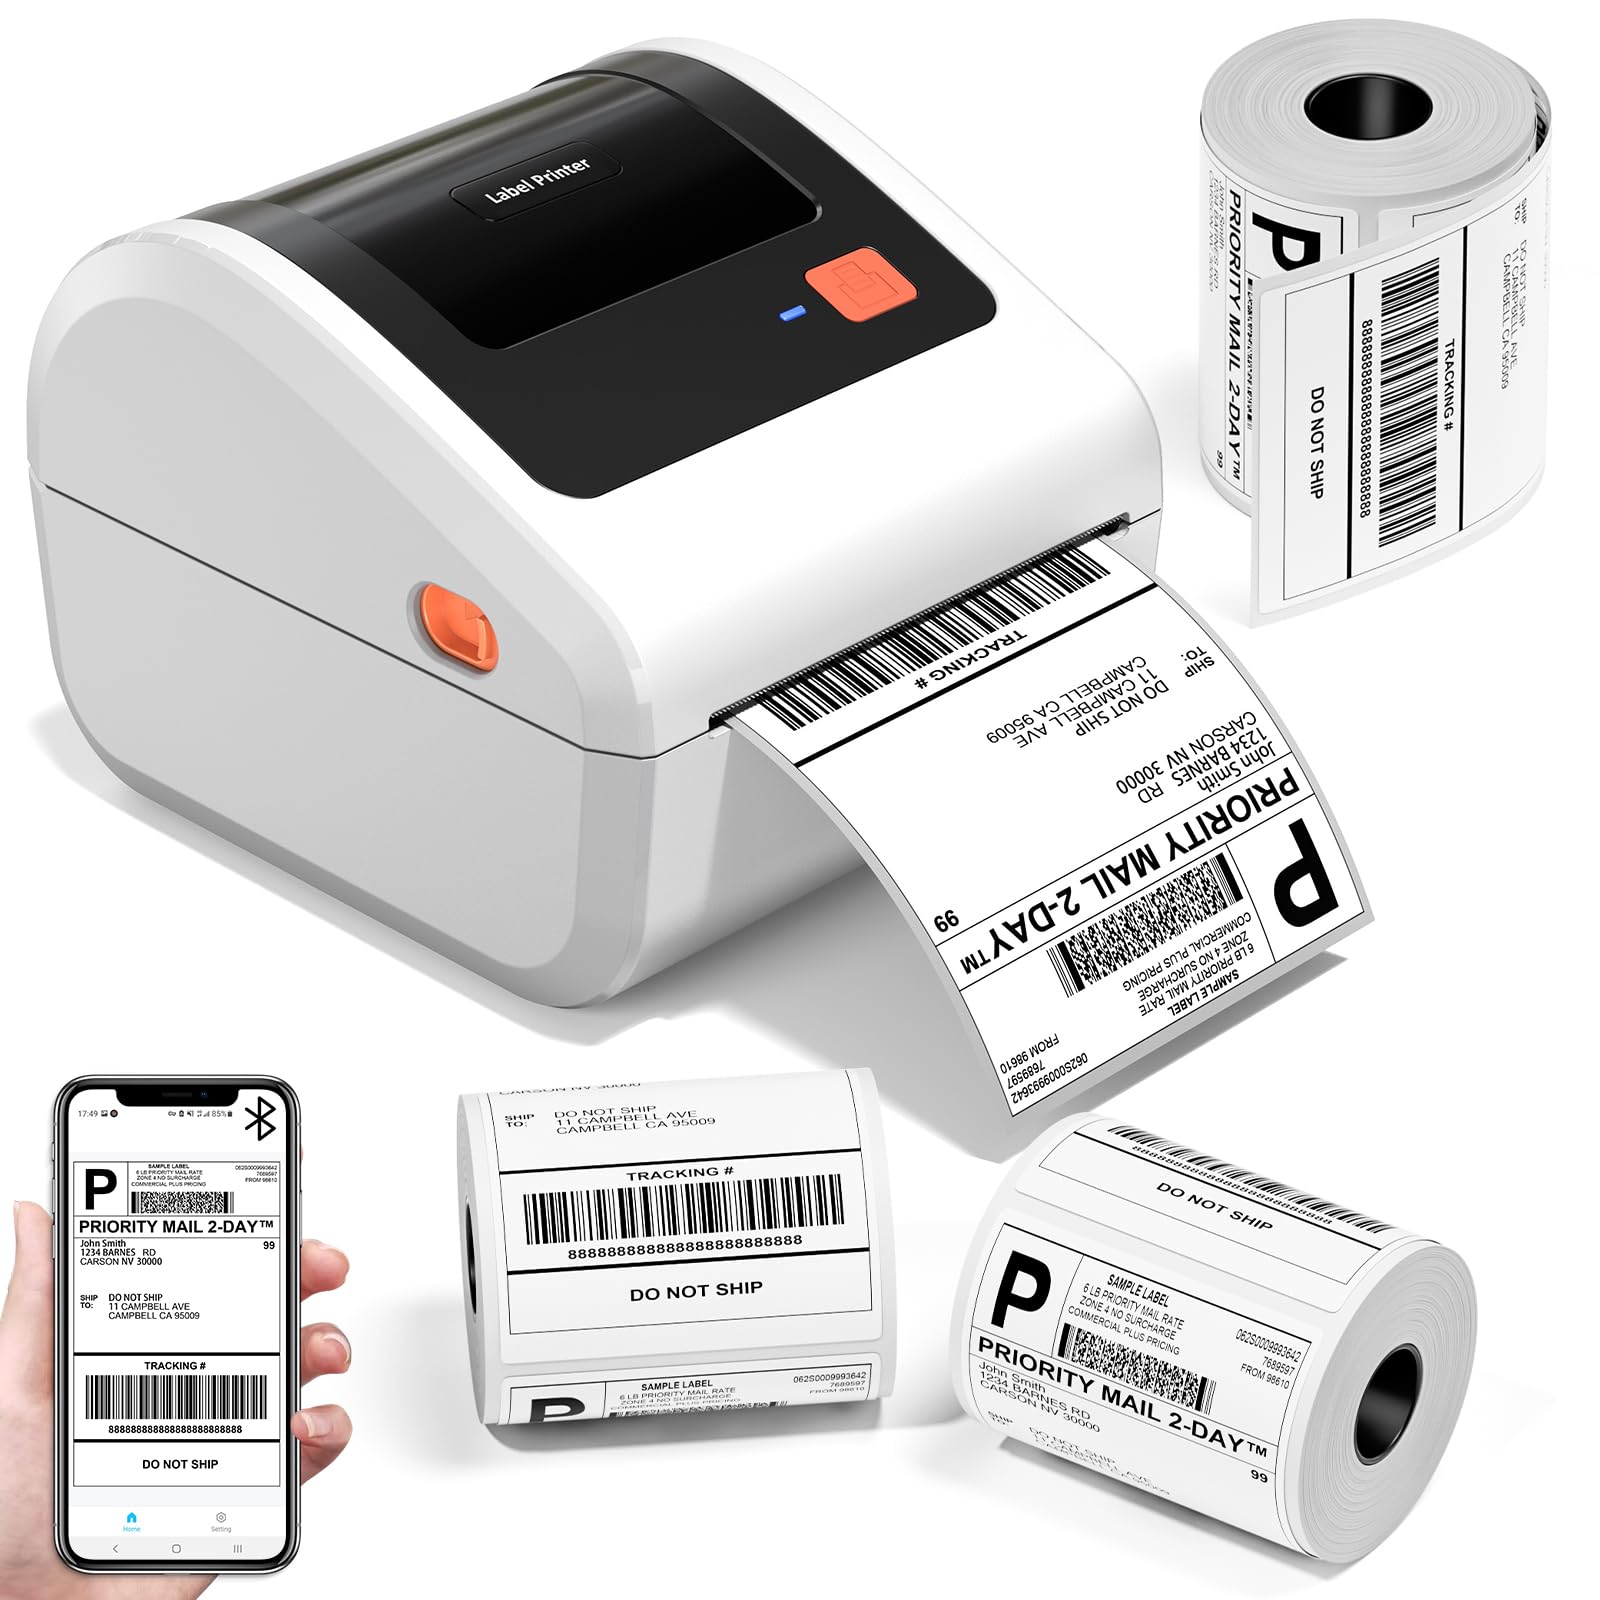
The Omezizy D450BT Bluetooth Thermal Label Printer, a compact and efficient device for various labeling needs.
The Omezizy D450BT is a compact and efficient thermal label printer designed for small businesses and home use. It supports both Bluetooth and USB connections, offering flexibility for printing from various devices including smartphones, tablets, and computers. Utilizing advanced thermal printing technology, it eliminates the need for ink or toner, providing a cost-effective and convenient labeling solution.
Video: An introduction to the Omezizy D450BT Bluetooth Thermal Label Printer, highlighting its key features and benefits.
2. பெட்டியில் என்ன இருக்கிறது
அனைத்து பொருட்களும் இருப்பதை உறுதிசெய்ய, வருகையின் போது பொட்டலத்தின் உள்ளடக்கங்களைச் சரிபார்க்கவும்:
- D450BT Label Printer (White)
- USB Cord & Type C Convertor
- பவர் அடாப்டர் & கேபிள்
- 30Pcs 4"x6" Test Labels
- Built-in label holder
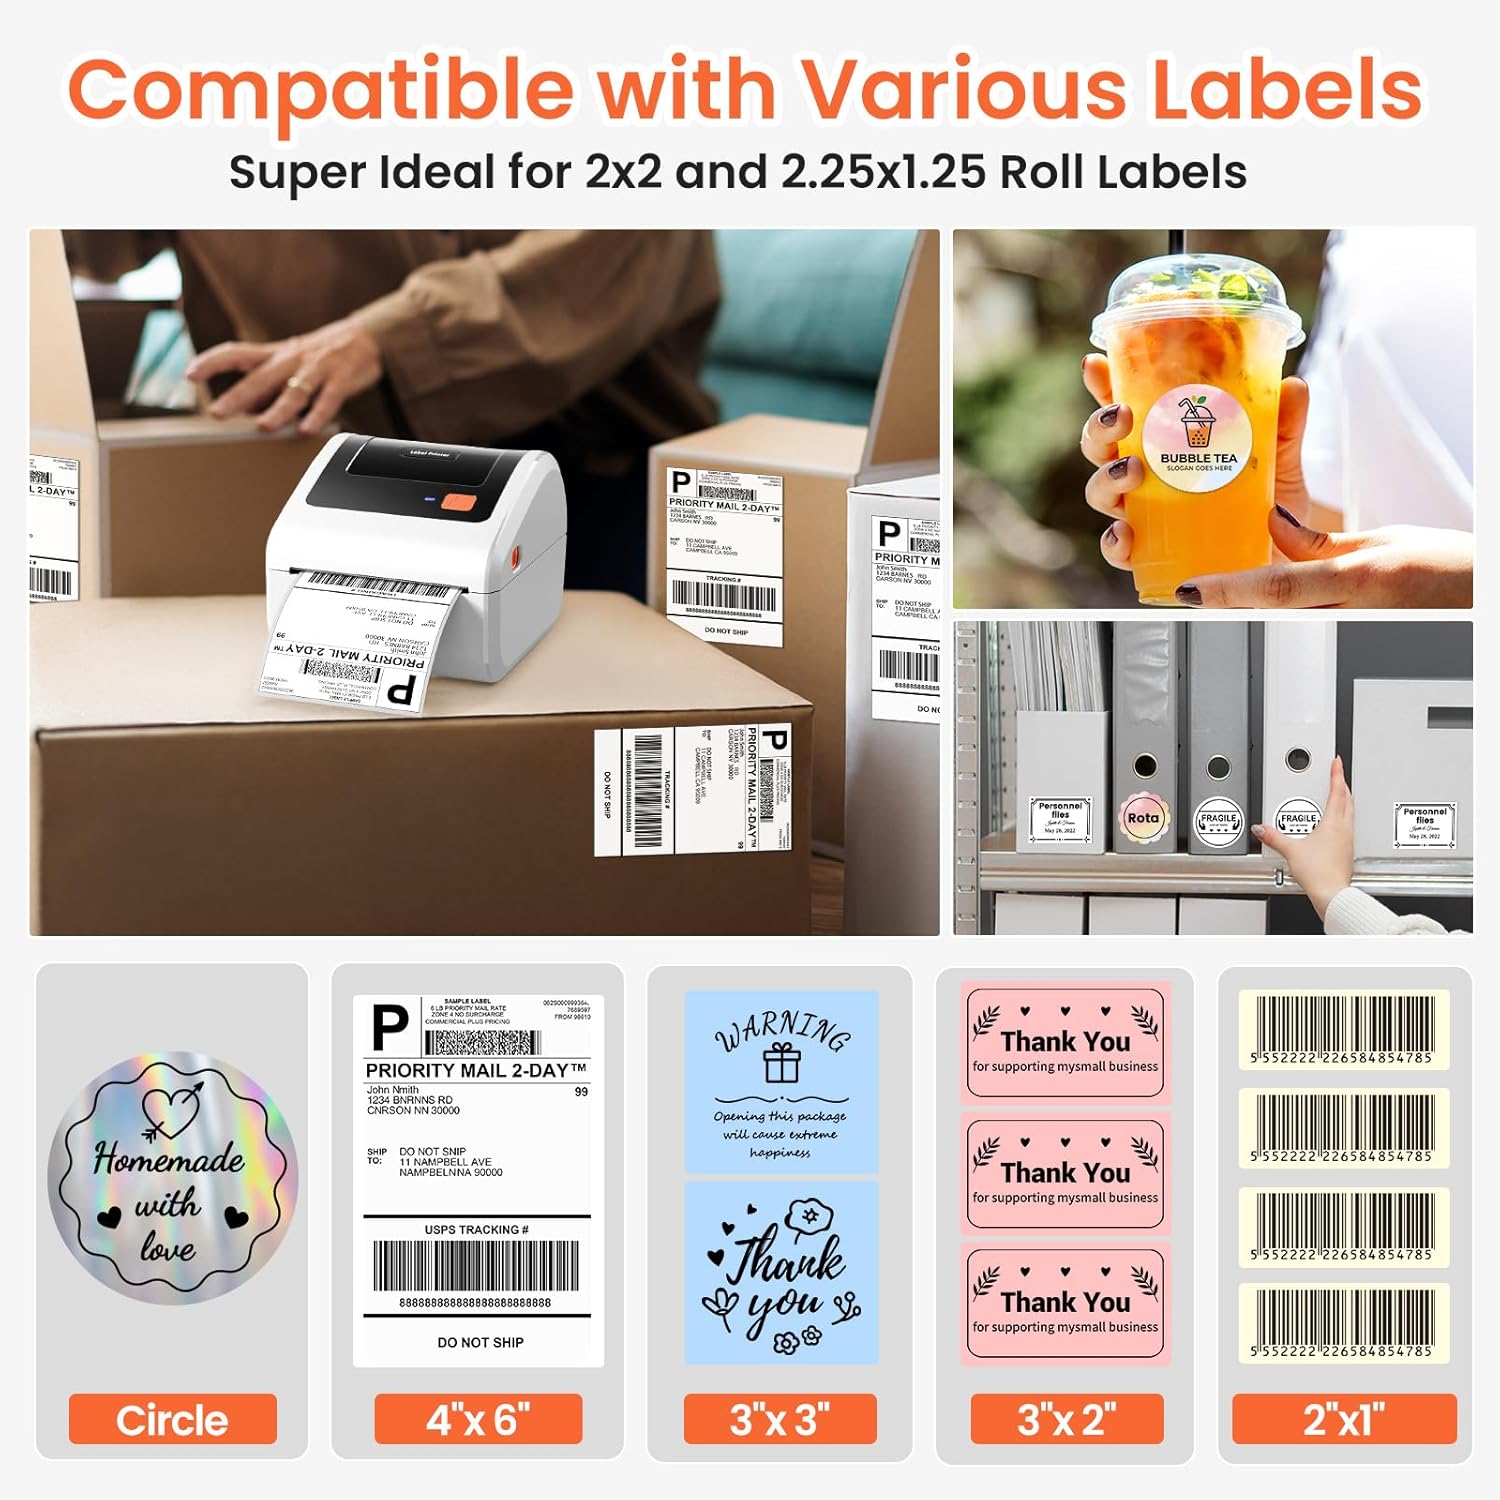
Image: All items included in the Omezizy D450BT printer package.
3. தயாரிப்பு முடிந்துவிட்டதுview
Familiarize yourself with the main components of the D450BT printer:
Video: A detailed introduction to the various components of the D450BT printer.
3.1 முன் மற்றும் மேல் View
- காட்டி ஒளி: Shows printer status (e.g., blue for ready, red for error).
- ஊட்ட பொத்தான்: Used for feeding labels, automatic label recognition, and pausing/resuming printing.
- Release Latches: Used to open the printer cover for loading labels.
3.2 உள்ளே View
- Paper Guide: Keeps labels aligned during printing.
- தட்டு உருளை: Feeds the labels through the printer.
- Thermal Printhead: Generates heat to print on thermal labels.
3.3 பின்புறம் View
- USB Port (Type-C): For connecting the printer to a computer via USB.
- AC Adapter Connector: பவர் அடாப்டரை இணைப்பதற்கு.
- மின்விசை மாற்றும் குமிழ்: To turn the printer On/Off.
4 அமைவு
4.1 மின் இணைப்பு
Connect the printer to a power source:
- பவர் கார்டை அடாப்டருடன் இணைக்கவும்.
- Connect the adapter cable to the AC Adapter Connector on the back of the printer.
- பவர் கார்டை ஒரு சுவர் கடையில் செருகவும்.
- Turn on the printer using the Power Switch (I: On; O: Off). The indicator light will turn blue.
Video: Instructions on how to connect the D450BT printer to power.
4.2 காகித ஏற்றுதல்
The D450BT supports both roll labels (internal bin) and fan-fold labels (rear loading). Ensure the print side of the labels faces upward.
4.2.1 Roll Labels Loading
- Press the Release Latches to open the printer cover.
- Install the paper roll onto the label holder, ensuring the print side is upward.
- Insert the label roll into the internal paper bin, ensuring it is straight and smooth.
- Adjust the paper guide to fit the label width.
- அச்சுப்பொறி அட்டையை மூடு.
4.2.2 Fan-Fold Labels Loading
- Press the Release Latches to open the printer cover.
- Insert the fan-fold labels from the rear slot, ensuring the print side is upward and the labels are straight and smooth.
- Adjust the paper guide to fit the label width.
- அச்சுப்பொறி அட்டையை மூடு.

Image: The D450BT printer's built-in paper label compartment, illustrating how to load labels.
Video: A demonstration of how to load labels into the D450BT printer.
4.3 Bluetooth Connection (Mobile Device)
Connect your D450BT printer to your Android or iOS device via Bluetooth:
- Download the "Labelife" app from Google Play Store or Apple App Store.
- Open the app and navigate to the Bluetooth connection settings.
- Select your printer's MAC address from the available devices and click "Connect".
- Once connected, the app will confirm the successful connection.
Video: Step-by-step guide to connecting the D450BT printer to a mobile phone via Bluetooth.
4.4 Bluetooth Connection (Computer)
Connect your D450BT printer to your Windows, macOS, or Linux computer via Bluetooth:
- உங்கள் கணினியில் புளூடூத் இயக்கப்பட்டுள்ளதை உறுதிசெய்யவும்.
- Go to your computer's Bluetooth settings and search for available devices.
- Select the D450BT printer from the list and pair it.
- Install the printer driver if prompted (usually available on the manufacturer's webதளம்)
Video: Instructions for connecting the D450BT printer to a computer via Bluetooth.
4.5 USB இணைப்பு
For a wired connection, use the provided USB cable:
- Connect one end of the USB cable to the Type-C USB Port on the printer.
- USB கேபிளின் மறுமுனையை உங்கள் கணினியில் இருக்கும் USB போர்ட்டுடன் இணைக்கவும்.
- Install the printer driver if prompted.
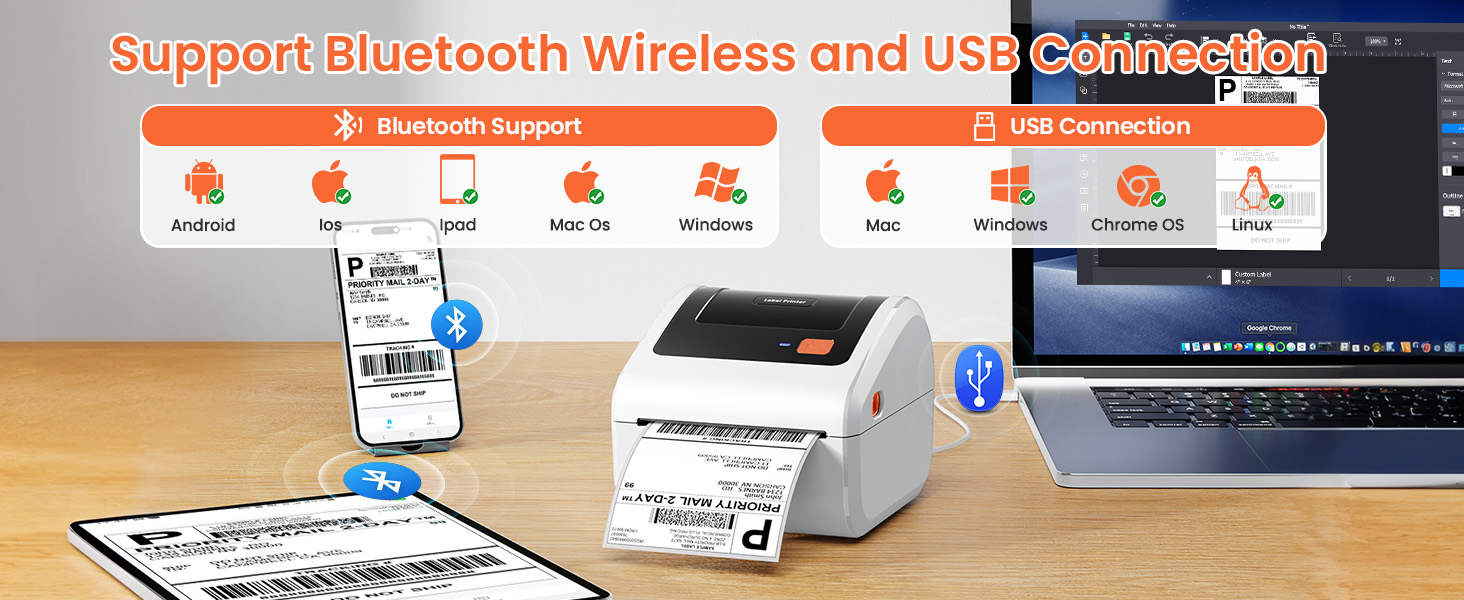
Image: The D450BT printer demonstrating both Bluetooth wireless and USB wired connection capabilities.
5. இயக்க வழிமுறைகள்
5.1 Printing from Mobile Device
After connecting your printer via Bluetooth using the "Labelife" app:
- Open the "Labelife" app.
- Select "Open PDF" to import your label file. You can import from local files or share from other applications.
- Use the "Crop PDF" function to select the desired area of the label.
- Input the correct width and height for your label.
- Adjust label orientation and preview the print.
- Click "Print" to send the label to the printer.
Video: Demonstrates the process of printing labels from a mobile device using the Labelife app.
5.2 Printing from Computer
Once your printer is connected via Bluetooth or USB and drivers are installed:
- Open the document or label file உங்கள் கணினியில் அச்சிட விரும்புகிறீர்கள்.
- "க்குச் செல்லவும்"File" -> "Print" or use the print shortcut (Ctrl+P for Windows, Cmd+P for Mac).
- Select the Omezizy D450BT printer from the list of available printers.
- Adjust print settings such as paper size (e.g., 4x6 inches), orientation, and print quality as needed.
- "அச்சிடு" என்பதைக் கிளிக் செய்யவும்.
Video: Shows how to connect the D450BT printer to a computer via Bluetooth and initiate printing.
5.3 Automatic Label Recognition
The printer can automatically detect the size of your labels:
- Ensure a label is inserted straight and smooth into the printer.
- When the printer's indicator light is blue (standby mode), press and hold the Feed Button for approximately 3 seconds.
- Release the Feed Button. The printer will feed a few labels to recognize the size.
குறிப்பு: Every time the continuous paper is changed to another type of paper roll, the automatic label recognition function needs to be manually operated to learn the labels.
5.4 அச்சிடும் சோதனைப் பக்கம்
To print a test page and verify printer functionality:
- Ensure a label is inserted straight and smooth into the printer.
- When the printer's indicator light is blue (standby mode), double-click the Feed Button.
- A test page will print, confirming the printer is working correctly.
5.5 Pause and Resume Printing
You can pause and resume printing jobs:
- When the printer is actively printing, press the Feed Button once to pause the printing process.
- To resume printing, press the Feed Button once again.
6. பராமரிப்பு
Regular maintenance ensures the longevity and optimal performance of your D450BT printer:
- அச்சுப்பொறியை சுத்தம் செய்தல்: Use an alcohol swab or a specialized printhead cleaning pen to gently wipe the thermal printhead. Ensure the printer is off and cooled down before cleaning.
- பிளேட்டன் ரோலரை சுத்தம் செய்தல்: ஒரு மென்மையான, டி பயன்படுத்தவும்amp cloth to wipe any dust or adhesive residue from the platen roller.
- தூசி அகற்றுதல்: Regularly clean the exterior of the printer with a soft, dry cloth to prevent dust accumulation.
- சேமிப்பு: நேரடி சூரிய ஒளி மற்றும் தீவிர வெப்பநிலையிலிருந்து விலகி, குளிர்ந்த, உலர்ந்த இடத்தில் அச்சுப்பொறியை சேமிக்கவும்.
7. சரிசெய்தல்
If you encounter issues with your D450BT printer, refer to the following common solutions:
- அச்சுப்பொறி இயக்கப்படவில்லை:
- Ensure the power cable is securely connected to both the printer and the power outlet.
- Verify the power switch is in the "On" position.
- No labels feeding or misfeeds:
- Check if labels are loaded correctly with the print side facing up.
- Ensure the paper guide is adjusted to the correct label width.
- Perform automatic label recognition (Section 5.3).
- மோசமான அச்சுத் தரம்:
- Clean the thermal printhead (Section 6).
- உயர்தர வெப்ப லேபிள்களைப் பயன்படுத்துவதை உறுதிசெய்யவும்.
- Adjust print density settings in your printing software/app.
- புளூடூத் இணைப்பு சிக்கல்கள்:
- Ensure Bluetooth is enabled on both the printer and your device.
- அச்சுப்பொறி மற்றும் உங்கள் சாதனம் இரண்டையும் மறுதொடக்கம் செய்யவும்.
- உங்கள் புளூடூத் அமைப்புகளில் சாதனத்தை மறந்துவிட்டு மீண்டும் இணைக்கவும்.
- Ensure you are within the effective range of Bluetooth.
- அச்சுப்பொறி பதிலளிக்கவில்லை:
- பிரிண்டரை மறுதொடக்கம் செய்யுங்கள்.
- Check USB or Bluetooth connection.
- Reinstall printer drivers if necessary.
7.1 தொழிற்சாலை அமைப்புகளை மீட்டமை
If troubleshooting steps do not resolve the issue, you may need to restore the printer to factory settings:
- Turn off the printer using the Power Switch.
- Press and hold the Feed Button.
- While holding the Feed Button, turn on the printer.
- Continue holding the Feed Button until the red indicator light flashes 5 times.
- Release the Feed Button. The printer will reset to factory defaults.
8. விவரக்குறிப்புகள்
| அம்சம் | விவரம் |
|---|---|
| பிராண்ட் | ஒமேஸிஸி |
| மாதிரி பெயர் | D450-BT |
| இணைப்பு தொழில்நுட்பம் | புளூடூத், யு.எஸ்.பி |
| அச்சிடும் தொழில்நுட்பம் | வெப்ப |
| சிறப்பு அம்சங்கள் | Bluetooth and USB Connection, Compatible with Mobile Phone & PC, Thermal Printing, No ink No toner, Auto Detection, Built-in Paper Bin |
| நிறம் | வெள்ளை |
| அச்சுப்பொறி வெளியீடு | ஒரே வண்ணமுடையது |
| அதிகபட்ச அச்சு வேகம் மோனோக்ரோம் | 72 பிபிஎம் |
| பொருளின் எடை | 0.97 கிலோகிராம் |
| தயாரிப்பு பரிமாணங்கள் | 7.3"டி x 6.3"அடி x 5.35"ஹெட் |
| அதிகபட்ச மீடியா அளவு | Paper Width: 1"-4.6" (25.4-117mm) |
| இணக்கமான சாதனங்கள் | IOS & Android Phone, Pad, Mac OS, Windows system, Chrome OS, Linux system |
9. உத்தரவாதம் மற்றும் ஆதரவு
Your Omezizy D450BT printer comes with a 2 ஆண்டு உத்தரவாதம்.
For technical support, troubleshooting assistance, or warranty claims, please contact Omezizy customer service through the retailer where you purchased the product or visit the official Omezizy webதளம்.
நீங்கள் பார்வையிடலாம் Omezizy Store on Amazon மேலும் தகவல் மற்றும் தொடர்புடைய தயாரிப்புகளுக்கு.
10. விண்ணப்பங்கள்
The Omezizy D450BT printer is versatile and suitable for a wide range of applications:
- Shipping Labels: Ideal for e-commerce businesses using platforms like USPS, UPS, FedEx, Amazon, eBay, Shopify, Etsy, PayPal, Poshmark.
- தயாரிப்பு லேபிள்கள்: Create custom labels for products, including nutrition labels, barcode labels, and branding.
- அமைப்பு: Perfect for organizing items in warehouses, offices, or at home.
- Gift Labels: Personalize gifts with custom "Thank You" or decorative labels.

Image: The D450BT printer is compatible with major shipping and sales platforms.

Image: The D450BT printer is suitable for multiple occasions such as office, warehouse, home, and retail.

படம்: Examples of nutrition labels, address labels, barcode labels, thank you labels, logo labels, and DIY labels.
Ask a question about this manual
Ask about setup, troubleshooting, compatibility, parts, safety, or missing instructions. Manuals+ will review the question and use this page’s manual context to help answer it.