1. முக்கியமான பாதுகாப்பு வழிமுறைகள்
Please read these instructions carefully before operating the unit and retain them for future reference. Following these guidelines will ensure safe and proper use of your GPX R602B radio.
- நீர் மற்றும் ஈரப்பதம்: Do not use this apparatus near water. Avoid exposure to rain or moisture.
- வெப்ப ஆதாரங்கள்: ரேடியேட்டர்கள், வெப்பப் பதிவேடுகள், அடுப்புகள் அல்லது பிற சாதனங்கள் (உட்பட) போன்ற எந்த வெப்ப மூலங்களுக்கும் அருகில் நிறுவ வேண்டாம் ampலிஃபையர்ஸ்) வெப்பத்தை உற்பத்தி செய்யும்.
- காற்றோட்டம்: சரியான காற்றோட்டத்தை உறுதி செய்யுங்கள். எந்த காற்றோட்ட திறப்புகளையும் அடைக்காதீர்கள்.
- சக்தி ஆதாரங்கள்: Operate only from the type of power source indicated on the marking label.
- சுத்தம்: உலர்ந்த துணியால் மட்டுமே சுத்தம் செய்யவும்.
- இணைப்புகள்: உற்பத்தியாளரால் குறிப்பிடப்பட்ட இணைப்புகள் / துணைக்கருவிகளை மட்டுமே பயன்படுத்தவும்.
- சேவை: அனைத்து சேவைகளையும் தகுதிவாய்ந்த சேவை பணியாளர்களிடம் பார்க்கவும். மின்சாரம் வழங்கல் தண்டு அல்லது பிளக் சேதமடைந்தது, திரவம் சிந்தப்பட்டால் அல்லது கருவியில் பொருட்கள் விழுந்துவிட்டன, இயந்திரம் மழை அல்லது ஈரப்பதத்திற்கு வெளிப்படும், சாதாரணமாக இயங்காதது போன்ற எந்த வகையிலும் சாதனம் சேதமடைந்தால் சேவை தேவைப்படுகிறது. , அல்லது கைவிடப்பட்டது.
பேட்டரி பாதுகாப்பு
- பழைய மற்றும் புதிய பேட்டரிகளை கலக்க வேண்டாம்.
- அல்கலைன், நிலையான (கார்பன்-துத்தநாகம்) அல்லது ரிச்சார்ஜபிள் (நிக்கல்-காட்மியம்) பேட்டரிகளை கலக்க வேண்டாம்.
- Insert batteries correctly, observing the + and - polarities.
- தீர்ந்துபோன பேட்டரிகளை உடனடியாக அகற்றவும்.
- பேட்டரிகளை முறையாக அப்புறப்படுத்துங்கள். எரிக்க வேண்டாம்.
2 அம்சங்கள்
The GPX R602B Portable AM/FM Radio offers a range of features designed for convenience and versatility:
- Portable AM/FM radio with a built-in handle for easy transport.
- Integrated speakers with analog volume control and durable metal grills.
- Digital clock with user-friendly setting buttons.
- Operates using the built-in AC power cable.
- Can also be powered by 3 C batteries (sold separately) for portable use.
- 3.5mm audio line input jack for connecting external audio devices.
- Telescopic antenna for improved FM reception.
- Stereo headphone jack for private listening.

Figure 2.1: Key features and connection points of the GPX R602B radio.
3. தொகுப்பு உள்ளடக்கங்கள்
Upon unpacking your GPX R602B radio, please ensure all the following items are present:
- GPX R602B Portable AM/FM Radio Unit
- உரிமையாளர் கையேடு
- Built-in AC Power Adapter
4. கட்டுப்பாடுகள் மற்றும் குறிகாட்டிகள்
Familiarize yourself with the controls and indicators on your radio for optimal operation.
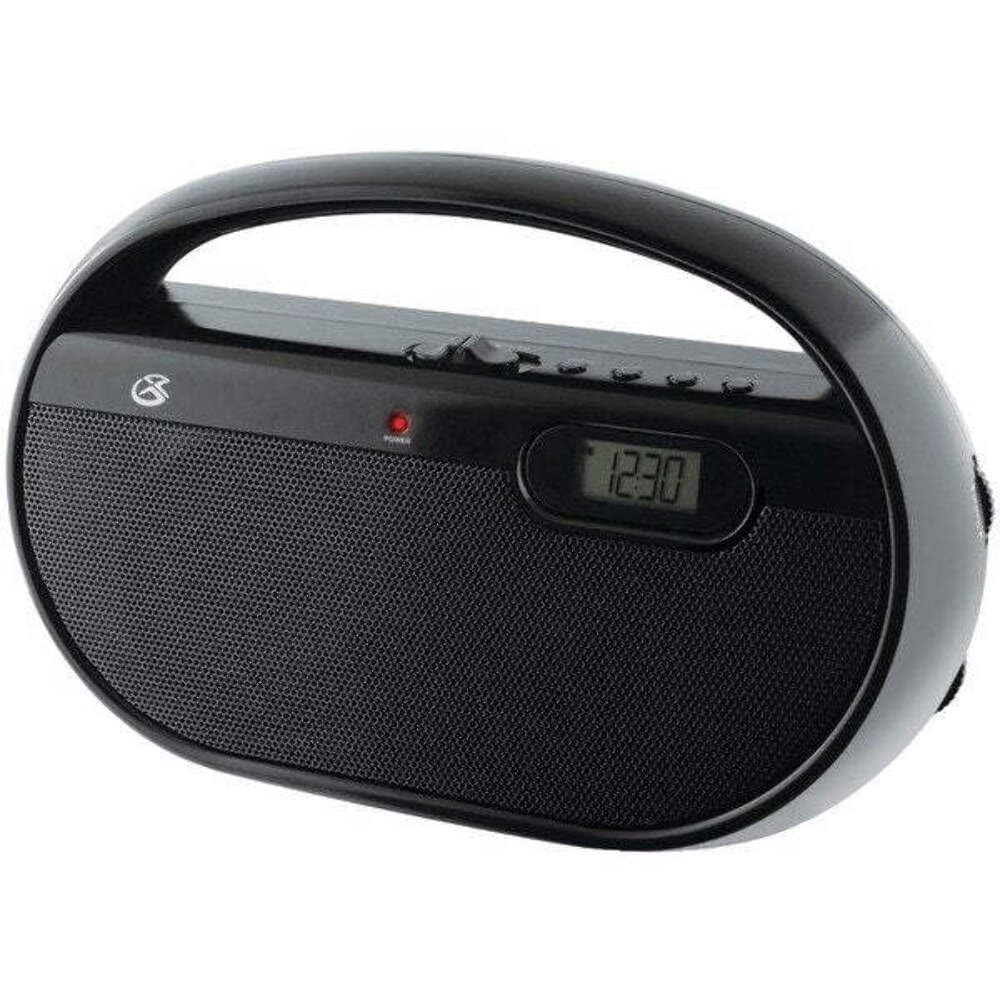
படம் 4.1: முன் view of the GPX R602B radio.
Control Layout (Refer to Figure 4.1)
- பவர்/வால்யூம் நாப்: Rotates to turn the unit ON/OFF and adjust the volume level.
- டியூனிங் குமிழ்: Rotates to select AM or FM radio stations.
- பேண்ட் செலக்டர் ஸ்விட்ச்: Slides to select between AM and FM radio bands.
- டிஜிட்டல் காட்சி: Shows the current time or radio frequency.
- நேரத்தை அமைக்கும் பொத்தான்: Used in conjunction with H/M buttons to set the clock.
- H/M Buttons: Used to adjust hours and minutes when setting the clock.
- Display Time Button: Briefly shows the time when the radio is playing.
- Aux In Jack (3.5mm): வெளிப்புற ஆடியோ சாதனங்களை இணைக்கவும்.
- ஹெட்ஃபோன் ஜாக் (3.5 மிமீ): தனிப்பட்ட கேட்பதற்கு ஹெட்ஃபோன்களை இணைக்கவும்.
- தொலைநோக்கி FM ஆண்டெனா: Extend and adjust for optimal FM reception.
5. அலகுக்கு சக்தி அளித்தல்
The GPX R602B radio can be powered by either AC power or batteries.
ஏசி பவர் ஆபரேஷன்
- Locate the built-in AC power cord. This cord is typically stored in the battery compartment when not in use.
- Plug the AC power cord into a standard wall outlet (120V AC, 60Hz).
- யூனிட் இப்போது செயல்பாட்டிற்கு தயாராக உள்ளது.
பேட்டரி ஆற்றல் செயல்பாடு
For portable use, the radio requires 3 'C' size batteries (not included).
- யூனிட்டின் பின்புறத்தில் அமைந்துள்ள பேட்டரி பெட்டியின் அட்டையைத் திறக்கவும்.
- Insert 3 'C' size batteries, ensuring the correct polarity (+ and -) as indicated inside the compartment.
- பேட்டரி பெட்டியின் அட்டையை பாதுகாப்பாக மூடு.
- The unit is now ready for battery-powered operation.

Figure 5.1: Power options for the GPX R602B radio.
6. அமைப்பு மற்றும் அடிப்படை செயல்பாடு
ஆரம்ப அமைப்பு
- மின் இணைப்பு: Connect the radio to AC power or insert batteries as described in Section 5.
- ஆண்டெனா சரிசெய்தல்: For FM reception, extend the telescopic antenna fully. For AM reception, the unit has a built-in antenna, so no external adjustment is needed. Position the unit for best AM reception.
வானொலியை இயக்குதல்
- இயக்கு: Rotate the Power/Volume knob clockwise until it clicks and the unit powers on.
- இசைக்குழுவைத் தேர்ந்தெடுக்கவும்: Slide the Band Selector switch to either AM or FM.
- டியூன் நிலையம்: Rotate the Tuning knob to find your desired radio station. The frequency will be displayed on the digital screen.
- ஒலியளவைச் சரிசெய்யவும்: Rotate the Power/Volume knob to adjust the sound level.
- அணைக்க: Rotate the Power/Volume knob counter-clockwise until it clicks and the unit powers off.
Using the Line Input (Aux In)
You can connect external audio devices, such as smartphones or MP3 players, to play audio through the radio's speakers.
- Connect a 3.5mm audio cable (not included) from the headphone jack or line-out jack of your external device to the Aux In jack on the radio.
- Turn on the radio and your external device.
- Adjust the volume on both the radio and your external device for optimal sound.

Figure 6.1: Devices compatible with the Aux In feature.
ஹெட்ஃபோன்களைப் பயன்படுத்துதல்
For private listening, plug standard 3.5mm headphones (not included) into the Headphone Jack. The internal speakers will automatically mute.
டிஜிட்டல் கடிகாரத்தை அமைத்தல்
The digital clock can be set when the radio is turned off.
- Ensure the radio is turned OFF using the Power/Volume knob.
- இரண்டையும் அழுத்திப் பிடிக்கவும் நேரத்தை அமைக்கவும் பொத்தான் மற்றும் எச்/எம் ஒரே நேரத்தில் பொத்தான்.
- வைத்திருக்கும் போது நேரத்தை அமைக்கவும் button, repeatedly press the எச்/எம் button to adjust the hour and then the minutes.
- விடுவிக்கவும் நேரத்தை அமைக்கவும் button once the desired time is set.
- செய்ய view the time while the radio is playing, press the காட்சி நேரம் button. The time will appear briefly on the digital display.
7. பராமரிப்பு
Proper care and maintenance will ensure the longevity of your GPX R602B radio.
- சுத்தம்: மென்மையான, உலர்ந்த துணியால் யூனிட்டின் வெளிப்புறத்தைத் துடைக்கவும். சிராய்ப்பு கிளீனர்கள், மெழுகுகள் அல்லது கரைப்பான்களைப் பயன்படுத்த வேண்டாம்.
- பேட்டரி மாற்று: If using batteries, replace all three 'C' batteries when the unit's performance diminishes. Always replace with new batteries of the same type.
- சேமிப்பு: If storing the unit for an extended period, remove the batteries to prevent leakage and corrosion.
8. சரிசெய்தல்
If you encounter issues with your GPX R602B radio, refer to the following common problems and solutions:
| பிரச்சனை | சாத்தியமான காரணம் | தீர்வு |
|---|---|---|
| சக்தி இல்லை | AC cord not plugged in; Batteries exhausted or incorrectly inserted. | Ensure AC cord is securely plugged into a live outlet. Replace batteries with new ones, checking polarity. |
| மோசமான வானொலி வரவேற்பு | Antenna not extended (FM); Unit poorly positioned (AM); Weak signal. | Extend and adjust the telescopic FM antenna. For AM, rotate the unit for better reception. Try moving the radio to a different location. |
| பேச்சாளர்களிடமிருந்து ஒலி இல்லை | ஒலி அளவு மிகக் குறைவு; ஹெட்ஃபோன்கள் இணைக்கப்பட்டுள்ளன. | Increase the volume using the Power/Volume knob. Disconnect headphones if not desired. |
| Clock not setting correctly | Incorrect button sequence. | Ensure the radio is OFF. Press and hold both 'Set Time' and 'H/M' buttons simultaneously, then repeatedly press 'H/M' to adjust. Release 'Set Time' when done. |
| ஒலி சிதைந்துள்ளது அல்லது தெளிவற்றது | Volume too high; Poor reception; External device volume too high. | Lower the volume. Adjust antenna or unit position for better reception. If using Aux In, adjust volume on the external device. |
9. விவரக்குறிப்புகள்
Detailed technical specifications for the GPX R602B Portable AM/FM Radio:
- மாதிரி எண்: R602B
- தயாரிப்பு பரிமாணங்கள் (L x W x H): 9.62 x 3.74 x 6.3 அங்குலம் (24.43 x 9.50 x 16.00 செமீ)
- பொருளின் எடை: 1.76 பவுண்டுகள் (0.80 கிலோ)
- சக்தி ஆதாரம்: AC 120V, 60Hz or 3 x 'C' size batteries (not included)
- ட்யூனர் தொழில்நுட்பம்: AM/FM
- ரேடியோ பேண்டுகள் ஆதரிக்கப்படுகின்றன: 2-Band (AM/FM)
- இணைப்பு தொழில்நுட்பம்: Radio, 3.5mm Aux In
- சிறப்பு அம்சங்கள்: Built-In AM Antenna, Built-In Clock, Portable, Telescopic FM Antenna, 3.5mm Headphone Jack
- நிறம்: கருப்பு
- உற்பத்தியாளர்: Digital Products International, Inc.
- முதல் தேதி கிடைக்கும்: ஜூன் 5, 2012
10. உத்தரவாதம் மற்றும் ஆதரவு
For warranty information and customer support regarding your GPX R602B radio, please refer to the warranty card included with your purchase or visit the official GPX webஎந்தவொரு உத்தரவாதக் கோரிக்கைகளுக்கும் வாங்கியதற்கான சான்றாக உங்கள் கொள்முதல் ரசீதை வைத்திருங்கள்.
If you require technical assistance or have questions not covered in this manual, please contact GPX customer service directly. Contact details are typically available on the manufacturer's webதளம் அல்லது தயாரிப்பு பேக்கேஜிங்கில்.


