1. அறிமுகம்
This manual provides essential information for the safe and effective operation, maintenance, and troubleshooting of your Crown CT21056LBMC 18V Cordless Drill Driver. Please read these instructions carefully before using the tool and keep them for future reference. This drill driver is designed for drilling into wood, metal, and plastics, and for driving screws.
2. பாதுகாப்பு வழிமுறைகள்
மின் கருவிகளை இயக்கும்போது தீ, மின்சார அதிர்ச்சி மற்றும் தனிப்பட்ட காயம் ஏற்படும் அபாயத்தைக் குறைக்க எப்போதும் அடிப்படை பாதுகாப்பு முன்னெச்சரிக்கை நடவடிக்கைகளைப் பின்பற்றவும்.
- வேலை பகுதி பாதுகாப்பு: உங்கள் பணியிடத்தை சுத்தமாகவும், நல்ல வெளிச்சத்துடனும் வைத்திருங்கள். இரைச்சலான அல்லது இருண்ட பகுதிகள் விபத்துக்களை அழைக்கின்றன. எரியக்கூடிய திரவங்கள், வாயுக்கள் அல்லது தூசி போன்ற வெடிக்கும் வளிமண்டலங்களில் மின் கருவிகளை இயக்க வேண்டாம்.
- மின் பாதுகாப்பு: குழாய்கள், ரேடியேட்டர்கள், ரேஞ்ச்கள் மற்றும் குளிர்சாதன பெட்டிகள் போன்ற மண் அல்லது தரையிறக்கப்பட்ட மேற்பரப்புகளுடன் உடல் தொடர்பைத் தவிர்க்கவும். மழை அல்லது ஈரமான சூழ்நிலைகளில் மின் கருவிகளை வெளிப்படுத்த வேண்டாம்.
- தனிப்பட்ட பாதுகாப்பு: எப்போதும் கண் பாதுகாப்பு அணியுங்கள். நீண்ட நேரம் அறுவை சிகிச்சை செய்யும்போது காது கேட்கும் பாதுகாப்பைப் பயன்படுத்துங்கள். ஒழுங்காக உடை அணியுங்கள்; தளர்வான ஆடைகள் அல்லது நகைகளைத் தவிர்க்கவும். நீண்ட முடியைப் பாதுகாக்கவும்.
- கருவி பயன்பாடு மற்றும் பராமரிப்பு: மின் கருவியை வலுக்கட்டாயமாகப் பயன்படுத்த வேண்டாம். உங்கள் பயன்பாட்டிற்கு ஏற்ற சரியான மின் கருவியைப் பயன்படுத்தவும். ஏதேனும் மாற்றங்களைச் செய்வதற்கு முன், துணைக்கருவிகளை மாற்றுவதற்கு முன் அல்லது மின் கருவிகளைச் சேமிப்பதற்கு முன், மின் கருவியிலிருந்து பேட்டரி பேக்கைத் துண்டிக்கவும்.
- பேட்டரி பேக் பாதுகாப்பு: உற்பத்தியாளரால் குறிப்பிடப்பட்ட சார்ஜரைப் பயன்படுத்தி மட்டுமே ரீசார்ஜ் செய்யவும். பேட்டரி பேக் கடுமையாக சேதமடைந்திருந்தாலும் அதை எரிக்க வேண்டாம்.
3. தொகுப்பு உள்ளடக்கங்கள்
Carefully unpack all items and check against the list below. If any parts are missing or damaged, contact your retailer.
- 1 x Crown CT21056LBMC Cordless Drill Driver
- 2 x 18V Lithium-Ion Batteries (1.5 Ah)
- 1 x பேட்டரி சார்ஜர்
- 1 x வழிமுறை கையேடு (இந்த ஆவணம்)
- 1 x கேரிங் கேஸ்

Image 1: The complete Crown CT21056LBMC kit, showing the drill driver, two batteries, charger, and the durable carrying case.
4. தயாரிப்பு முடிந்துவிட்டதுview
Familiarize yourself with the components of your drill driver before operation.
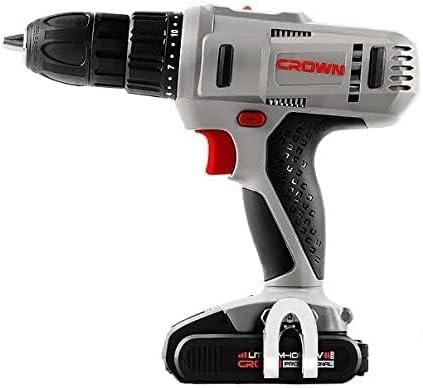
படம் 2: பக்கம் view of the drill driver, illustrating key components such as the chuck, torque adjustment collar, speed selector switch, and trigger.
- கீலெஸ் சக்: விரைவான மற்றும் எளிதான பிட் மாற்றங்களுக்கு.
- முறுக்கு சரிசெய்தல் காலர்: Selects the desired torque setting for driving screws or drill mode.
- வேகத் தேர்வி சுவிட்ச்: Allows selection between two mechanical speed ranges.
- முன்னோக்கி/தலைகீழ் சுவிட்ச்: சக்கின் சுழற்சி திசையை மாற்றுகிறது.
- தூண்டுதல் சுவிட்ச்: துரப்பணியைச் செயல்படுத்தி வேகத்தைக் கட்டுப்படுத்துகிறது.
- LED வேலை விளக்கு: வேலைப் பகுதியை ஒளிரச் செய்கிறது.
- பேட்டரி பேக்: கருவிக்கு சக்தியை வழங்குகிறது.
- பேட்டரி வெளியீட்டு பொத்தான்: பேட்டரி பேக்கை அகற்றுவதற்கு.
5 அமைவு
5.1. பேட்டரியை சார்ஜ் செய்தல்
The battery pack is not fully charged at the time of purchase. It must be fully charged before first use.
- சார்ஜரை ஒரு நிலையான மின் நிலையத்துடன் இணைக்கவும்.
- Slide the battery pack onto the charger base. Ensure it clicks into place.
- The charging indicator light on the charger will show the charging status. A full charge takes approximately 45 minutes for a 1.5 Ah battery.
- Once fully charged, disconnect the battery from the charger and unplug the charger from the outlet.
5.2. பேட்டரி பேக்கை நிறுவுதல் மற்றும் அகற்றுதல்
- நிறுவ: பேட்டரி பேக்கை டிரில் டிரைவரின் அடிப்பகுதியுடன் சீரமைத்து, அது பாதுகாப்பாக இடத்தில் கிளிக் செய்யும் வரை உள்ளே ஸ்லைடு செய்யவும்.
- அகற்ற: பேட்டரி வெளியீட்டு பொத்தானை அழுத்தி, கருவியிலிருந்து பேட்டரி பேக்கை வெளியே இழுக்கவும்.

Image 3: The drill driver with a fully installed battery pack, ready for use.
5.3. Installing and Removing Drill Bits/Driver Bits
- Rotate the keyless chuck counter-clockwise to open the jaws.
- Insert the drill bit or driver bit into the chuck, ensuring it is centered.
- Rotate the keyless chuck clockwise to tighten the jaws firmly around the bit. Do not overtighten.
- To remove, rotate the chuck counter-clockwise until the bit can be pulled out.
6. இயக்க வழிமுறைகள்
6.1. வேகத்தைத் தேர்ந்தெடுப்பது
The drill driver features two mechanical speed settings:
- Speed 1 (Low Speed, 0-350 RPM): Ideal for driving screws, larger drilling diameters, or applications requiring higher torque.
- Speed 2 (High Speed, 0-1350 RPM): Suitable for smaller drilling diameters and faster drilling.
To change speed, slide the speed selector switch located on top of the drill. Ensure the tool is stopped before changing speeds.
6.2. Adjusting Torque
The torque adjustment collar has 18 torque settings plus a drill mode (indicated by a drill bit symbol).
- முறுக்கு அமைப்புகள் (1-18): Use these settings for driving screws. Lower numbers are for smaller screws or softer materials, higher numbers for larger screws or harder materials. The clutch will disengage when the set torque is reached, preventing overtightening or stripping.
- துளையிடும் முறை (துளையிடும் பிட் சின்னம்): Provides maximum torque for drilling applications without the clutch disengaging.
Rotate the torque adjustment collar to select the desired setting.
6.3. முன்னோக்கி/தலைகீழ் சுழற்சி
The forward/reverse switch is located above the trigger. Push it to the left for forward rotation (for drilling and driving screws) and to the right for reverse rotation (for removing screws or freeing jammed bits). Position the switch in the center to lock the trigger and prevent accidental starting.
6.4. Operating the Trigger Switch and LED Light
Squeeze the trigger switch to start the drill. The speed is variable depending on how far the trigger is pressed. The integrated LED work light will illuminate when the trigger is pressed, providing visibility in dimly lit areas.
7. பராமரிப்பு
வழக்கமான பராமரிப்பு உகந்த செயல்திறனை உறுதிசெய்து உங்கள் கருவியின் ஆயுளை நீட்டிக்கிறது.
- சுத்தம்: Keep the ventilation openings clear and free of dust. Use a soft, damp கருவியை சுத்தம் செய்வதற்கான துணி casing. கரைப்பான்கள் அல்லது சிராய்ப்பு கிளீனர்களைப் பயன்படுத்த வேண்டாம்.
- பேட்டரி பராமரிப்பு: நேரடி சூரிய ஒளி படாத குளிர்ந்த, உலர்ந்த இடத்தில் பேட்டரிகளை சேமிக்கவும். முழுமையாக டிஸ்சார்ஜ் செய்யப்பட்ட பேட்டரிகளை நீண்ட நேரம் சேமிக்க வேண்டாம். பயன்பாட்டில் இல்லாவிட்டால் அவ்வப்போது சார்ஜ் செய்யவும்.
- சேமிப்பு: Store the drill driver, batteries, and charger in the provided carrying case in a dry, secure location out of reach of children.
- ஆய்வு: Regularly inspect the power tool for any signs of damage, loose screws, or worn parts. If damage is found, have it repaired by a qualified service technician.
8. சரிசெய்தல்
Before attempting any repairs, ensure the battery is removed from the tool.
| பிரச்சனை | சாத்தியமான காரணம் | தீர்வு |
|---|---|---|
| துரப்பணம் தொடங்கவில்லை | பேட்டரி சார்ஜ் செய்யப்படவில்லை அல்லது தவறாக நிறுவப்படவில்லை. மைய (பூட்டப்பட்ட) நிலையில் முன்னோக்கி/தலைகீழ் சுவிட்ச். | Charge battery fully and ensure it is securely installed. Move Forward/Reverse switch to either forward or reverse position. |
| பேட்டரி சார்ஜ் ஆகவில்லை | Charger not plugged in. Battery or charger is faulty. | Check power connection. If problem persists, contact customer support for replacement. |
| செயல்பாட்டின் போது சக்தி இழப்பு | Battery is low. Overload protection activated. | Recharge the battery. Reduce pressure on the tool or use a lower speed setting. |
| சக்கில் பிட் நழுவுகிறது | சக் போதுமான அளவு இறுக்கப்படவில்லை. பிட் ஷாங்க் அழுக்காகவோ அல்லது சேதமடைந்தோ உள்ளது. | சக்கை மீண்டும் உறுதியாக இறுக்குங்கள். பிட்டை சுத்தம் செய்யவும் அல்லது மாற்றவும். |
9. விவரக்குறிப்புகள்
| அம்சம் | விவரக்குறிப்பு |
|---|---|
| மாதிரி எண் | CT21056LBMC |
| தொகுதிtage | 18 வோல்ட் |
| பேட்டரி வகை | லித்தியம்-அயன் |
| பேட்டரி திறன் | 1.5 ஆ |
| சக் திறன் | 1.5 - 13 மி.மீ. |
| சுமை இல்லாத வேகம் (வேகம் 1) | 0 - 350 ஆர்.பி.எம். |
| சுமை இல்லாத வேகம் (வேகம் 2) | 0 - 1350 ஆர்.பி.எம். |
| மேக்ஸ் முறுக்கு | 4 Newton-Meter (Nm) |
| கிளட்ச் நிலைகள் | 18 + 1 (துரப்பண முறை) |
| சார்ஜிங் நேரம் | தோராயமாக 45 நிமிடங்கள் |
| தயாரிப்பு பரிமாணங்கள் | 20.5 x 5 x 20 செ.மீ |
| தயாரிப்பு எடை | 1.54 கிலோ |
| சிறப்பு அம்சங்கள் | ஒருங்கிணைந்த LED வேலை விளக்கு |
10. உத்தரவாதம் மற்றும் ஆதரவு
For warranty information, service, or technical support, please refer to the warranty card included with your product or contact your point of purchase. Keep your purchase receipt as proof of purchase for any warranty claims.


