அறிமுகம்
This manual provides comprehensive instructions for the proper installation and use of the Logitech Rally Mounting Kit, Model 939-001644. Please read these instructions carefully before proceeding with installation to ensure correct setup and optimal performance of your Logitech Rally system components.
தயாரிப்பு முடிந்துவிட்டதுview மற்றும் தொகுப்பு உள்ளடக்கங்கள்
The Logitech Rally Mounting Kit is designed to securely mount various Logitech Rally system components. Verify that all items listed below are present in your package.
தொகுப்பு உள்ளடக்கம்:
- 2 x Speaker Brackets
- 1 x Camera Bracket (invertible)
- 2 x Cable Retention Brackets
- Associated mounting hardware (screws, anchors - not explicitly listed in input but implied for a mounting kit)
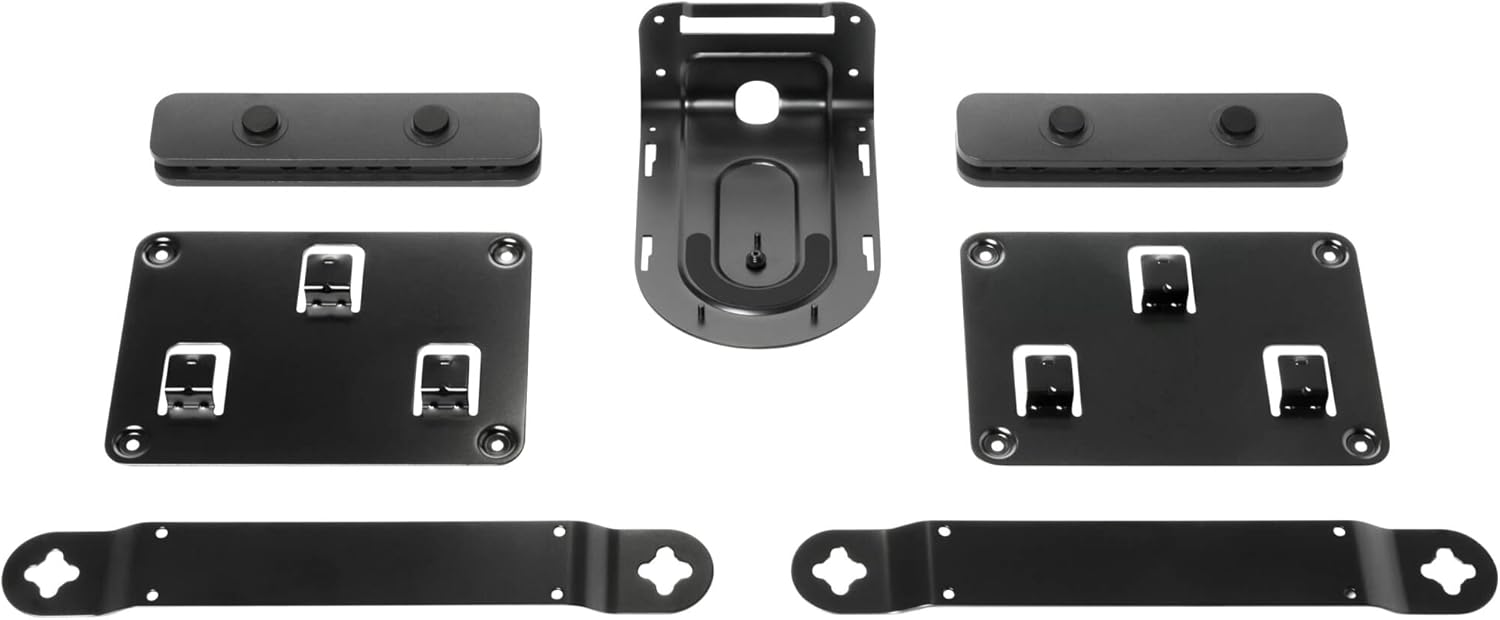
Figure 1: All components of the Logitech Rally Mounting Kit, including speaker brackets, camera bracket, and cable retention brackets.
அமைவு மற்றும் நிறுவல்
This section details the steps for installing the Logitech Rally Mounting Kit. Ensure you have the necessary tools (e.g., drill, screwdriver, level) before beginning.
ஏற்ற வகைகள்:
The kit supports various mounting configurations, including wall mount, ceiling mount, and tripod mount, depending on the specific component.
பொது நிறுவல் படிகள்:
- பொருத்தும் இடத்தை அடையாளம் காணவும்: Determine the optimal location for your Logitech Rally speaker, camera, or hub. Consider cable routing and viewing கோணங்கள்.
- மேற்பரப்பு தயார்: For wall or ceiling mounts, ensure the surface is structurally sound. Use appropriate anchors if mounting into drywall or hollow surfaces.
- அடைப்புக்குறிகளை இணைக்கவும்: Secure the relevant mounting bracket (speaker, camera, or cable retention) to the chosen surface using the provided screws. Ensure the bracket is level and firmly attached.
- சாதனத்தை ஏற்று: Carefully attach your Logitech Rally component to the installed bracket. The camera bracket is invertible, allowing for flexible orientation.
- பாதுகாப்பான கேபிள்கள்: Utilize the cable retention brackets to manage and secure cables, preventing accidental disconnections and maintaining a tidy installation. This feature ensures secure connections with robust cable retention.
- நிலைத்தன்மையை சரிபார்க்கவும்: After installation, gently test the mounted component to ensure it is stable and securely fastened.
இயக்க வழிமுறைகள்
Once properly installed, the Logitech Rally Mounting Kit provides a stable and secure platform for your Logitech Rally system components. No specific operational steps are required for the brackets themselves; their function is passive support.
பராமரிப்பு
The Logitech Rally Mounting Kit requires minimal maintenance. Periodically inspect the brackets and mounting points to ensure they remain secure. If any looseness is detected, re-tighten screws as necessary. Clean the brackets with a soft, dry cloth if dust accumulates.
சரிசெய்தல்
| பிரச்சினை | சாத்தியமான காரணம் | தீர்வு |
|---|---|---|
| நிறுவிய பின் அடைப்புக்குறி தளர்வாக உணர்கிறது. | Screws not fully tightened; incorrect anchors used; unsuitable mounting surface. | Ensure all screws are tightened. Use appropriate wall anchors for your surface type. If the surface is not suitable, relocate the mounting point. |
| Device does not fit onto the bracket. | Incorrect bracket for the device; device not aligned properly. | Verify you are using the correct bracket for the specific Logitech Rally component. Ensure proper alignment before attempting to secure the device. |
| Cables are not securely retained. | Cable retention bracket not used or improperly installed. | Ensure cable retention brackets are correctly installed and cables are routed through them as intended. |
விவரக்குறிப்புகள்
| பிராண்ட் | லாஜிடெக் |
| மாதிரி எண் | 939-001644 |
| தயாரிப்பு பரிமாணங்கள் | 4.92 x 11.14 x 3.27 அங்குலம் |
| பொருளின் எடை | 2.86 பவுண்டுகள் |
| நிறம் | கருப்பு |
| சிறப்பு அம்சங்கள் | Invertible camera bracket, robust cable retention brackets |
| மவுண்டிங் வகை | Ceiling Mount, Tripod, Wall Mount |
| இணக்கமான சாதனங்கள் | Logitech Rally Speakers, Cameras, Table Hub, Display Hub |
உத்தரவாதம் மற்றும் ஆதரவு
For information regarding warranty coverage and technical support for your Logitech Rally Mounting Kit, please refer to the official Logitech website or contact Logitech customer service directly. Keep your proof of purchase for warranty claims.
நீங்கள் கூடுதல் தகவல்களையும் ஆதரவு வளங்களையும் இங்கே காணலாம் Logitech official webதளம்.


