1. அறிமுகம்
This manual provides detailed instructions for setting up, operating, maintaining, and troubleshooting your HUAWEI 4G Wireless Router B311As-853. Please read this manual thoroughly before using the device to ensure proper and safe operation.
2. தொகுப்பு உள்ளடக்கங்கள்
உங்கள் தொகுப்பில் பின்வரும் உருப்படிகள் உள்ளதா என்பதைச் சரிபார்க்கவும்:
- HUAWEI 4G Wireless Router B311As-853
- பவர் அடாப்டர்
- விரைவு தொடக்க வழிகாட்டி (இந்த ஆவணம்)
- Ethernet Cable (may vary by region)
Note: Actual contents may vary. Please check the packaging for a complete list.
3. தயாரிப்பு முடிந்துவிட்டதுview
Familiarize yourself with the main components and indicators of your router.
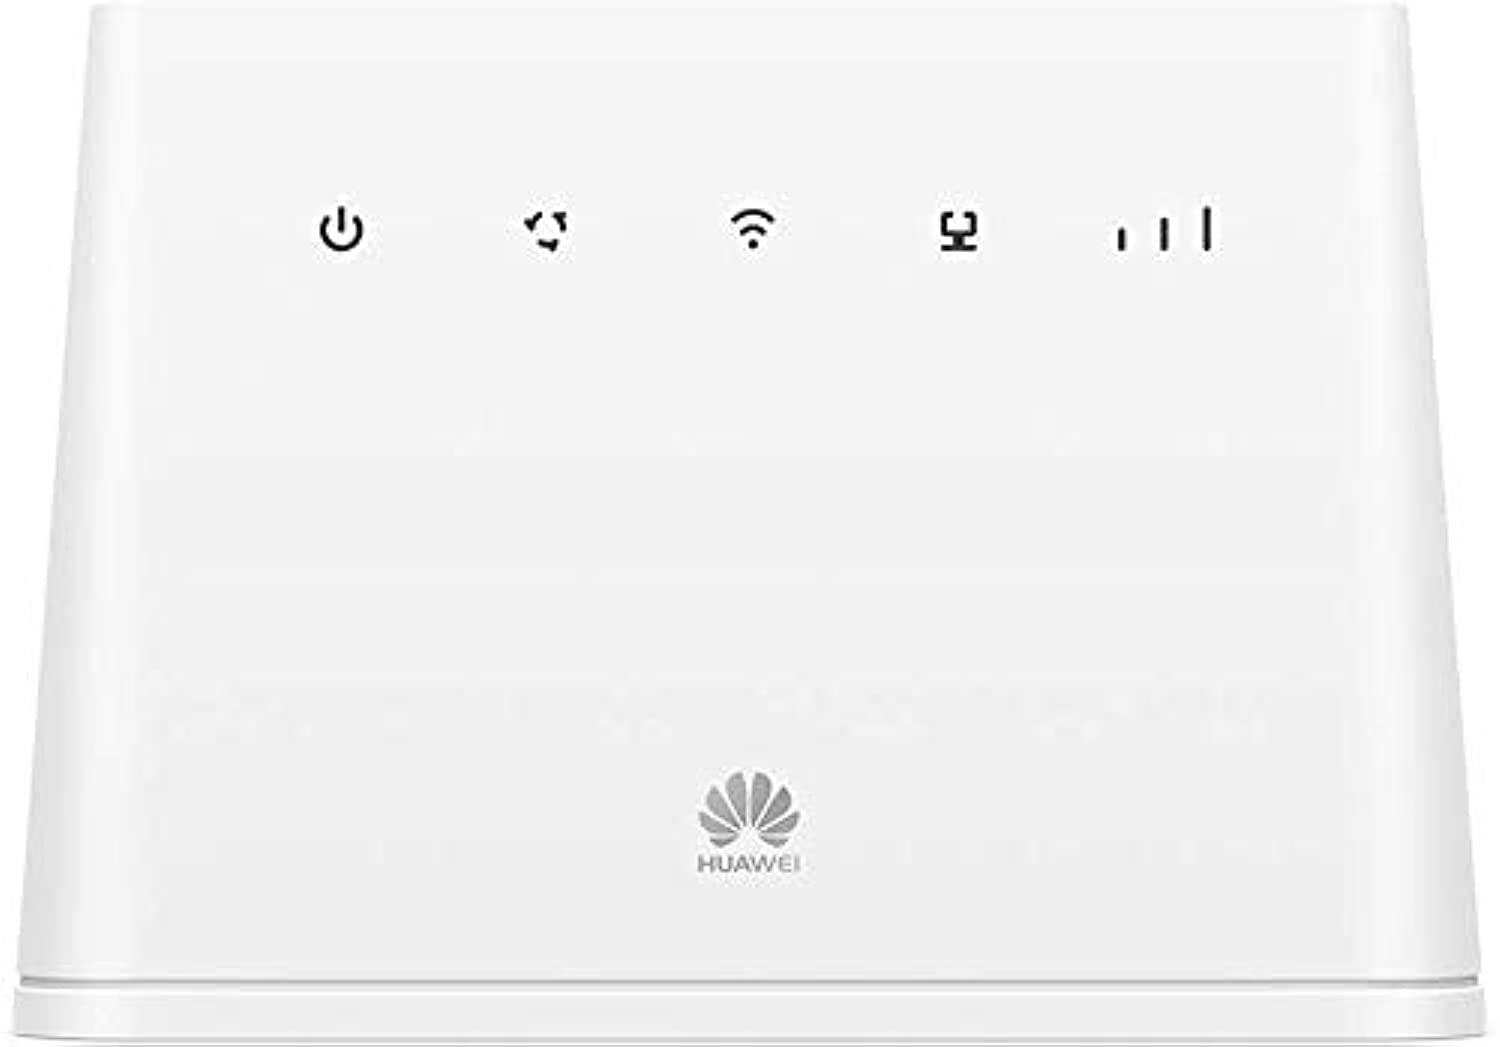
படம் 1: முன் view of the HUAWEI 4G Wireless Router B311As-853, showing power and WPS buttons, and indicator lights for power, network status, Wi-Fi, and signal strength.
காட்டி விளக்குகள்:
- சக்தி காட்டி: சக்தி நிலையைக் குறிக்கிறது.
- நெட்வொர்க் நிலை காட்டி: Shows connection to the 4G network.
- வைஃபை காட்டி: வைஃபை நிலையைக் காட்டுகிறது.
- சிக்னல் வலிமை காட்டி: Displays the strength of the 4G signal.
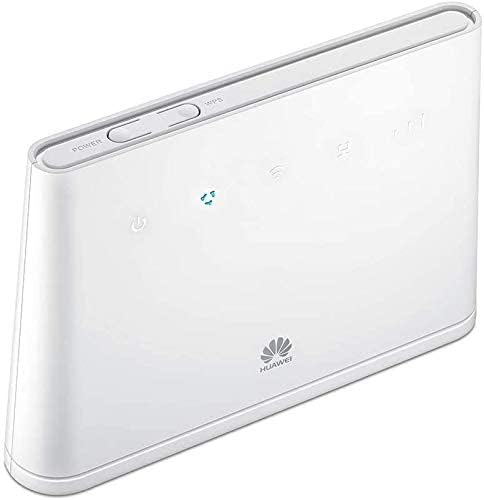
படம் 2: பக்கம் view of the HUAWEI 4G Wireless Router B311As-853, showing ports and SIM card slot.
துறைமுகங்கள் மற்றும் பொத்தான்கள்:
- பவர் போர்ட்: பவர் அடாப்டருடன் இணைக்கிறது.
- LAN/WAN போர்ட்: கணினி அல்லது பிற பிணைய சாதனங்களுடன் இணைகிறது.
- சிம் கார்டு ஸ்லாட்: உங்கள் 4G சிம் கார்டை இங்கே செருகவும்.
- மீட்டமை பொத்தான்: தொழிற்சாலை அமைப்புகளை மீட்டமைக்கப் பயன்படுகிறது.
- WPS பொத்தான்: For quick Wi-Fi Protected Setup.
4. அமைவு வழிகாட்டி
4.1. சிம் கார்டைச் செருகுதல்
- திசைவி அணைக்கப்பட்டுள்ளதா என்பதை உறுதிப்படுத்தவும்.
- Locate the SIM card slot, usually on the side or bottom of the device.
- Insert a standard 4G SIM card into the slot with the gold contacts facing down and the notched corner oriented correctly. Push until it clicks into place.
4.2. இணைக்கும் சக்தி
- பவர் அடாப்டரை ரூட்டரின் பவர் போர்ட்டுடன் இணைக்கவும்.
- பவர் அடாப்டரின் மறுமுனையை சுவர் கடையில் செருகவும்.
- Press the Power button to turn on the router. The Power indicator should light up.
4.3. ஆரம்ப கட்டமைப்பு
You can connect to the router via Wi-Fi or an Ethernet cable.
வைஃபை வழியாக இணைக்கிறது:
- On your computer or smartphone, search for available Wi-Fi networks.
- உங்கள் ரூட்டரின் கீழே உள்ள லேபிளில் அச்சிடப்பட்ட வைஃபை நெட்வொர்க் பெயரை (SSID) தேர்ந்தெடுக்கவும்.
- ரூட்டரின் லேபிளில் காணப்படும் வைஃபை கடவுச்சொல்லை (விசை) உள்ளிடவும்.
Connecting via Ethernet:
- Connect one end of an Ethernet cable to the LAN/WAN port on the router.
- ஈதர்நெட் கேபிளின் மறுமுனையை உங்கள் கணினியின் ஈதர்நெட் போர்ட்டுடன் இணைக்கவும்.
அணுகுகிறது Web மேலாண்மை பக்கம்:
- திற a web உலாவி (எ.கா., குரோம், பயர்பாக்ஸ், எட்ஜ்).
- முகவரிப் பட்டியில், இயல்புநிலை ஐபி முகவரியை தட்டச்சு செய்யவும் (பொதுவாக
192.168.8.1or192.168.1.1) அல்லது web address printed on the router's label, then press Enter. - இயல்புநிலை பயனர்பெயர் மற்றும் கடவுச்சொல்லை உள்ளிடவும் (பொதுவாக
adminஇரண்டிற்கும், அல்லது ரூட்டரின் லேபிளில் குறிப்பிடப்பட்டுள்ளபடி). - பாதுகாப்புக்காக இயல்புநிலை வைஃபை பெயர் மற்றும் கடவுச்சொல்லை மாற்றுவது உட்பட ஆரம்ப அமைப்பை முடிக்க திரையில் உள்ள வழிமுறைகளைப் பின்பற்றவும்.
5. இயக்க வழிமுறைகள்
5.1. இணைக்கும் சாதனங்கள்
Once the router is set up and connected to the internet, you can connect multiple devices:
- வைஃபை சாதனங்கள்: Connect smartphones, tablets, laptops, and other Wi-Fi enabled devices using the Wi-Fi name (SSID) and password you configured.
- கம்பி சாதனங்கள்: Use Ethernet cables to connect devices like desktop computers, smart TVs, or gaming consoles to the LAN ports.
5.2. காட்டி விளக்குகளைப் புரிந்துகொள்வது
The indicator lights provide important information about the router's status:
- சக்தி: அடர் பச்சை நிறம் பவர் ஆன் என்பதைக் குறிக்கிறது.
- நெட்வொர்க் நிலை: Solid blue/green indicates connected to 4G network; blinking indicates searching for network; red indicates no network or error.
- வைஃபை: Solid green indicates Wi-Fi is active; blinking indicates data transmission.
- சிக்னல் வலிமை: Multiple bars indicate strong signal; fewer bars indicate weaker signal.
5.3. அமைப்புகளை நிர்வகித்தல்
அணுகவும் web management page (as described in Section 4.3) to manage advanced settings such as:
- வைஃபை பெயர் மற்றும் கடவுச்சொல்லை மாற்றுதல்.
- Configuring network settings (APN, data limits).
- Managing connected devices.
- நிலைபொருளைப் புதுப்பித்தல்.
6. பராமரிப்பு
6.1. சுத்தம் செய்தல்
Regularly clean the router to prevent dust buildup:
- Power off the device and unplug it from the power outlet.
- வெளிப்புறத்தைத் துடைக்க மென்மையான, உலர்ந்த துணியைப் பயன்படுத்தவும்.
- திரவ கிளீனர்கள் அல்லது ஏரோசோல்களைப் பயன்படுத்த வேண்டாம்.
6.2. நிலைபொருள் புதுப்பிப்புகள்
Periodically check for and install firmware updates through the web மேலாண்மை பக்கம். நிலைபொருள் புதுப்பிப்புகள் செயல்திறனை மேம்படுத்தலாம், புதிய அம்சங்களைச் சேர்க்கலாம் மற்றும் பாதுகாப்பை மேம்படுத்தலாம்.
6.3. தொழிற்சாலை அமைப்புகளுக்கு மீட்டமைத்தல்
If you encounter persistent issues or forget your login credentials, you can reset the router to its factory default settings:
- With the router powered on, use a pointed object (like a paperclip) to press and hold the Reset button for approximately 5-10 seconds.
- Release the button when the indicators flash. The router will restart with factory settings.
- You will need to reconfigure the router after a factory reset.
7. சரிசெய்தல்
இந்தப் பிரிவு நீங்கள் சந்திக்கக்கூடிய பொதுவான சிக்கல்களைக் கையாள்கிறது.
7.1. இணைய இணைப்பு இல்லை
- சிம் கார்டை சரிபார்க்கவும்: சிம் கார்டு சரியாகச் செருகப்பட்டு செயலில் உள்ளதா என்பதை உறுதிப்படுத்தவும்.
- நெட்வொர்க் சிக்னல்: Check the Network Status and Signal Strength indicators. If the signal is weak or red, try moving the router to a location with better reception.
- APN அமைப்புகள்: Verify that the Access Point Name (APN) settings in the web management page are correct for your mobile operator.
- திசைவியை மறுதொடக்கம்: ரூட்டரை அணைத்து, சில வினாடிகள் காத்திருந்து, பின்னர் மீண்டும் இயக்கவும்.
7.2. மெதுவான Wi-Fi வேகம்
- சிக்னல் வலிமை: Ensure your connected device is within a good Wi-Fi signal range.
- குறுக்கீடு: Move the router away from other electronic devices that might cause interference (e.g., cordless phones, microwaves).
- பல சாதனங்கள்: Disconnect some devices if too many are simultaneously using the network.
- நிலைபொருள்: ரூட்டரின் ஃபார்ம்வேர் புதுப்பித்த நிலையில் இருப்பதை உறுதிசெய்யவும்.
7.3. அணுக முடியாது Web மேலாண்மை பக்கம்
- ஐபி முகவரி: உலாவியில் உள்ளிட்ட ஐபி முகவரியை இருமுறை சரிபார்க்கவும்.
- இணைப்பு: உங்கள் சாதனம் Wi-Fi அல்லது ஈதர்நெட் வழியாக ரூட்டருடன் சரியாக இணைக்கப்பட்டுள்ளதா என்பதை உறுதிப்படுத்தவும்.
- உலாவி தற்காலிக சேமிப்பு: உங்கள் உலாவியின் தற்காலிக சேமிப்பையும் குக்கீகளையும் அழிக்கவும் அல்லது வேறு உலாவியை முயற்சிக்கவும்.
- மீட்டமை: மற்ற அனைத்தும் தோல்வியுற்றால், தொழிற்சாலை மீட்டமைப்பைச் செய்யவும் (பிரிவு 6.3 ஐப் பார்க்கவும்).
8. விவரக்குறிப்புகள்
Key technical specifications for the HUAWEI 4G Wireless Router B311As-853:
| அம்சம் | விளக்கம் |
|---|---|
| பிராண்ட் | ஹவாய் |
| மாதிரி பெயர் | B311As-853 |
| இணைப்பு தொழில்நுட்பம் | வயர்லெஸ் |
| வயர்லெஸ் தொடர்பு தரநிலை | 802.11ac |
| அதிர்வெண் பேண்ட் வகுப்பு | இரட்டை இசைக்குழு |
| இணக்கமான சாதனங்கள் | ஸ்மார்ட்போன் |
| பரிந்துரைக்கப்பட்ட பயன்பாடுகள் | வீடு |
| உள்ளிட்ட கூறுகள் | திசைவி |
| இயக்க முறைமை | ரூட்டர்ஓஎஸ் |
| கப்பல் பரிமாணங்கள் | 22.8 x 18.6 x 6.2 செமீ; 670 கிராம் |
| உற்பத்தியாளர் குறிப்பு | 545542 |
9. பாதுகாப்பு தகவல்
பின்வரும் பாதுகாப்பு முன்னெச்சரிக்கை நடவடிக்கைகளைக் கவனியுங்கள்:
- சாதனத்தை தீவிர வெப்பநிலை, நேரடி சூரிய ஒளி அல்லது ஈரப்பதமான சூழல்களுக்கு வெளிப்படுத்த வேண்டாம்.
- சாதனத்துடன் வழங்கப்பட்ட அசல் பவர் அடாப்டரை மட்டும் பயன்படுத்தவும்.
- சாதனத்தை தண்ணீர் மற்றும் பிற திரவங்களிலிருந்து விலக்கி வைக்கவும்.
- சாதனத்தை நீங்களே திறக்கவோ அல்லது சரிசெய்யவோ முயற்சிக்காதீர்கள். தகுதிவாய்ந்த சேவை பணியாளர்களைப் பார்க்கவும்.
- அதிக வெப்பத்தைத் தடுக்க சாதனத்தைச் சுற்றி சரியான காற்றோட்டத்தை உறுதி செய்யவும்.
10. உத்தரவாதம் மற்றும் ஆதரவு
For warranty information and technical support, please refer to the warranty card included in your package or visit the official HUAWEI website. You can also contact HUAWEI customer service for assistance.
HUAWEI அதிகாரப்பூர்வமானது Webதளம்: consumer.huawei.com


