1. முக்கியமான பாதுகாப்பு வழிமுறைகள்
இந்த சாதனத்தைப் பயன்படுத்துவதற்கு முன் அனைத்து வழிமுறைகளையும் கவனமாகப் படித்து, எதிர்கால குறிப்புக்காக அவற்றை வைத்திருங்கள். இந்த வழிமுறைகளைப் பின்பற்றத் தவறினால் மின்சார அதிர்ச்சி, தீ அல்லது கடுமையான தனிப்பட்ட காயம் ஏற்படலாம்.
- எப்போதும் யூனிட்டை ஒரு தரையிறக்கப்பட்ட மின் நிலையத்துடன் இணைக்கவும்.
- சேதமடைந்த தண்டு அல்லது பிளக் மூலம் யூனிட்டை இயக்க வேண்டாம்.
- எரியக்கூடிய பொருட்கள் மற்றும் திறந்த தீப்பிழம்புகளிலிருந்து அலகை விலக்கி வைக்கவும்.
- செயல்பாட்டின் போது அலகு சுற்றி சரியான காற்றோட்டத்தை உறுதி செய்யவும்.
- காற்று நுழைவாயில் அல்லது கடையில் பொருட்களை செருக வேண்டாம்.
- சுத்தம் செய்வதற்கு முன் அல்லது பராமரிப்பு செய்வதற்கு முன் யூனிட்டைத் துண்டிக்கவும்.
- இந்த சாதனம் அவர்களின் பாதுகாப்பிற்குப் பொறுப்பான ஒருவரால் உபகரணத்தைப் பயன்படுத்துவது தொடர்பான மேற்பார்வை அல்லது அறிவுறுத்தல் வழங்கப்படாவிட்டால், குறைந்த உடல், உணர்ச்சி அல்லது மன திறன்கள் அல்லது அனுபவம் மற்றும் அறிவு இல்லாமை கொண்ட நபர்கள் (குழந்தைகள் உட்பட) பயன்படுத்துவதை நோக்கமாகக் கொண்டிருக்கவில்லை.
2. தயாரிப்பு முடிந்துவிட்டதுview
The FlinQ Mobile Air Conditioner is a versatile unit designed to provide cooling, dehumidification, and fan functions for your living space. It is equipped with an energy-efficient design and comes with a window kit for easy installation.

படம் 2.1: முன் view of the FlinQ Mobile Air Conditioner, showing the main air outlet and control panel area.

Figure 2.2: The mobile air conditioner unit, displaying its energy efficiency label (Class A) and the included remote control for convenient operation.
3. கூறுகள் மற்றும் பாகங்கள்
Familiarize yourself with the main components of your mobile air conditioner:
- Main Unit (with control panel)
- வெளியேற்ற குழாய்
- Window Sealing Kit (adjustable window slider/plate)
- ரிமோட் கண்ட்ரோல்
- Drain Hose (for continuous drainage in dehumidification mode)
- Air Filters (located on the back/side)
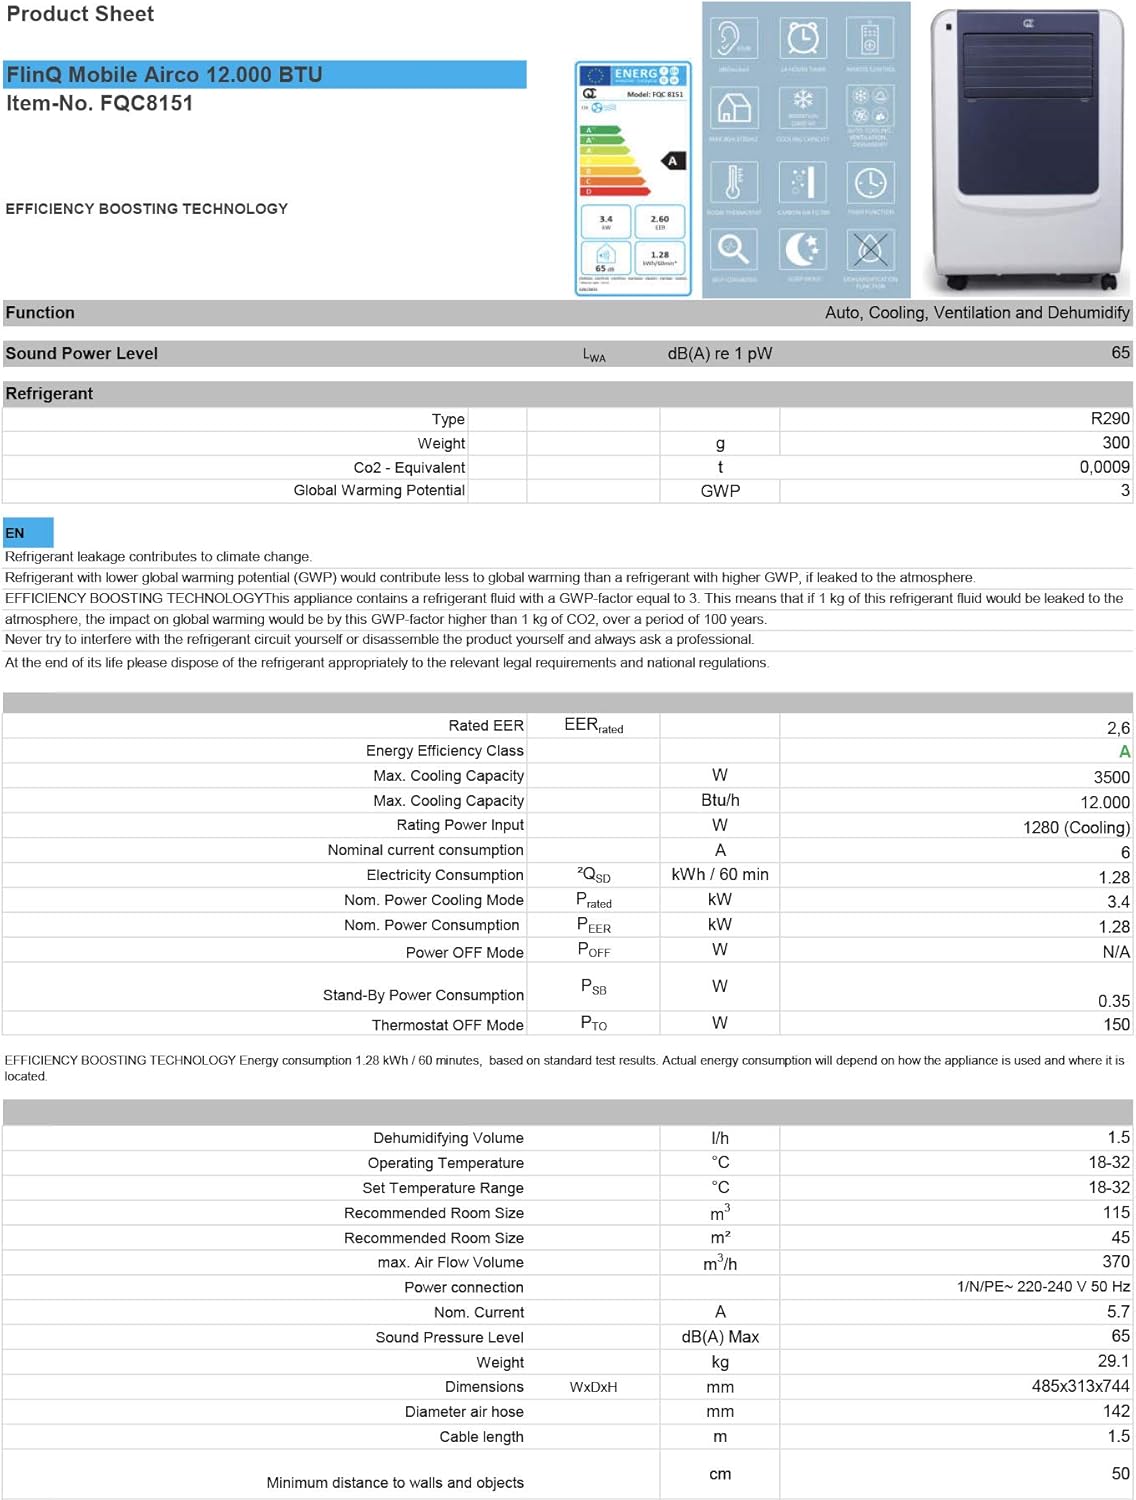
Figure 3.1: The remote control and a visual representation of the unit's key features, including noise level (65dB), 24-hour timer, cooling capacity (12000 BTU/h), room thermostat, carbon air filter, self-diagnosis, sleep mode, remote control function, timer function, auto cooling/fan/dehumidification, and dehumidification function.
4. அமைவு மற்றும் நிறுவல்
4.1 பேக்கிங்
Carefully remove the air conditioner and all accessories from the packaging. Inspect for any damage during transit. Keep the original packaging for future storage or transport.
4.2 வேலை வாய்ப்பு
Place the unit on a flat, stable surface. Ensure there is at least 30 cm (12 inches) of clear space around the unit for proper airflow. Do not place it near heat sources or in direct sunlight.
4.3 சாளர கிட் நிறுவல்
To ensure efficient cooling, the hot air extracted by the unit must be vented outside. Use the provided window sealing kit for this purpose.
- Attach the exhaust hose connector to the air outlet on the back of the unit.
- வெளியேற்ற குழாயை நீட்டி, மறுமுனையில் சாளர அடாப்டரை இணைக்கவும்.
- Adjust the window slider/plate to fit your window opening.
- Insert the window adapter into the opening of the window slider/plate.
- Close the window as much as possible to seal the opening around the kit, minimizing air leakage.

படம் 4.1: பக்கம் view of the mobile air conditioner, illustrating the connection point for the exhaust hose, which expels hot air from the room.
5. இயக்க வழிமுறைகள்
5.1 கண்ட்ரோல் பேனல்
The control panel is located on the top of the unit and features various buttons and an LED display for setting modes, temperature, and timer functions.
5.2 தொலை கட்டுப்பாடு
The remote control allows you to operate all functions of the air conditioner from a distance. Ensure the remote control batteries are inserted correctly.
5.3 இயக்க முறைகள்
கிடைக்கக்கூடிய இயக்க முறைமைகளின் வழியாகச் செல்ல 'பயன்முறை' பொத்தானை அழுத்தவும்:
- குளிரூட்டும் முறை: For cooling the room. Set your desired temperature using the temperature adjustment buttons.
- ஈரப்பதம் நீக்கும் முறை: Removes excess moisture from the air. The fan speed is typically fixed in this mode. Consider connecting a drain hose for continuous drainage.
- ரசிகர் பயன்முறை: Circulates air without cooling. You can adjust the fan speed (Low, Medium, High).

படம் 5.1: நெருக்கமான காட்சி view of the adjustable louvers on the air conditioner's front panel, which direct the airflow.
6. பராமரிப்பு
வழக்கமான பராமரிப்பு உகந்த செயல்திறனை உறுதிசெய்து உங்கள் ஏர் கண்டிஷனரின் ஆயுளை நீட்டிக்கிறது.
6.1 Cleaning Air Filters
The air filters should be cleaned every two weeks or more frequently depending on usage and air quality. Dirty filters reduce efficiency and can damage the unit.
- மின்சார இணைப்பிலிருந்து ஏர் கண்டிஷனரைத் துண்டிக்கவும்.
- Locate and remove the air filters (usually on the back or side of the unit).
- Wash the filters under running water (warm, not hot) or use a vacuum cleaner to remove dust.
- Allow the filters to air dry completely before reinserting them. Do not expose them to direct sunlight.

Figure 6.1: Illustration of how to remove the air filter from the mobile air conditioner for cleaning, highlighting the accessible filter panel.
6.2 வடிகால் நீர்
The unit collects condensed water during cooling and dehumidification. The internal tank will fill up, and the unit may stop operating when full. Drain the water regularly.
- வடிகால் துறைமுகத்தின் கீழ் (பொதுவாக அலகுக்குக் கீழே பின்புறத்தில்) ஒரு ஆழமற்ற பான் அல்லது தட்டில் வைக்கவும்.
- தண்ணீர் வெளியேற அனுமதிக்க வடிகால் பிளக்கை அகற்றவும்.
- For continuous drainage in dehumidification mode, attach the provided drain hose to the drain port.
6.3 சேமிப்பு
நீண்ட காலத்திற்கு அலகை சேமித்து வைக்கும் போது:
- யூனிட்டிலிருந்து அனைத்து தண்ணீரையும் வடிகட்டவும்.
- காற்று வடிகட்டிகளை சுத்தம் செய்யவும்.
- மின் கம்பியை அவிழ்த்து, அதை நேர்த்தியாகச் சுருட்டவும்.
- யூனிட்டை உலர்ந்த, குளிர்ந்த இடத்தில், முன்னுரிமை அதன் அசல் பேக்கேஜிங்கில் சேமிக்கவும்.
7. சரிசெய்தல்
வாடிக்கையாளர் ஆதரவைத் தொடர்புகொள்வதற்கு முன், பொதுவான சிக்கல்கள் மற்றும் அவற்றின் தீர்வுகளுக்கு பின்வரும் அட்டவணையைப் பார்க்கவும்:
| பிரச்சனை | சாத்தியமான காரணம் | தீர்வு |
|---|---|---|
| அலகு இயக்கப்படவில்லை | மின்சாரம் இல்லை; மின் கம்பி இணைக்கப்படவில்லை; தண்ணீர் தொட்டி நிரம்பியுள்ளது. | மின் நிலையத்தைச் சரிபார்க்கவும்; மின் கம்பியைச் செருகவும்; தண்ணீர் தொட்டியை வடிகட்டவும். |
| அலகு போதுமான அளவு குளிர்ச்சியடையவில்லை. | Dirty air filters; Exhaust hose blocked/leaking; Room too large; Doors/windows open | Clean filters; Check hose for blockages/proper sealing; Ensure room size is within capacity; Close doors/windows |
| அலகு சத்தமாக இருக்கிறது | Unit not on a flat surface; Air filters dirty | Place on flat surface; Clean air filters |
| யூனிட்டில் இருந்து நீர் கசிவு | Drain plug not properly sealed; Unit tilted | Ensure drain plug is secure; Place unit on a level surface |
8. விவரக்குறிப்புகள்
Technical details for the FlinQ Mobile Air Conditioner:
| அம்சம் | மதிப்பு |
|---|---|
| மாதிரி எண் | 8720168680396 |
| தயாரிப்பு பரிமாணங்கள் | 74 x 48 x 31 செ.மீ |
| பொருளின் எடை | 29 g (Note: This weight seems unusually low for an AC unit, please refer to product packaging for accurate weight) |
| இரைச்சல் நிலை | 65 டி.பி |
| குளிரூட்டும் திறன் | 12000 BTU/h |
| பரிந்துரைக்கப்பட்ட அறை அளவு | 45 m² வரை |
| சிறப்பு அம்சங்கள் | ரிமோட் கண்ட்ரோல் |
| ஆற்றல் வகுப்பு | A |

Figure 8.1: Official product sheet detailing technical specifications, energy consumption, cooling capacity, and dimensions of the FlinQ Mobile Air Conditioner.
9. உத்தரவாதம் மற்றும் ஆதரவு
This FlinQ Mobile Air Conditioner comes with a limited warranty. Please refer to the warranty card included with your purchase for specific terms and conditions.
For technical support, service, or warranty claims, please contact your retailer or the manufacturer directly. Keep your proof of purchase for warranty validation.
தொடர்பு தகவல்:
- பிராண்ட்: ஃபிளிங்க்
- Webதளம்: www.flinq.nl (எ.காample, please refer to actual product documentation for correct webதளம்)
- மின்னஞ்சல்: support@flinq.nl (எ.காample, please refer to actual product documentation for correct email)


