அறிமுகம்
This manual provides detailed instructions for the installation, operation, and maintenance of your Infinity PRIMUS3000A Primus Ampலிஃபையர். நிறுவ அல்லது இயக்க முயற்சிக்கும் முன் இந்த கையேட்டை முழுமையாகப் படிக்கவும். amplifier to ensure proper function and to prevent damage.
The Infinity PRIMUS3000A is a compact mono amplifier designed to deliver 300W of power. It features full on-board protection and input level control for optimal audio performance.
பாதுகாப்பு தகவல்
- எந்தவொரு நிறுவலையும் தொடங்குவதற்கு முன் எப்போதும் வாகனத்தின் எதிர்மறை பேட்டரி முனையத்தைத் துண்டிக்கவும்.
- Ensure all wiring is properly routed and secured to prevent damage from sharp edges or moving parts.
- Use appropriate gauge wiring for power and ground connections to prevent overheating and potential fire hazards.
- நிறுவவும் ampஅதிக வெப்பமடைவதைத் தடுக்க போதுமான காற்றோட்டத்தை அனுமதிக்கும் இடத்தில் லிஃபையர்.
- அம்பலப்படுத்த வேண்டாம் ampஈரப்பதம் அல்லது தீவிர வெப்பநிலைக்கு ஏற்றி.
- நிறுவல் செயல்முறையின் எந்தப் பகுதியிலும் உங்களுக்குத் தெரியாவிட்டால், தகுதிவாய்ந்த நிபுணரை அணுகவும்.
தொகுப்பு உள்ளடக்கங்கள்
தொகுப்பில் அனைத்து பொருட்களும் உள்ளதா என சரிபார்க்கவும்:
- இன்ஃபினிட்டி PRIMUS3000A பிரைமஸ் Ampஆயுள்
- பயனர் கையேடு
தயாரிப்பு முடிந்துவிட்டதுview
The Infinity PRIMUS3000A amplifier is designed for reliable performance in a compact form factor. Key features include:
- கச்சிதமான தடம்: Allows for flexible installation in various vehicle types.
- Full On-Board Protection: Safeguards the amplifier against short circuits, over-voltagமின், கீழ் தொகுதிtage, and thermal overload.
- உள்ளீட்டு நிலை கட்டுப்பாடு: Adjustable input sensitivity to match the output of your head unit.
Ampலைஃபையர் தளவமைப்பு
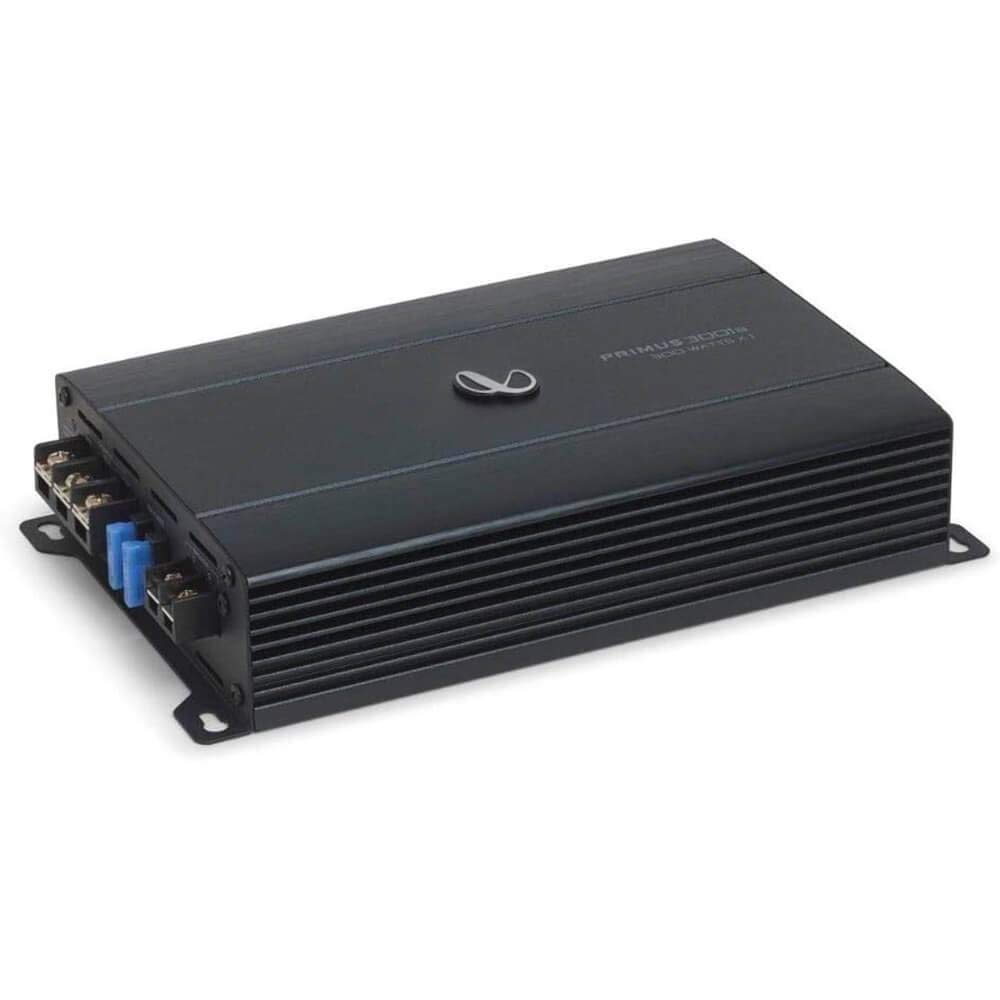
படம் 1: மேல் view of the Infinity PRIMUS3000A Primus Amplifier. This image displays the overall compact design of the amplifier, featuring the Infinity logo and model designation on the top panel.

படம் 2: Control panel of the Infinity PRIMUS3000A Primus Ampதூக்கிலிடுபவர். இது view shows the input section with High Input and Line Input terminals, along with adjustable controls for Gain, Level, Frequency (FREQ), Low-Pass Filter (LPF), and Phase.

படம் 3: Power and speaker connection terminals of the Infinity PRIMUS3000A Primus Amplifier. This image highlights the GND (Ground), REM (Remote), +12V (Power), and Speaker output terminals, along with the dual 15A fuses for protection.
அமைவு மற்றும் நிறுவல்
Proper installation is crucial for optimal performance and safety. Follow these general guidelines:
1. மவுண்டிங் இடம்
- நேரடி சூரிய ஒளி மற்றும் வெப்ப மூலங்களிலிருந்து விலகி, உலர்ந்த, நன்கு காற்றோட்டமான இடத்தைத் தேர்வு செய்யவும்.
- Ensure the mounting surface is sturdy enough to support the amplifier's weight.
- Allow sufficient space around the ampகாற்று சுழற்சிக்கு ஏற்றி.
2. வயரிங் இணைப்புகள்
எந்தவொரு இணைப்பையும் ஏற்படுத்துவதற்கு முன், வாகனத்தின் எதிர்மறை பேட்டரி முனையத்தைத் துண்டிக்கவும்.
- சக்தி (+12V): Connect a suitable gauge power cable directly from the vehicle's positive battery terminal to the amplifier's "+12V" terminal. Install an in-line fuse holder (not supplied) within 18 inches (45 cm) of the battery.
- மைதானம் (GND): Connect a suitable gauge ground cable from the amplifier's "GND" terminal to a clean, unpainted metal surface on the vehicle's chassis. Ensure a good electrical connection.
- ரிமோட் (REM): உங்கள் ஹெட் யூனிட்டின் ரிமோட் அவுட்புட்டிலிருந்து ரிமோட் டர்ன்-ஆன் வயரை இணைக்கவும் amplifier's "REM" terminal. This wire turns the ampஉங்கள் ஹெட் யூனிட்டுடன் லிஃபையரை ஆன் மற்றும் ஆஃப் செய்யவும்.
- ஆடியோ உள்ளீடு:
- வரி உள்ளீடு (RCA): உங்கள் ஹெட் யூனிட்டின் முன்-ல் இருந்து RCA கேபிள்களை இணைக்கவும்.amp வெளியீடு amplifier's "LINE INPUT" jacks.
- High Input (Speaker Level): If your head unit does not have RCA outputs, connect the speaker output wires from your head unit to the amplifier's "HIGH INPUT" terminals.
- பேச்சாளர் வெளியீடு: உங்கள் ஒலிபெருக்கி(களை) உடன் இணைக்கவும் amplifier's "SPEAKER" terminals. Ensure correct polarity (+ to + and - to -). Refer to your subwoofer's specifications for proper impedance matching.
இயக்க வழிமுறைகள்
ஒருமுறை தி amplifier is installed and wired, follow these steps for initial setup and operation:
- ஆரம்ப பவர்-அப்: Reconnect the vehicle's negative battery terminal. Turn on your head unit. The amplifier should power on (indicated by an LED, if present).
- Gain/Level Adjustment:
- அமைக்கவும் amplifier's "GAIN" or "LEVEL" control to its minimum position.
- Play a familiar piece of music at a moderate volume on your head unit (around 75% of maximum).
- மெதுவாக அதிகரிக்கவும் ampநீங்கள் விலகலைக் கேட்கும் வரை லிஃபையரின் கட்டுப்பாட்டைப் பெறுங்கள், பின்னர் ஒலி தெளிவாக இருக்கும் வரை அதை சற்று பின்வாங்கவும்.
- லோ-பாஸ் வடிகட்டி (LPF): The LPF control allows you to set the upper frequency limit for the subwoofer. Adjust this control (e.g., between 40Hz and 120Hz) to blend the subwoofer's output smoothly with your main speakers.
- கட்ட கட்டுப்பாடு: The "PHASE" switch (0°/180°) helps to align the subwoofer's output with the main speakers. Experiment with both settings to find the one that provides the most impactful and cohesive bass response.
பராமரிப்பு
- சுத்தம்: அவ்வப்போது துடைக்கவும் ampமென்மையான, உலர்ந்த துணியால் லிஃபையரின் வெளிப்புறத்தை துடைக்கவும். கடுமையான இரசாயனங்கள் அல்லது சிராய்ப்பு கிளீனர்களைப் பயன்படுத்த வேண்டாம்.
- ஆய்வு: Regularly check all wiring connections for tightness and signs of corrosion or damage. Ensure adequate ventilation around the ampஆயுள்.
- உருகிகள்: தி amplifier is equipped with two 15A fuses. If a fuse blows, replace it only with a fuse of the same type and rating. Never use a higher-rated fuse.
சரிசெய்தல்
| பிரச்சனை | சாத்தியமான காரணம் | தீர்வு |
|---|---|---|
| சக்தி இல்லை / Ampஆன் செய்யவில்லை |
|
|
| ஒலி வெளியீடு இல்லை |
|
|
| சிதைந்த ஒலி |
|
|
| Amplifier goes into protection mode |
|
|
விவரக்குறிப்புகள்
| மாதிரி எண் | PRIMUS3000A |
| பிராண்ட் | முடிவிலி |
| சக்தி வெளியீடு | 300W x 1 (Mono) |
| தயாரிப்பு பரிமாணங்கள் (L x W x H) | 12.5 x 7.6 x 3.9 அங்குலம் |
| பொருளின் எடை | 3.75 பவுண்டுகள் |
| அதிகபட்ச வழங்கல் தொகுதிtage | 14.4 வோல்ட் (DC) |
| மவுண்டிங் வகை | மேற்பரப்பு மவுண்ட் |
உத்தரவாதம் மற்றும் ஆதரவு
This product is covered by a manufacturer's warranty. For specific warranty terms and conditions, please refer to the documentation included with your purchase or visit the official Infinity website. For technical support or service inquiries, please contact Infinity customer service.
As this is a renewed product, please also refer to the Amazon Renewed Guarantee for details regarding replacement or refund options, as mentioned in the product description.


