அறிமுகம்
This manual provides detailed instructions for the Mackie Onyx16 16-Channel Premium Analog Mixer with Multi-Track USB. The Onyx16 is designed for live audio, home recording, and content creation, offering 24-Bit / 96kHz multitrack recording, high-gain Onyx mic preamps, and an ultra-low-noise design. It includes powerful DSP effects, British-style Perkins EQ, a full-color display, and integrated recording and playback from an SD card. Please read this manual thoroughly to ensure proper setup and operation of your device.
முக்கியமான பாதுகாப்பு தகவல்
- சக்தி ஆதாரம்: Connect the mixer only to the specified power source as indicated on the unit.
- காற்றோட்டம்: அலகு சுற்றி போதுமான காற்றோட்டத்தை உறுதி செய்யவும். காற்றோட்ட திறப்புகளை அடைக்க வேண்டாம்.
- நீர் மற்றும் ஈரப்பதம்: மழை அல்லது ஈரப்பதத்திற்கு அலகை வெளிப்படுத்த வேண்டாம். திரவங்களால் நிரப்பப்பட்ட பொருட்களை அலகின் மீது வைக்க வேண்டாம்.
- வெப்பம்: ரேடியேட்டர்கள், வெப்பப் பதிவேடுகள், அடுப்புகள் அல்லது வெப்பத்தை உருவாக்கும் பிற சாதனங்கள் போன்ற வெப்ப மூலங்களிலிருந்து யூனிட்டை விலக்கி வைக்கவும்.
- சேவை: இந்த தயாரிப்புக்கு நீங்களே சேவை செய்ய முயற்சிக்காதீர்கள். தகுதிவாய்ந்த சேவை ஊழியர்களுக்கு அனைத்து சேவைகளையும் பார்க்கவும்.
- கேபிள்கள்: குறிப்பாக பிளக்குகள், கன்வீனியன் ரிசெப்டக்கிள்கள் மற்றும் எந்திரத்தில் இருந்து அவை வெளியேறும் இடத்தில் பவர் கார்டு நடக்காமல் அல்லது கிள்ளப்படாமல் பாதுகாக்கவும்.
பெட்டியில் என்ன இருக்கிறது
Upon unpacking your Mackie Onyx16 mixer, verify that all the following items are included:
- Mackie Onyx16 16-Channel Premium Analog Mixer
- பவர் கார்ட்
- USB கேபிள்
- விரைவு தொடக்க வழிகாட்டி
- DAW Software & Plug-Ins (download information typically provided)
அமைவு வழிகாட்டி
1. பிரித்தல் மற்றும் இடம் அமைத்தல்
Carefully remove the mixer from its packaging. Place the mixer on a stable, flat surface, ensuring there is adequate space for ventilation and cable connections.
2. உடல் இணைப்புகள்
Before connecting any audio devices, ensure the mixer and all connected equipment are powered off.
- சக்தி: Connect the supplied power cord to the mixer's power inlet and then to a suitable AC power outlet.
- ஆடியோ உள்ளீடுகள்: Connect microphones to the XLR inputs (channels 1-16) and line-level instruments or devices to the 1/4" TRS/TS inputs. Channels 1 and 2 feature Hi-Z inputs for direct instrument connection.
- முக்கிய வெளியீடுகள்: உங்கள் பிரதான ஸ்பீக்கர்கள் அல்லது பவரை இணைக்கவும் amplifier to the MAIN OUT (XLR or 1/4" TRS) connectors.
- வெளியீடுகளைக் கண்காணிக்கவும்: Connect studio monitors to the CONTROL ROOM OUT (1/4" TRS) for monitoring.
- ஹெட்ஃபோன்கள்: Plug your headphones into the PHONES jack.
- USB இணைப்பு: For multi-track recording and playback with a computer, connect the mixer to your Mac or PC using the supplied USB cable.

படம் 1: முன் குழு view of the Mackie Onyx16 mixer, showing all controls and input channels.
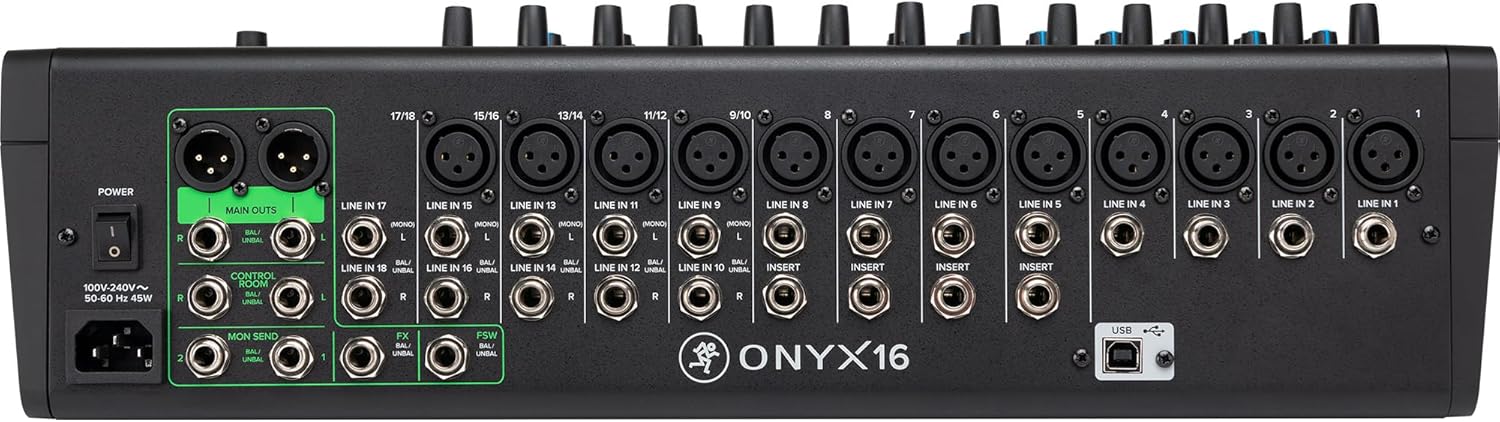
படம் 2: பின்புற பேனல் view of the Mackie Onyx16 mixer, detailing the various input and output connectors including XLR, 1/4" TRS, and USB.
3. Driver Installation (for USB)
For Windows users, it may be necessary to install specific drivers for multi-track USB functionality. Visit the official Mackie website for the latest drivers compatible with your operating system. Mac users typically do not require additional drivers.
4. ஆரம்ப பவர்-அப்
Once all connections are secure, power on your audio sources first, then the Mackie Onyx16 mixer, and finally your powered speakers or amplifier. Reverse this order when powering down.
இயக்க வழிமுறைகள்
1. Channel Strip Overview
Each input channel on the Onyx16 features a dedicated set of controls for signal processing.
- கட்டுப்பாட்டில் கொண்டுவா: Adjusts the input sensitivity for microphones or line-level signals. Use the PFL/Solo button to monitor the input level and prevent clipping.
- குறைந்த வெட்டு வடிகட்டி: Engages a high-pass filter to remove unwanted low-frequency rumble.
- Perkins EQ: A 3-band "British-style" equalizer with sweepable midrange for precise tone shaping.
- Aux Sends: Controls the amount of signal sent to external effects processors or monitor mixes.
- பான் கட்டுப்பாடு: ஸ்டீரியோ புலத்திற்குள் (இடமிருந்து வலமாக) சேனலின் சிக்னலை நிலைநிறுத்துகிறது.
- முடக்கு பொத்தான்: Silences the channel's output to the main mix and aux sends.
- தனி பட்டன்: Isolates the channel's signal for monitoring through headphones or control room outputs without affecting the main mix.
- சேனல் ஃபேடர்: பிரதான கலவையில் சேனலின் ஒட்டுமொத்த ஒலியளவை சரிசெய்கிறது.
2. Master Section Controls
The master section manages the overall output and monitoring of the mixer.
- முக்கிய மிக்ஸ் ஃபேடர்கள்: Controls the overall volume of the stereo main output.
- Control Room/Phones Level: Adjusts the volume for the control room outputs and headphone jack.
- முக்கிய மீட்டர்கள்: Displays the output level of the main stereo mix.
- பாண்டம் பவர் (+48V): Activates phantom power for condenser microphones connected to XLR inputs. This is a global switch.

படம் 3: கோணல் view of the Mackie Onyx16, highlighting the layout of channel strips and master section controls.
3. USB Multi-Track Recording and Playback
The Onyx16 offers high-resolution 96kHz / 24-bit multi-track recording to a connected Mac or PC.
- Connecting to DAW: After connecting via USB, select the Onyx16 as your audio interface in your Digital Audio Workstation (DAW) software.
- ரூட்டிங்: Individual channels can be routed to separate tracks in your DAW for multi-track recording. The mixer also allows for playback from your DAW back through the mixer.
4. SD Card Stereo Recording and Playback
Record your stereo mix directly to an SD card without a computer.
- SD கார்டைச் செருகவும்: Insert a formatted SD card into the SD card slot.
- பதிவு: Use the dedicated transport controls (Record, Play, Pause) in the Studio Command section to manage SD card operations. The mixer records the main stereo mix.
- பின்னணி: Play back audio files directly from the SD card through the mixer.
5. புளூடூத் ஸ்ட்ரீமிங்
Stream audio wirelessly to the mixer via Bluetooth.
- இணைத்தல்: Press and hold the "PAIR" button in the Bluetooth section until the indicator flashes. On your device, select "Onyx16" from the Bluetooth device list to pair.
- பின்னணி: Once paired, audio streamed from your device will play through a dedicated stereo channel on the mixer.

Figure 4: Close-up of the Studio Command section, showing Bluetooth pairing controls and SD card recording/playback buttons.
6. Digital Effects Engine
The Onyx16 includes a robust digital effects engine with customizable reverbs, delays, and more.
- விளைவுகளைத் தேர்ந்தெடுப்பது: Use the display and rotary encoder in the FX section to browse and select desired effects.
- விளைவுகளைப் பயன்படுத்துதல்: Use the dedicated FX send controls on each channel strip to send signal to the effects processor. The FX Return fader controls the overall level of the effects in the main mix.
பராமரிப்பு
- சுத்தம்: Use a soft, dry cloth to clean the exterior of the mixer. Avoid abrasive cleaners or solvents.
- தூசி பாதுகாப்பு: பயன்பாட்டில் இல்லாதபோது, மிக்சியை தூசி மற்றும் குப்பைகளிலிருந்து பாதுகாக்க மூடி வைக்கவும்.
- சேமிப்பு: Store the mixer in a cool, dry environment away from direct sunlight and extreme temperatures.
- நிலைபொருள் புதுப்பிப்புகள்: Periodically check the Mackie website for any available firmware updates for your Onyx16 mixer. Follow the instructions provided with the update carefully.
சரிசெய்தல்
If you encounter issues with your Mackie Onyx16, refer to the following common troubleshooting steps. For more detailed information, consult the full user manual available on the Mackie webதளம்.
- ஒலி வெளியீடு இல்லை:
- அனைத்து கேபிள் இணைப்புகளையும் (உள்ளீடுகள், வெளியீடுகள், சக்தி) சரிபார்க்கவும்.
- Ensure main mix faders and channel faders are up.
- Verify that Mute buttons are not engaged on channels or master.
- Check gain settings on input channels.
- Confirm speakers/amplifiers are powered on and connected correctly.
- ஹம் அல்லது சத்தம்:
- அனைத்து கேபிள்களும் நல்ல நிலையில் இருப்பதையும், சரியாகப் பாதுகாக்கப்பட்டுள்ளதையும் உறுதிசெய்யவும்.
- Check for ground loops; try connecting all equipment to the same power strip.
- Reduce gain settings if input signal is too hot.
- USB Recording Issues:
- USB கேபிள் இணைப்பைச் சரிபார்க்கவும்.
- Ensure correct drivers are installed (Windows).
- Confirm the Onyx16 is selected as the audio interface in your DAW settings.
- Effects Not Working:
- Check FX send levels on individual channels.
- Ensure the FX Return fader is up.
- Verify an effect is selected and active in the digital effects engine.
விவரக்குறிப்புகள்
| அம்சம் | விவரம் |
|---|---|
| மாதிரி எண் | ஓனிக்ஸ்16 |
| சேனல்களின் எண்ணிக்கை | 16 |
| பொருளின் எடை | 20.6 பவுண்டுகள் |
| தயாரிப்பு பரிமாணங்கள் | 14.02 x 18.7 x 5.39 அங்குலம் |
| வன்பொருள் இடைமுகம் | Bluetooth, Secure Digital Card, USB 2.0 |
| சக்தி ஆதாரம் | கம்பியூட்டப்பட்ட மின்சாரம் |
| இணைப்பு தொழில்நுட்பம் | USB |
| Multi-Track Recording | 24-Bit / 96kHz via USB |
| மைக் ப்ரீamps | Onyx, up to 60dB gain |
| சமன்பாடு | Perkins "British style" EQ with sweepable midrange |
| விளைவுகள் | Robust digital effect engine (reverbs, delays, etc.) |
உத்தரவாதம் மற்றும் ஆதரவு
Mackie products are designed for reliability and performance. For specific warranty details, please refer to the warranty card included with your product or visit the official Mackie webதளம்.
For technical support, product registration, or to download the full user manual (PDF), please visit the official Mackie support page:Mackie Onyx16 Full User Manual (PDF)
கூடுதல் ஆதாரங்கள் மற்றும் தொடர்புத் தகவல்களையும் நீங்கள் காணலாம் Mackie Store on Amazon.


