1. அறிமுகம்
நன்றி, நன்றி.asing the Kimwood Bluetooth Headset. This manual provides detailed instructions on how to set up, operate, and maintain your headset. Please read this manual carefully before use to ensure optimal performance and longevity of your device.

Figure 1.1: Kimwood Bluetooth Headset with its charging case.
2. பாதுகாப்பு தகவல்
- ஹெட்செட்டை தீவிர வெப்பநிலை, ஈரப்பதம் அல்லது அரிக்கும் பொருட்களுக்கு வெளிப்படுத்த வேண்டாம்.
- ஹெட்செட்டை கீழே போடுவதையோ அல்லது வலுவான தாக்கங்களுக்கு உட்படுத்துவதையோ தவிர்க்கவும்.
- Do not disassemble or modify the headset. This will void the warranty and may cause damage.
- ஹெட்செட்டை குழந்தைகள் மற்றும் செல்லப்பிராணிகளிடமிருந்து விலக்கி வைக்கவும்.
- வழங்கப்பட்ட சார்ஜிங் கேபிள் மற்றும் இணக்கமான பவர் அடாப்டரை மட்டும் பயன்படுத்தவும்.
3. தொகுப்பு உள்ளடக்கங்கள்
பின்வரும் பொருட்களுக்கு தொகுப்பைச் சரிபார்க்கவும்:
- Kimwood Bluetooth Headset
- சார்ஜிங் கேஸ்
- யூ.எஸ்.பி டைப்-சி சார்ஜிங் கேபிள்
- பயனர் கையேடு

படம் 3.1: தொகுப்பில் சேர்க்கப்பட்டுள்ள பொருட்கள்.
4. தயாரிப்பு முடிந்துவிட்டதுview
Familiarize yourself with the components of your Kimwood Bluetooth Headset:
| இல்லை | கூறு | செயல்பாடு |
|---|---|---|
| 1 | பவர்/மல்டி ஃபங்க்ஷன் பட்டன் | Power On/Off, Play/Pause, Answer/End Call, Voice Assistant |
| 2 | வால்யூம் அப்/அடுத்த ட்ராக் | Increase volume, skip to next track (long press) |
| 3 | தொகுதி டவுன்/முந்தைய டிராக் | Decrease volume, go to previous track (long press) |
| 4 | ஒலிவாங்கி | Picks up your voice for calls |
| 5 | சார்ஜிங் போர்ட் (வகை-சி) | Connects to charging cable |
| 6 | LED காட்டி | Shows power, pairing, and charging status |
5 அமைவு
5.1 ஹெட்செட் மற்றும் கேஸை சார்ஜ் செய்தல்
Before first use, fully charge the headset and its charging case.
- Connect the USB Type-C cable to the charging port on the case.
- கேபிளின் மறுமுனையை USB பவர் மூலத்துடன் இணைக்கவும் (எ.கா. கணினி, சுவர் அடாப்டர்).
- சார்ஜிங் கேஸில் உள்ள டிஜிட்டல் டிஸ்ப்ளே பேட்டரி சதவீதத்தைக் காண்பிக்கும்.tage. When fully charged, it will display "100".
- Place the headset into the charging case. The headset will automatically begin charging.
The charging case has a 500mAh battery, and the earphone has a 100mAh battery. A full charge takes approximately 1.5 hours.

Figure 5.1: Charging the headset and case.
5.2 புளூடூத் சாதனத்துடன் இணைத்தல்
The headset supports Bluetooth 5.1 for stable and automatic connections.
- Take the headset out of the charging case. It will automatically power on and enter pairing mode (LED indicator will flash blue).
- உங்கள் சாதனத்தில் (ஸ்மார்ட்போன், டேப்லெட், பிசி), புளூடூத்தை இயக்கவும்.
- தேடுங்கள் available Bluetooth devices and select "VYK-B26" from the list.
- Once connected, the LED indicator on the headset will stop flashing and remain solid blue. A voice prompt will confirm the connection.
After the initial pairing, the headset will automatically connect to the last paired device when taken out of the case.

Figure 5.2: Automatic pairing process.
5.3 ஹெட்செட் அணிதல்
The ear-hook design allows for comfortable wear on either the left or right ear. The microphone and ear hook can be rotated to fit your preference.
- Adjust the ear hook to fit securely around your ear.
- Rotate the microphone arm up to 180 degrees and the ear hook up to 360 degrees to find the optimal position for comfort and clear voice pickup.

Figure 5.3: Adjusting the headset for left or right ear use.
6. இயக்க வழிமுறைகள்
6.1 பவர் ஆன்/ஆஃப்
- பவர் ஆன்: Take the headset out of the charging case, or long-press the Multi-function Button for 3 seconds.
- பவர் ஆஃப்: Place the headset back into the charging case, or long-press the Multi-function Button for 5 seconds.
6.2 அழைப்பு செயல்பாடுகள்
- பதில்/முடிவு அழைப்பு: மல்டி ஃபங்க்ஷன் பட்டனை சுருக்கமாக அழுத்தவும்.
- அழைப்பை நிராகரி: Long press the Multi-function Button for 2 seconds.
- மைக்ரோஃபோனை முடக்கு/அன்முட்: During a call, long press the Volume Up or Volume Down button for approximately 3 seconds.

Figure 6.1: Mute function and unidirectional microphone for clear calls.
6.3 இசை பின்னணி
- விளையாடு/இடைநிறுத்தம்: மல்டி ஃபங்க்ஷன் பட்டனை சுருக்கமாக அழுத்தவும்.
- அடுத்த ட்ராக்: வால்யூம் அப் பட்டனை சுருக்கமாக அழுத்தவும்.
- முந்தைய ட்ராக்: வால்யூம் டவுன் பட்டனை சுருக்கமாக அழுத்தவும்.
6.4 தொகுதி கட்டுப்பாடு
- அளவை அதிகரிக்கும்: வால்யூம் அப் பட்டனை சுருக்கமாக அழுத்தவும்.
- ஒலியைக் குறைக்கவும்: வால்யூம் டவுன் பட்டனை சுருக்கமாக அழுத்தவும்.
6.5 குரல் உதவியாளர்
Activate your device's voice assistant (Siri, Google Assistant, etc.) directly from the headset.
- குரல் உதவியாளரைச் செயலாக்கு: While the headset is connected and in standby mode, long press the Multi-function Button for 2 seconds.
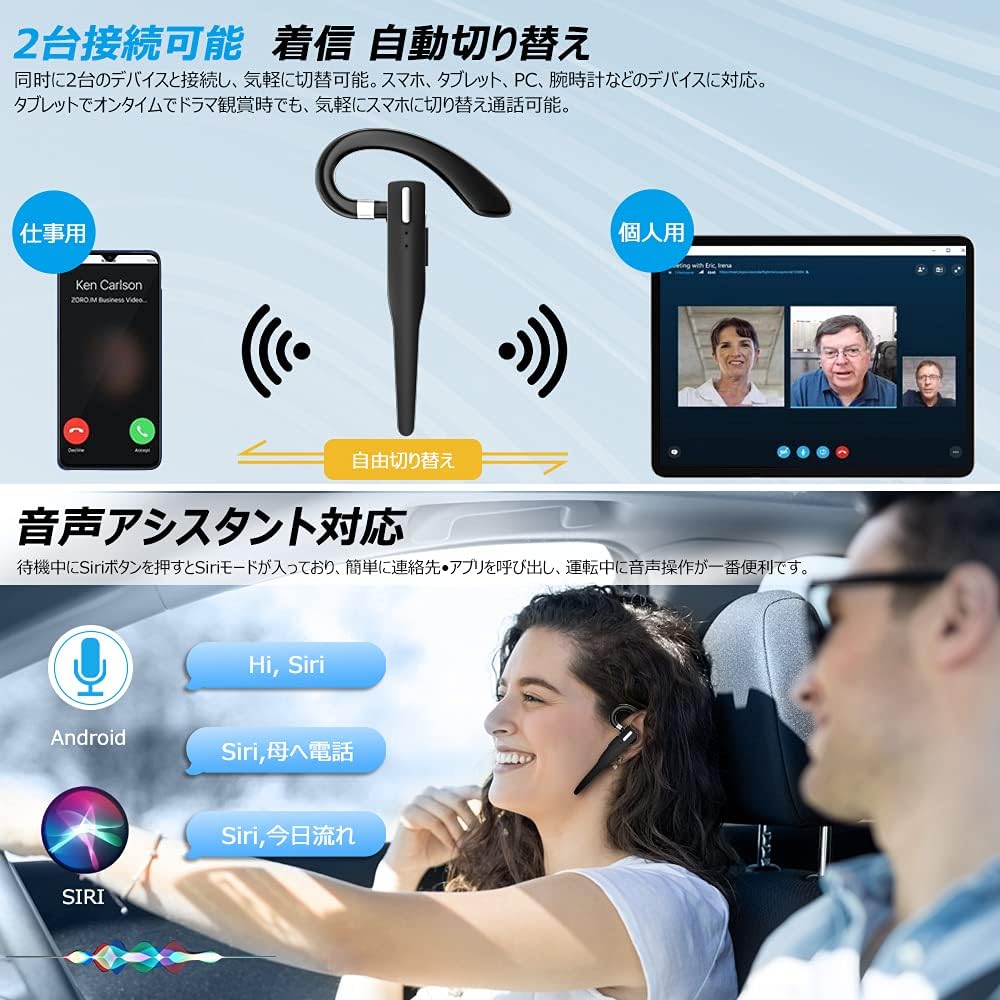
Figure 6.2: Multi-device connectivity and voice assistant features.
6.6 பல சாதன இணைப்பு
The headset can connect to two Bluetooth devices simultaneously, allowing for seamless switching between them.
- Pair the headset with the first device as described in Section 5.2.
- Turn off Bluetooth on the first device. The headset will re-enter pairing mode.
- இரண்டாவது சாதனத்துடன் ஹெட்செட்டை இணைக்கவும்.
- Turn on Bluetooth on the first device. The headset should now be connected to both devices.
- The headset will automatically switch audio output to the device that is actively playing media or receiving a call.
7. பராமரிப்பு
7.1 சுத்தம் செய்தல்
- Wipe the headset and charging case with a soft, dry, lint-free cloth.
- கடுமையான இரசாயனங்கள், துப்புரவு கரைப்பான்கள் அல்லது வலுவான சவர்க்காரங்களைப் பயன்படுத்த வேண்டாம்.
7.2 சேமிப்பு
- When not in use, store the headset in its charging case to protect it from dust and damage.
- நேரடி சூரிய ஒளி மற்றும் தீவிர வெப்பநிலையிலிருந்து விலகி, குளிர்ந்த, உலர்ந்த இடத்தில் சாதனத்தை சேமிக்கவும்.

Figure 7.1: The compact charging case provides convenient storage.
8. சரிசெய்தல்
உங்கள் ஹெட்செட்டில் சிக்கல்கள் ஏற்பட்டால், பின்வரும் பொதுவான சிக்கல்கள் மற்றும் தீர்வுகளைப் பார்க்கவும்:
| பிரச்சனை | சாத்தியமான காரணம் | தீர்வு |
|---|---|---|
| ஹெட்செட் இயக்கப்படவில்லை. | குறைந்த பேட்டரி. | Charge the headset and charging case. |
| சாதனத்துடன் இணைக்க முடியவில்லை. | Bluetooth is off on device; headset not in pairing mode; too far from device. | Ensure Bluetooth is on; take headset out of case to enter pairing mode; keep within 10 meters. |
| ஒலி இல்லை அல்லது குறைந்த அளவு. | Volume too low; headset not connected; sound output set to another device. | Increase volume on headset and device; re-pair headset; check device's audio output settings. |
| மைக்ரோஃபோன் வேலை செய்யவில்லை. | Microphone muted; incorrect audio input settings on device. | Unmute microphone (long press Volume Up/Down); check device's audio input settings. |
| Connection unstable or drops. | குறுக்கீடு; சாதனத்திலிருந்து மிக தொலைவில்; குறைந்த பேட்டரி. | Move closer to device; avoid strong electromagnetic interference; charge headset. |
9. விவரக்குறிப்புகள்
| அம்சம் | விவரம் |
|---|---|
| மாதிரி | VYK-B26 |
| புளூடூத் பதிப்பு | 5.1 |
| சத்தம் ரத்து | CVC8.0 |
| ஹெட்செட் பேட்டரி திறன் | 100mAh |
| சார்ஜிங் கேஸ் பேட்டரி திறன் | 500mAh |
| பேச்சு நேரம் | 12 மணி நேரம் வரை |
| இசை பின்னணி நேரம் | 12 மணி நேரம் வரை |
| மொத்த பயன்பாட்டு நேரம் (கேஸுடன்) | 72 மணி நேரம் வரை |
| காத்திருப்பு நேரம் | 400 மணி நேரம் வரை |
| சார்ஜிங் நேரம் | தோராயமாக 1.5 மணி நேரம் |
| சார்ஜிங் போர்ட் | USB வகை-C |
| நீர்ப்புகா மதிப்பீடு | IPX7 (வியர்வை புகாத) |
| இணக்கத்தன்மை | iOS, Android, Windows (Bluetooth-enabled devices) |

Figure 9.1: Advanced Bluetooth 5.1 and CVC8.0 Noise Cancelling features.
10. உத்தரவாதம் மற்றும் ஆதரவு
Kimwood products are designed for reliability and performance. For warranty information and technical support, please refer to the contact details provided on the product packaging or visit the official Kimwood webஉத்தரவாதக் கோரிக்கைகளுக்கு உங்கள் வாங்கியதற்கான ஆதாரத்தை வைத்திருங்கள்.


