1. அறிமுகம்
This manual provides detailed instructions for the installation, operation, and maintenance of the Alphacool Eisblock Aurora Acryl GPX-N water block for NVIDIA RTX 3090 TI FTW3 Ultra graphics cards. This product is designed to provide efficient liquid cooling for your graphics card's critical components, including the GPU, VRAM, and VRMs, and features integrated digital RGB lighting.
2. பாதுகாப்பு தகவல்
Please read all safety instructions carefully before installation and operation. Failure to follow these instructions may result in product damage, system damage, or personal injury.
- Ensure your computer system is powered off and disconnected from the main power supply before beginning installation.
- சேதத்தைத் தவிர்க்க கூறுகளை கவனமாகக் கையாளவும்.
- Use appropriate tools and follow anti-static precautions.
- Perform a leak test before powering on your system after installation.
- குழந்தைகளுக்கு எட்டாத இடத்தில் வைக்கவும்.
3. தொகுப்பு உள்ளடக்கங்கள்
Verify that all components are present before proceeding with the installation:
- Alphacool Eisblock Aurora Acryl GPX-N Water Block
- பின் தட்டு
- பெருகிவரும் திருகுகள் மற்றும் துவைப்பிகள்
- வெப்ப பட்டைகள்
- வெப்ப பேஸ்ட்
- Digital RGB Adapter Cable
- நிறுவல் வழிகாட்டி (இந்த ஆவணம்)
4. அமைவு மற்றும் நிறுவல்
This section details the steps required to install the water block onto your NVIDIA RTX 3090 TI FTW3 Ultra graphics card.
4.1. தயாரிப்பு
- Carefully remove your graphics card from your computer system.
- Remove the stock cooler and backplate from the graphics card. Refer to your graphics card manufacturer's instructions for this step.
- Clean the GPU die and all VRAM/VRM components thoroughly to remove any old thermal paste or residue using isopropyl alcohol and a lint-free cloth.
4.2. Applying Thermal Pads and Paste
- Cut the provided thermal pads according to the dimensions specified in the included diagram (if applicable) or the water block's instructions for your specific GPU model.
- Apply the thermal pads to the VRAM and VRM components on the graphics card PCB. Ensure full coverage and good contact.
- Apply a small amount of thermal paste to the center of the GPU die. A pea-sized amount is typically sufficient.
4.3. நீர் தடுப்பை ஏற்றுதல்
- Carefully align the water block with the mounting holes on the graphics card PCB. Ensure the GPU die makes contact with the copper cold plate and all thermal pads are properly seated.
- Gently lower the water block onto the graphics card.
- Secure the water block using the provided mounting screws and washers. Tighten screws in a diagonal pattern to ensure even pressure, but do not overtighten.

படம் 1: மேல் view of the Alphacool Eisblock Aurora Acryl GPX-N Water Block, showing the clear acrylic top and internal cooling channels.
4.4. Installing the Backplate
- Align the backplate with the corresponding mounting holes on the rear of the graphics card PCB.
- Secure the backplate using the designated screws.
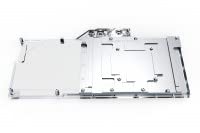
Figure 2: The Alphacool Eisblock Aurora Acryl GPX-N Backplate, designed to cover the rear of the graphics card PCB.

Figure 3: The Alphacool Eisblock Aurora Acryl GPX-N Water Block with the backplate installed, showing the complete assembly.
4.5. Connecting Digital RGB Lighting
- Connect the digital RGB cable from the water block to the appropriate 3-pin 5V addressable RGB header on your motherboard or a compatible RGB controller.
- Ensure the connector is oriented correctly to avoid damage.
4.6. Integrating into the Cooling Loop
- Install appropriate fittings (not included) into the G1/4" ports on the water block.
- Connect the water block into your existing or new custom liquid cooling loop using compatible tubing.
- Ensure all connections are secure and fittings are tightened to prevent leaks.
4.7. கசிவு சோதனை
- Before powering on your computer, fill your liquid cooling loop with coolant.
- Use a dedicated leak testing tool or run the pump independently (without powering the rest of the system) for at least 24 hours.
- Visually inspect all connections and components for any signs of leaks. Address any leaks immediately before proceeding.
5. இயக்க வழிமுறைகள்
Once the water block is successfully installed and leak-tested, you can power on your system. The water block will passively cool your GPU as long as the liquid cooling loop is operational.
- Monitor your GPU temperatures using appropriate software to ensure optimal cooling performance.
- Manage the digital RGB lighting effects through your motherboard's software or a connected RGB controller.
6. பராமரிப்பு
Regular maintenance is crucial for the longevity and performance of your liquid cooling system.
- குளிரூட்டி மாற்றீடு: It is recommended to replace the coolant in your loop every 6-12 months, depending on the coolant type and usage.
- கணினி சுத்தம்: Periodically inspect the water block and other loop components for any signs of buildup or discoloration. If necessary, drain the loop and clean components with distilled water or a specialized cleaning solution.
- காட்சி ஆய்வு: Regularly check tubing and fittings for wear, cracks, or loose connections.
7. சரிசெய்தல்
இந்தப் பிரிவு நீங்கள் சந்திக்கக்கூடிய பொதுவான சிக்கல்களைக் கையாள்கிறது.
7.1. High GPU Temperatures
- பம்ப் செயல்பாட்டைச் சரிபார்க்கவும்: Ensure your pump is running and circulating coolant.
- காற்று குமிழ்கள்: Bleed any air bubbles from the loop. Tilt your system gently to help move air to the reservoir.
- Thermal Paste/Pads: Verify that thermal paste was applied correctly and thermal pads are making good contact. Re-seat the water block if necessary.
- Radiator Performance: Ensure your radiator fans are spinning and the radiator fins are clean and unobstructed.
7.2. கசிவுகள்
- Identify Source: Immediately power off your system and locate the source of the leak.
- இறுக்கமான பொருத்துதல்கள்: Ensure all fittings are securely tightened. Do not overtighten.
- குழாய் அமைப்பை ஆய்வு செய்யுங்கள்: Check tubing for cuts, cracks, or improper seating. Replace damaged tubing.
7.3. RGB விளக்கு வேலை செய்யவில்லை
- இணைப்பைச் சரிபார்க்கவும்: Ensure the 3-pin 5V ARGB cable is correctly connected to the motherboard or controller.
- மென்பொருள் கட்டமைப்பு: Verify that your motherboard's RGB software or external controller is properly configured and enabled.
- சக்தி: Confirm the ARGB header on your motherboard is receiving power.
8. விவரக்குறிப்புகள்
| தயாரிப்பு பெயர் | Alphacool Eisblock Aurora Acryl GPX-N RTX 3090 TI FTW3 Ultra |
| மாதிரி எண் | 1022801 |
| இணக்கமான சாதனங்கள் | NVIDIA RTX 3090 TI FTW3 Ultra Graphics Cards (Desktop) |
| குளிரூட்டும் முறை | திரவம் |
| பொருள் | Nickel-plated Copper (cold plate), Acrylic (top) |
| Power Connector Type (RGB) | 3-Pin (5V Addressable RGB) |
| தயாரிப்பு பரிமாணங்கள் | Approximately 19.69 x 19.69 x 11.02 inches (as packaged) |
9. உத்தரவாதம் மற்றும் ஆதரவு
Alphacool products are manufactured to high-quality standards. For warranty information and technical support, please refer to the official Alphacool webஉங்கள் தளத்தில் அல்லது உங்கள் சில்லறை விற்பனையாளரைத் தொடர்பு கொள்ளவும். உத்தரவாதக் கோரிக்கைகளுக்கு உங்கள் வாங்கியதற்கான ஆதாரத்தை வைத்திருங்கள்.
மேலும் உதவிக்கு, பார்வையிடவும் Alphacool Store on Amazon.


