1. அறிமுகம்
நன்றி, நன்றி.asing the Nedis KAAF320BK Dual Basket Digital Air Fryer. This appliance uses high-speed hot air circulation technology to cook food with little to no oil, resulting in healthier, crispier meals. With its dual 4.2-liter baskets, you can prepare two different dishes simultaneously. This manual provides essential information for safe operation, setup, maintenance, and troubleshooting.

Image 1.1: The Nedis KAAF320BK Dual Basket Digital Air Fryer shown in a kitchen environment, demonstrating its dual cooking capability with different foods in each basket.
2. முக்கியமான பாதுகாப்பு வழிமுறைகள்
சாதனத்தைப் பயன்படுத்துவதற்கு முன்பு இந்தப் பாதுகாப்பு வழிமுறைகளை கவனமாகப் படித்து, எதிர்காலக் குறிப்புக்காக அவற்றை வைத்திருங்கள். தவறான பயன்பாடு மின்சார அதிர்ச்சி, தீ அல்லது கடுமையான காயத்தை ஏற்படுத்தக்கூடும்.
- தொகுதியை எப்போதும் உறுதிப்படுத்தவும்tage on the rating label matches your mains supply voltage.
- சாதனம், தண்டு அல்லது பிளக்கை தண்ணீரில் அல்லது பிற திரவங்களில் மூழ்கடிக்க வேண்டாம்.
- கருவியை குழந்தைகள் மற்றும் செல்லப்பிராணிகளுக்கு எட்டாதவாறு வைத்திருங்கள்.
- Do not operate the appliance if the plug, power cord, or appliance itself is damaged.
- Place the appliance on a stable, heat-resistant surface, away from walls and other appliances to allow for proper ventilation.
- Do not cover the air inlet or outlet vents during operation.
- The appliance surfaces become hot during use. Use oven mitts when handling hot parts.
- பயன்பாட்டில் இல்லாதபோது மற்றும் சுத்தம் செய்வதற்கு முன்பு மின் நிலையத்திலிருந்து சாதனத்தை அவிழ்த்து விடுங்கள்.
- உற்பத்தியாளரால் பரிந்துரைக்கப்படாத பாகங்கள் பயன்படுத்த வேண்டாம்.
- இந்த சாதனம் வீட்டு உபயோகத்திற்காக மட்டுமே வடிவமைக்கப்பட்டுள்ளது.
3. தயாரிப்பு கூறுகள்
Familiarize yourself with the parts of your Nedis KAAF320BK Air Fryer:
- முக்கியப்பிரிவு
- Digital Control Panel with LED Display
- Basket 1 (4.2 Liters capacity)
- Basket 2 (4.2 Liters capacity)
- Removable Crisper Racks (2 units)
- பவர் கார்ட்

படம் 3.1: முன் view of the air fryer, highlighting the two separate cooking baskets.
4. அமைப்பு மற்றும் முதல் பயன்பாடு
- பேக்கிங்: Carefully remove the air fryer and all packaging materials.
- சுத்தம்: Before first use, wash the baskets and crisper racks with hot water, dish soap, and a non-abrasive sponge. Rinse thoroughly and dry. Wipe the main unit with a damp துணி.
- இடம்: Place the air fryer on a stable, level, heat-resistant surface. Ensure there is at least 10 cm (4 inches) of clear space around the back and sides, and above the appliance for proper air circulation.
- மின் இணைப்பு: பவர் கார்டை தரையிறக்கப்பட்ட சுவர் கடையில் செருகவும்.
- தொடக்க இயக்கம் (விரும்பினால்): For the first use, it is recommended to run the air fryer empty for about 10-15 minutes at 180°C (350°F) to burn off any manufacturing residues. A slight odor may be present, which is normal. Allow the appliance to cool completely afterward.
5. இயக்க வழிமுறைகள்
The Nedis KAAF320BK features a digital control panel for easy operation.
5.1. கண்ட்ரோல் பேனல் ஓவர்view

Image 5.1: The digital control panel, displaying cooking zones, temperature/time settings, and preset program icons.
- ஆற்றல் பொத்தானை (⏻ ⏻ தமிழ்): சாதனத்தை ஆன்/ஆஃப் செய்கிறது.
- Zone 1 / Zone 2 Selection: Press the corresponding zone number to select which basket to program.
- Temperature/Time Buttons (⏱ ⏱ कालिका कालिक कालिक कालिक के स�ालि� / ⏰): Adjust temperature and time using the up/down arrows.
- முன்னமைக்கப்பட்ட திட்டங்கள்: Icons for 10 common dishes (Fries, Chicken, Shrimp, Bake, Bacon, Pizza, Steak, Fish, Dehydrate, Reheat).
- START / STOP: சமையல் செயல்முறையைத் தொடங்குகிறது அல்லது இடைநிறுத்துகிறது.
- ஸ்மார்ட் ஃபினிஷ்: Synchronizes cooking times so both baskets finish simultaneously.
- MATCH COOK: Copies settings from Zone 1 to Zone 2.
5.2. Basic Cooking Operation
- Place the crisper rack into the basket(s).
- Place your food into the basket(s). Do not overfill.
- Insert the basket(s) back into the air fryer.
- பவர் பட்டனை அழுத்தவும் (⏻ ⏻ தமிழ்) சாதனத்தை இயக்கவும்.
- For single basket cooking: Select Zone 1 or Zone 2. Adjust temperature and time using the ⏱ ⏱ कालिका कालिक कालिक कालिक के स�ालि� / ⏰ buttons. Alternatively, select a preset program.
- For dual basket cooking (different settings): Select Zone 1, set its temperature/time or preset. Then select Zone 2, and set its temperature/time or preset.
- சமைக்கத் தொடங்க START/STOP ஐ அழுத்தவும்.
- The air fryer will beep when cooking is complete. Carefully remove the baskets.
5.3. முன்னமைக்கப்பட்ட நிரல்களைப் பயன்படுத்துதல்
The air fryer comes with 10 pre-programmed cooking settings for convenience. Simply select the desired preset icon after choosing a zone, and the appliance will automatically set the optimal temperature and time.
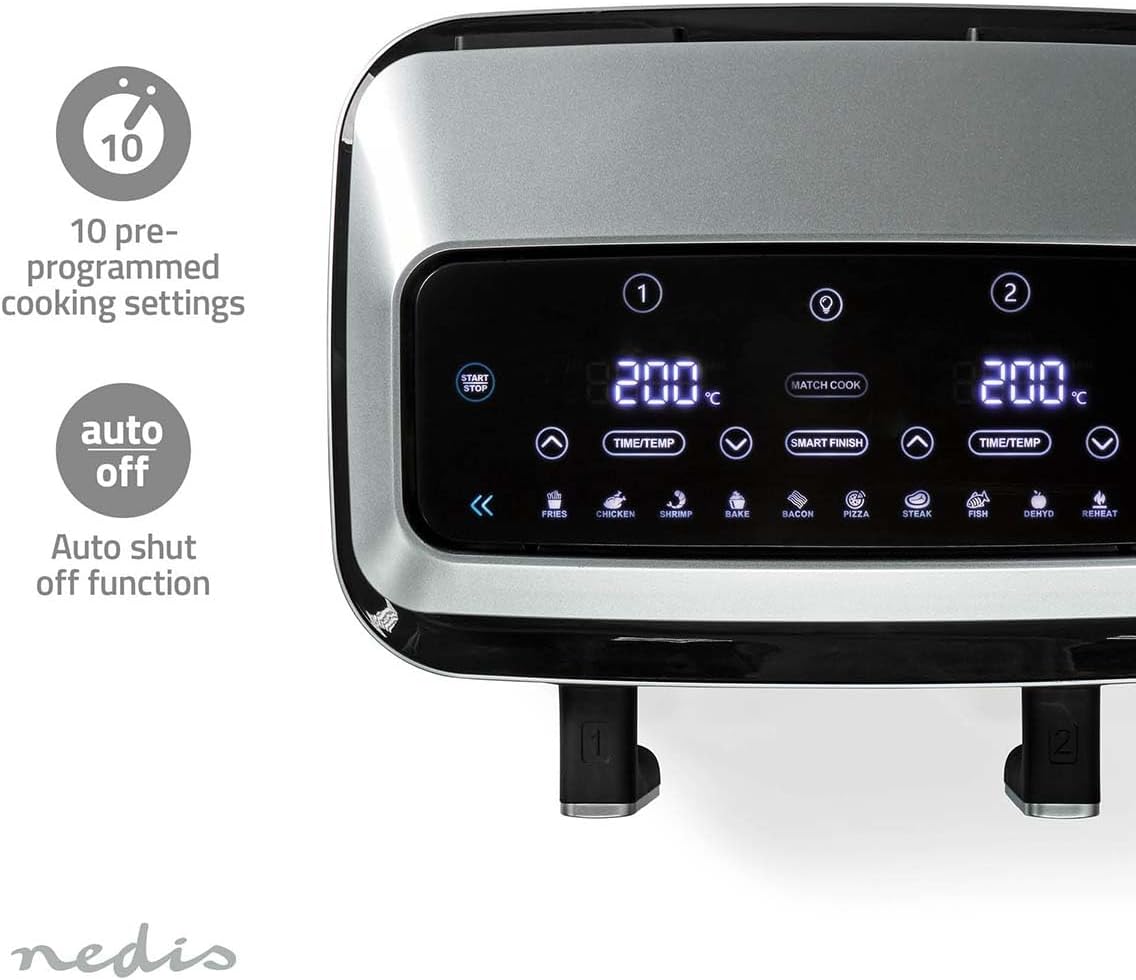
Image 5.2: Display of the 10 pre-programmed cooking settings and the auto-off feature.
5.4. Smart Finish Function
The Smart Finish function allows you to cook two different foods with different cooking times and temperatures, ensuring they both finish at the same time.
- இரண்டு கூடைகளிலும் உணவை ஏற்றவும்.
- Select Zone 1 and set its desired cooking time and temperature (or preset).
- Select Zone 2 and set its desired cooking time and temperature (or preset).
- Press the SMART FINISH button.
- Press START/STOP. The air fryer will automatically adjust the start times for each zone so they conclude simultaneously.
5.5. Match Cook Function
The Match Cook function is useful when you want to cook the same food in both baskets using identical settings.
- Load both baskets with the same food.
- Select Zone 1 and set its desired cooking time and temperature (or preset).
- Press the MATCH COOK button. The settings from Zone 1 will be copied to Zone 2.
- சமைக்கத் தொடங்க START/STOP ஐ அழுத்தவும்.

Image 5.3: Visual explanation of the Match Cook and Smart Finish functions.
5.6. Shake Reminder
For certain foods, especially fries, the air fryer includes a shake reminder function. During the cooking cycle, the appliance will beep and display a "SHAKE" icon to remind you to shake the basket(s) for even cooking and crispiness. Open the basket, shake the contents, and reinsert it to resume cooking.
6. சமையல் வழிகாட்டி மற்றும் குறிப்புகள்
- முன்கூட்டியே சூடாக்குதல்: சிறந்த முடிவுகளுக்கு, உணவைச் சேர்ப்பதற்கு முன் ஏர் பிரையரை 3-5 நிமிடங்கள் சூடாக்கவும்.
- எண்ணெய் பயன்பாடு: காற்றில் வறுக்க எண்ணெய் குறைவாகவோ அல்லது இல்லாமலோ தேவைப்பட்டாலும், லேசாக எண்ணெயைத் தெளிப்பது அல்லது எண்ணெயைத் தூவுவது சில உணவுகளின் மொறுமொறுப்பையும் சுவையையும் அதிகரிக்கும்.
- தொகுதி சமையல்: Avoid overcrowding the baskets. Cook in smaller batches if necessary to ensure even cooking and crispiness.
- குலுக்கல்/எறிதல்: For foods like fries, chicken nuggets, or vegetables, shaking or tossing the basket halfway through cooking helps achieve uniform results.
- உறுதியை சரிபார்க்கிறது: Always check food for doneness, especially meats and poultry, using a food thermometer.
- Recipe Adjustments: Air fryer cooking times and temperatures may vary from conventional oven recipes. Start with recommended settings and adjust as needed.
7. பராமரிப்பு மற்றும் சுத்தம்
வழக்கமான சுத்தம் செய்தல் உகந்த செயல்திறனை உறுதிசெய்து உங்கள் ஏர் பிரையரின் ஆயுளை நீட்டிக்கிறது.
- துண்டிக்கவும்: எப்போதும் ஏர் பிரையரை அவிழ்த்து சுத்தம் செய்வதற்கு முன் முழுமையாக குளிர்விக்க அனுமதிக்கவும்.
- Baskets and Racks: The cooking baskets and crisper racks are dishwasher safe. For hand washing, use hot water, dish soap, and a non-abrasive sponge. The non-stick coating allows for easy removal of food residues.
- உட்புறம்: சாதனத்தின் உட்புறத்தை விளம்பரத்துடன் துடைக்கவும்amp துணி. சிராய்ப்பு கிளீனர்கள் அல்லது துடைக்கும் பட்டைகள் பயன்படுத்த வேண்டாம்.
- வெளிப்புறம்: ஒரு மென்மையான, வெளிப்புறத்துடன் வெளிப்புறத்தை சுத்தம் செய்யவும்amp துணி.
- சேமிப்பு: ஏர் பிரையரை குளிர்ந்த, உலர்ந்த இடத்தில் சேமிப்பதற்கு முன், அனைத்து பகுதிகளும் சுத்தமாகவும் உலர்ந்ததாகவும் இருப்பதை உறுதிசெய்யவும்.

Image 7.1: Detachable baskets and dishwasher-safe crisper racks for easy cleaning.
8. சரிசெய்தல்
உங்கள் ஏர் பிரையரில் சிக்கல்கள் ஏற்பட்டால், பொதுவான பிரச்சனைகள் மற்றும் தீர்வுகளுக்கு கீழே உள்ள அட்டவணையைப் பார்க்கவும்.
| பிரச்சனை | சாத்தியமான காரணம் | தீர்வு |
|---|---|---|
| ஏர் பிரையர் இயக்கப்படவில்லை. | இணைக்கப்படவில்லை; மின் இணைப்புப் பிரச்சினை; சாதனக் கோளாறு. | பவர் கார்டு வேலை செய்யும் அவுட்லெட்டில் பாதுகாப்பாக செருகப்பட்டுள்ளதா என்பதை உறுதிப்படுத்திக் கொள்ளுங்கள். உங்கள் சர்க்யூட் பிரேக்கரைச் சரிபார்க்கவும். |
| உணவு சமமாக சமைக்கப்படுவதில்லை. | Baskets overcrowded; food not shaken/tossed. | Cook in smaller batches. Shake or toss food halfway through cooking. |
| உணவு மிருதுவாக இல்லை. | அதிக ஈரப்பதம்; போதுமான எண்ணெய் இல்லை (சில உணவுகளுக்கு); வெப்பநிலை மிகவும் குறைவு. | Pat food dry before cooking. Lightly coat with oil. Increase temperature slightly. |
| சாதனத்திலிருந்து வெள்ளை புகை வருகிறது. | முந்தைய பயன்பாட்டிலிருந்து கிரீஸ் எச்சம்; அதிக கொழுப்புள்ள உணவு. | Clean the baskets and interior thoroughly. For high-fat foods, drain excess fat during cooking. |
| முதல் பயன்பாட்டின் போது சாதனத்தின் துர்நாற்றம் வீசுகிறது. | உற்பத்தி எச்சங்கள் எரிக்கப்படுகின்றன. | This is normal for first use. Run empty for 10-15 minutes as described in Setup. Ensure good ventilation. |
9. விவரக்குறிப்புகள்
- மாதிரி: KAAF320BK
- பிராண்ட்: நெடிஸ்
- திறன்: 2 x 4.2 லிட்டர்கள் (மொத்தம் 8.4 லிட்டர்கள்)
- சக்தி: 2600 வாட்ஸ்
- தொகுதிtage: 240 வோல்ட்
- வெப்பநிலை வரம்பு: 50°C - 200°C (Adjustable)
- டைமர்: 60 நிமிடங்கள் வரை
- முன் திட்டமிடப்பட்ட அமைப்புகள்: 10
- பொருள்: அக்ரிலோனிட்ரைல் புடாடீன் ஸ்டைரீன் (ABS)
- தயாரிப்பு பரிமாணங்கள்: 27 x 39 x 31 செ.மீ (ஆழம் x அகலம் x உயரம்)
- பொருளின் எடை: 7.25 கிலோகிராம்
- சிறப்பு அம்சங்கள்: Dual Zone Functions, Smart Control, Shake Reminder, Auto Shut-off

Image 9.1: Key specifications and features of the Nedis KAAF320BK Air Fryer.
10. உத்தரவாதம் மற்றும் ஆதரவு
Nedis products are manufactured to high quality standards. This product is covered by a warranty period of 2 years from the date of purchase. The warranty does not cover damage caused by improper use, neglect, accidents, or normal wear and tear.
For technical support, warranty claims, or further information, please refer to the official Nedis webஉங்கள் உள்ளூர் சில்லறை விற்பனையாளரைத் தொடர்பு கொள்ளவும் அல்லது வாங்குவதற்கான சான்றாக உங்கள் கொள்முதல் ரசீதை வைத்திருங்கள்.
மேலும் தகவலுக்கு, அதிகாரியைப் பார்வையிடவும் Nedis Store on Amazon.


