1. அறிமுகம்
The GLEDOPTO ZigBee 3.0 Pro+ 5 in 1 LED Strip Controller (Model GL-C-201P) is designed for intelligent control of various LED strip types, including RGBCCT, RGBW, RGB, CCT, and Dimmer. This controller utilizes the ZigBee 3.0 protocol, ensuring compatibility with a wide range of ZigBee hubs and smart home systems. It offers enhanced stability, extended connection distance, and reduced standby power consumption. This manual provides detailed instructions for installation, operation, and troubleshooting to ensure optimal performance of your LED strip controller.
2. பாதுகாப்பு தகவல்
Please read all safety warnings carefully before installation and operation.
- Before powering on the device, ensure all connections are correct and secure. Do not work on the device while it is powered on.
- The device should only be operated with its rated voltage (DC12V-24V). Using excessively high or low voltage சேதத்தை ஏற்படுத்தக்கூடும்.
- Do not disassemble the device, as this may lead to fires and electric shocks.
- Do not use the product in environments exposed to direct sunlight, moisture, or high temperatures.
- Do not use the product in metal-shielded areas or near strong magnetic fields, as this can severely impair the product's wireless signal transmission.
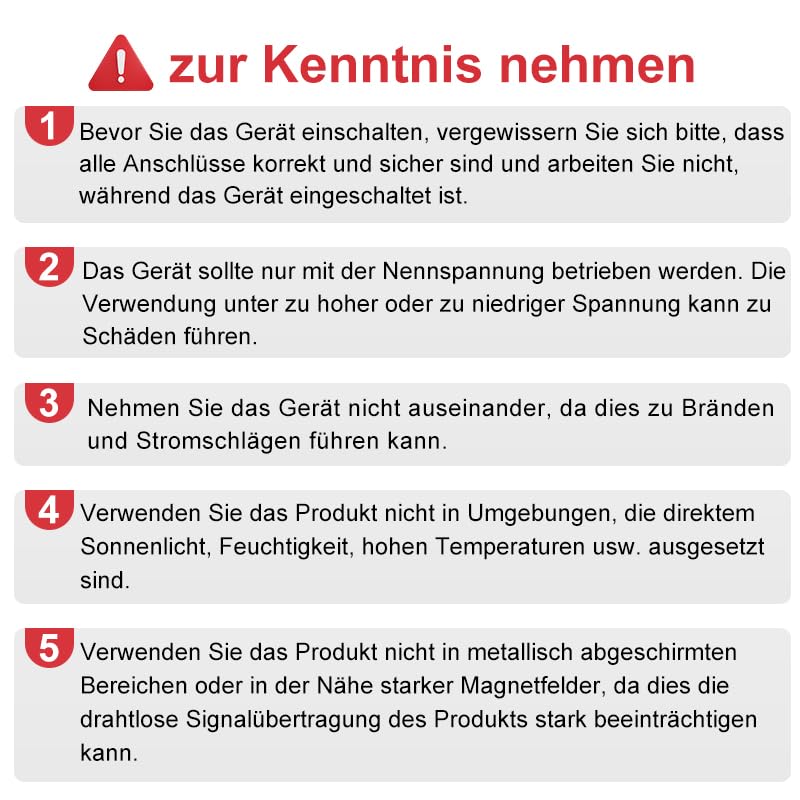
This image displays important safety warnings regarding the use and handling of the LED controller, emphasizing correct connections, voltage requirements, and environmental considerations.
3. தயாரிப்பு அம்சங்கள்
- ZigBee 3.0 Protocol: Compatible with general ZigBee bridges and coordinators, offering stable and convenient connection.
- 5-இன்-1 செயல்பாடு: Supports RGBCCT, RGBW, RGB, CCT, and Dimmer LED strip configurations.
- விரிவாக்கப்பட்ட வரம்பு: Increases connection distance up to 31 meters and functions as a signal repeater to expand network coverage.
- குறைந்த மின் நுகர்வு: Reduces standby power consumption for energy efficiency.
- Power-on Status Settings: Configurable default state (light on or off) after power restoration.
- தேர்ந்தெடுக்கக்கூடிய அதிர்வெண்: Adjustable PWM frequency (600Hz, 800Hz, 1000Hz, 2000Hz, 4000Hz, 8000Hz) to match different power supplies and reduce noise.
- ஸ்மார்ட் கட்டுப்பாடு: Compatible with ZigBee hubs for app control (e.g., Tuya Smart, SmartThings) and voice control via Amazon Alexa or Google Home.
- பரந்த தொகுதிtagமின் உள்ளீடு: Operates with DC12V-24V power supplies.
- அதிக வெளியீட்டு மின்னோட்டம்: Supports a total output current of 20A Max, with 15A Max per channel, suitable for longer LED strips.
4. தொகுப்பு உள்ளடக்கங்கள்
தொகுப்பில் அனைத்து பொருட்களும் உள்ளதா என்பதை சரிபார்க்கவும்:
- 1 x GLEDOPTO ZigBee Pro+ LED Strip Controller (GL-C-201P)
- 1 x பயனர் கையேடு
- 1 x 3cm Sticker
5. விவரக்குறிப்புகள்
| விவரக்குறிப்பு | மதிப்பு |
|---|---|
| தயாரிப்பு பெயர் | ZigBee Pro+ 5 in 1 LED Strip Controller |
| மாதிரி எண். | GL-C-201P |
| உள்ளீடு தொகுதிtage | DC12V-24V |
| மொத்த வெளியீட்டு மின்னோட்டம் | 20A அதிகபட்சம் |
| Max Current/Channel | 15A அதிகபட்சம் |
| இயக்க வெப்பநிலை | -20°C முதல் 45°C வரை |
| பரிமாணங்கள் | 108 x 45 x 18 மிமீ |
| சர்வதேச பாதுகாப்பு மதிப்பீடு | IP20 |
| செயல்பாட்டு முறை | தானியங்கி |
| இணைப்பான் வகை | செருகு |
| சுற்று வகை | இணை |
| இயக்கி வகை | புஷ் பட்டன் |
| தொடர்பு பொருள் | உலோகம் |
6. அமைவு வழிமுறைகள்
Follow these steps to set up your GLEDOPTO ZigBee LED Strip Controller:
- Step 1: Power Your Light Sources
Connect the LED strip to the controller's output terminals (V+, R, G, B, W, C). Ensure the correct wiring for your specific LED strip type (RGBCCT, RGBW, RGB, CCT, or Dimmer). Connect the power adapter to the controller's input (V+, V-). Plug in the power adapter to an electrical outlet.
Image 6.1: GLEDOPTO LED Strip Controller showing input and output terminals with wiring diagram. This image illustrates the physical layout of the controller, including input and output terminals, indicator light, and control buttons. It also shows a diagram for connecting different types of LED strips.

Image 6.2: The LED controller integrated into a living room environment, highlighting its quick connect port and maximum output current. This image shows the controller in a typical installation scenario, emphasizing the quick connect port for easy wiring and its capability to handle a total output current of 20A Max.
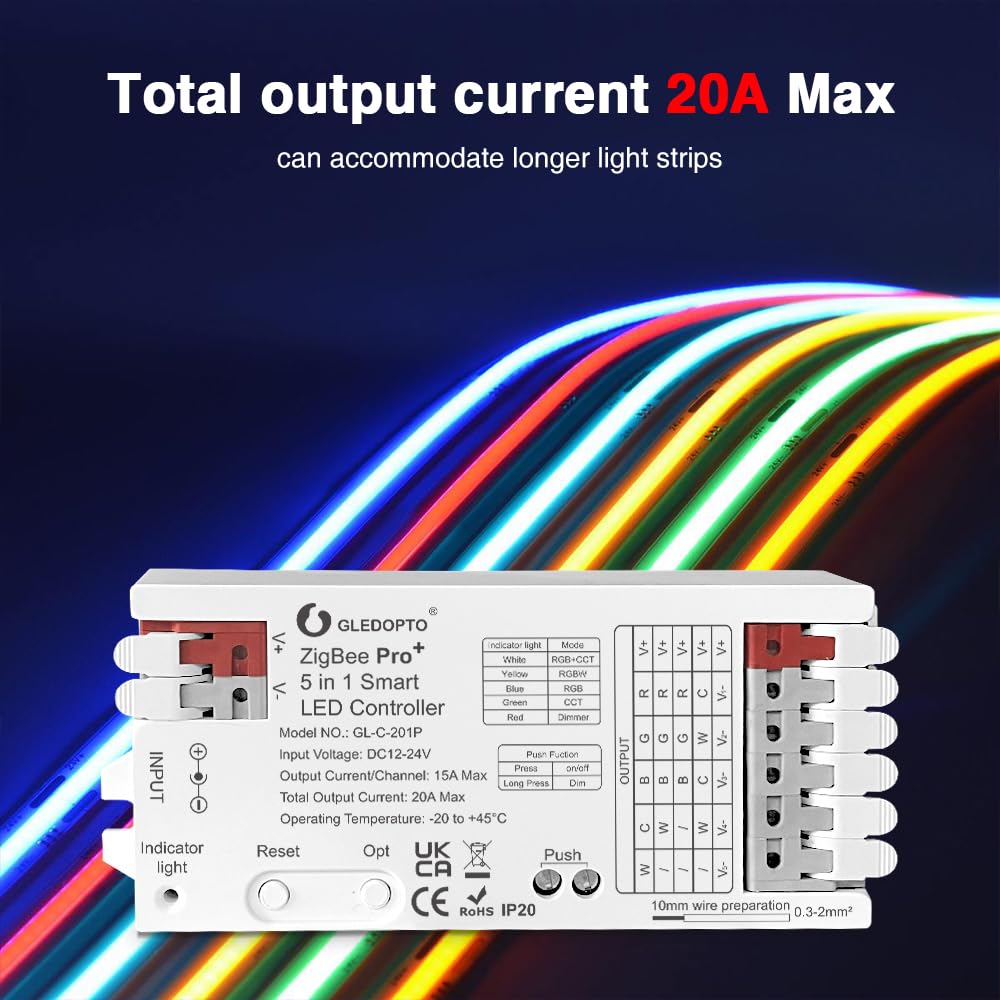
Image 6.3: The LED controller connected to multiple LED strips, illustrating its capacity to power longer light strips with a 20A maximum output. This image demonstrates the controller's ability to accommodate longer LED strips due to its 20A maximum total output current.
- Step 2: Set Up Your ZigBee Bridge/Gateway
Plug in your ZigBee bridge/gateway and ensure it is powered on. Connect it to your Wi-Fi router using the provided network cable. - Step 3: Download the Gateway App
Download the corresponding app for your ZigBee gateway (e.g., Tuya Smart, SmartThings, Philips Hue app) on your smartphone. Start the device searching process within the app. If the device is not found, try powering the controller off and on, or perform a reset. - Step 4: Complete Setup and Control Lights
Once the controller is detected and paired with your gateway, you can use the app to control the light color, color temperature, and brightness of your LED strips.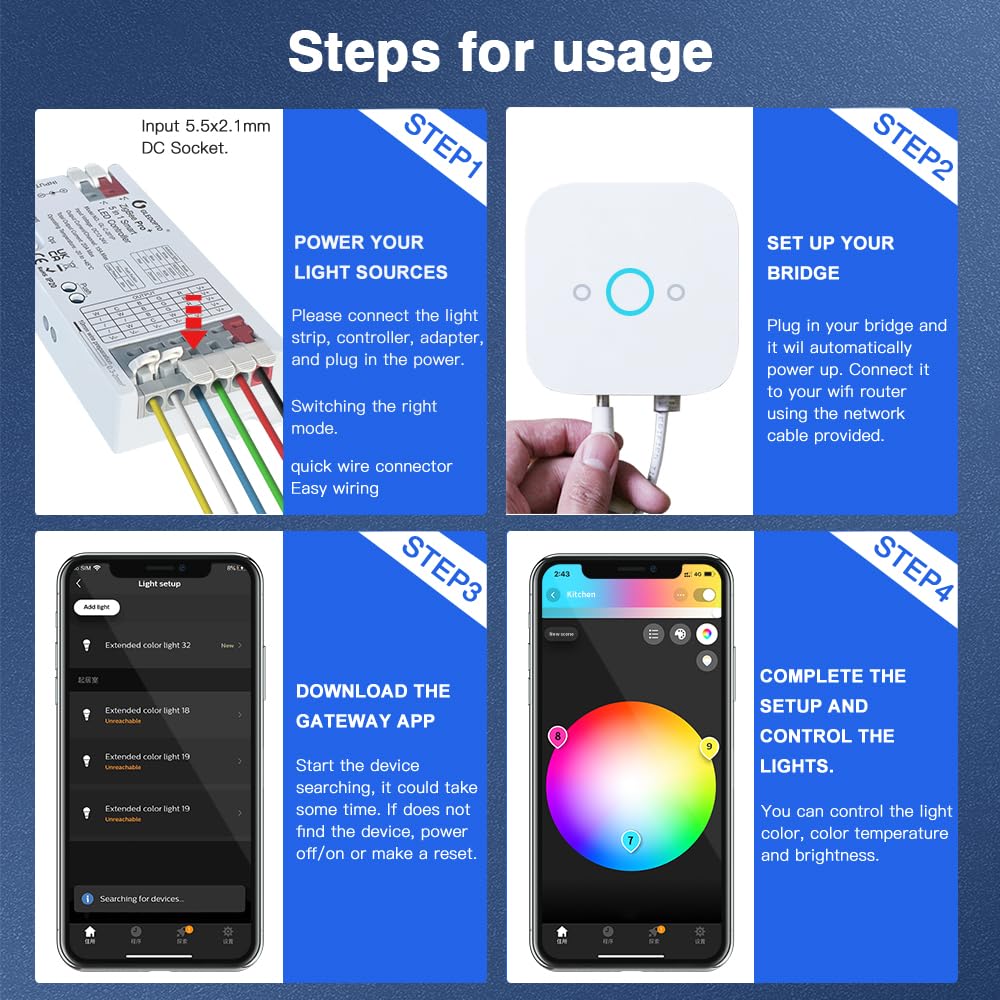
Image 6.4: A four-step diagram illustrating the setup process: powering light sources, setting up the bridge, downloading the gateway app, and controlling the lights. This image provides a visual guide to the four main steps for setting up and using the LED controller with a ZigBee gateway and smartphone app.
7. இயக்க வழிமுறைகள்
7.1. 5-in-1 Mode Switching
The controller supports five different LED strip modes: RGBCCT, RGBW, RGB, CCT, and Dimmer. An indicator light on the controller corresponds to each mode. To switch between modes, short press the "Opt" button once. The indicator light will change color to reflect the selected mode:
- வெள்ளை: RGBCCT Mode
- மஞ்சள்: RGBW பயன்முறை
- நீலம்: RGB பயன்முறை
- பச்சை: சிசிடி முறை
- சிவப்பு: மங்கலான முறை

This image visually explains the one-touch switching mode functionality, showing the different LED indicator colors corresponding to each of the five supported LED strip types.
7.2. பவர்-ஆன் நிலை அமைப்புகள்
You can configure the controller's default state after a power interruption:
- To set the power-on status, long press the "Opt" button for more than 5 seconds.
- The indicator light will flash in light blue.
- After 4 seconds of being off, the indicator will resume its previous color, indicating the setting is complete.
- The default power-on status is 'light on'.
- If the indicator flashes 3 times in light blue, it means the power-on status is set to 'light on'.
- If the indicator flashes 4 times in light blue, it means the power-on status is set to 'light off'.
7.3. Smart App and Voice Control
Once connected to a compatible ZigBee hub, you can control your LED strips using a smartphone app or voice commands:
- நிறம் மாறுதல்: Adjust the color of RGB/RGBCCT/RGBW strips to millions of options.
- Color Temperature Regulation: For CCT/RGBCCT strips, adjust the white light color temperature from 2200K to 6500K.
- ஒளிர்வு சரிசெய்தல்: Dim or brighten your LED strips from 1% to 100%.

This image displays various app interfaces for controlling LED strip characteristics such as color, color temperature, and brightness levels.
8. அதிர்வெண் அமைப்புகள்
The controller's PWM frequency can be adjusted to match different power supplies and minimize noise. To switch the frequency, short press the "Reset" key. The indicator light will flash in white and then resume its previous color after 2 seconds, indicating the frequency has changed.
Available frequencies and corresponding indicator flashes:
- 1000Hz (Default): 3 ஃப்ளாஷ்கள்
- 2000 ஹெர்ட்ஸ்: 4 ஃப்ளாஷ்கள்
- 4000 ஹெர்ட்ஸ்: 5 ஃப்ளாஷ்கள்
- 8000 ஹெர்ட்ஸ்: 6 ஃப்ளாஷ்கள்
- 600 ஹெர்ட்ஸ்: 1 ஃபிளாஷ்
- 800 ஹெர்ட்ஸ்: 2 ஃப்ளாஷ்கள்
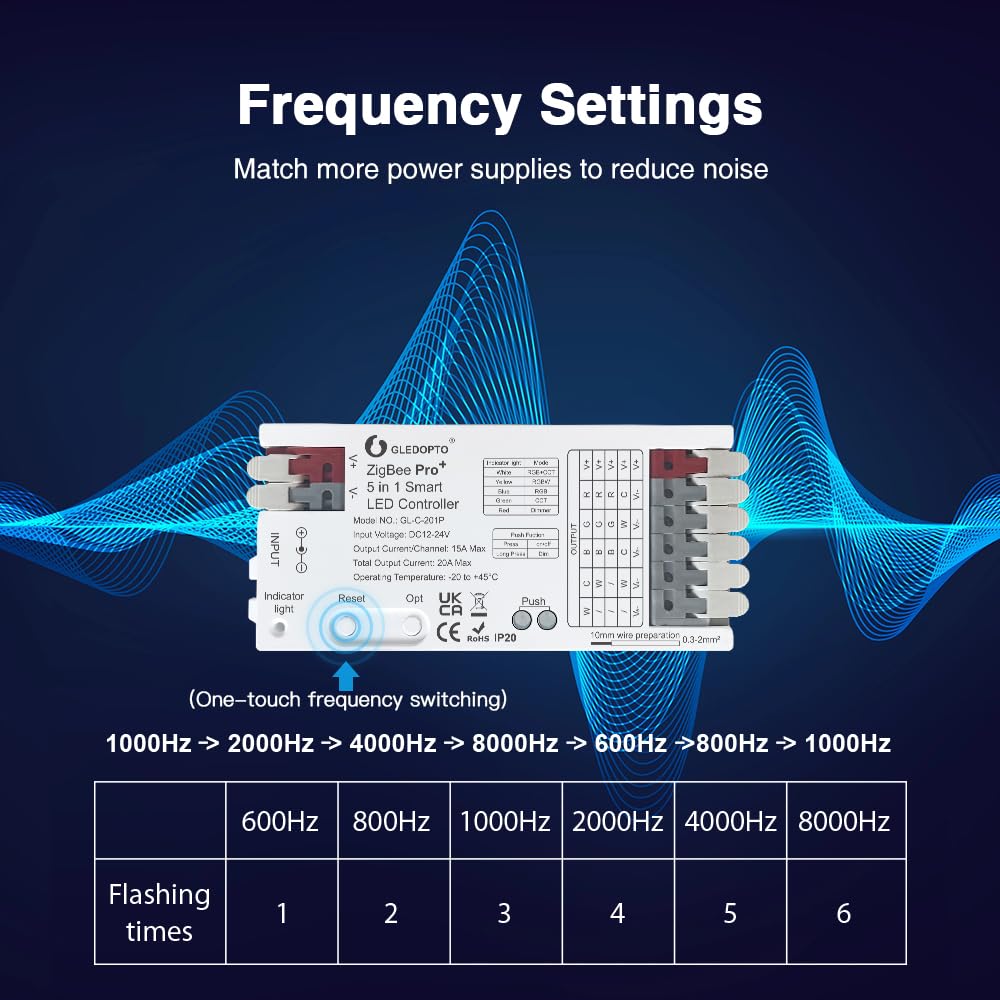
This image details how to adjust the PWM frequency of the controller using the reset button, listing the available frequencies and their corresponding indicator flash patterns.
9. இணக்கத்தன்மை
The GLEDOPTO ZigBee 3.0 Pro+ controller is compatible with most ZigBee 3.0 gateways on the market. This includes, but is not limited to, the following platforms:
- இல்லறம்
- கான்பீ
- ஸ்மார்ட் விஷயங்கள்
- தூயா
- பிலிப்ஸ் ஹியூ
- Amazon Echo Studio / Echo Plus
The table below summarizes the compatibility for RGB, CCT, and Brightness control with various gateways:
| பொருள் | பிலிப்ஸ் ஹியூ | அமேசான் எக்கோ பிளஸ் | ஸ்மார்ட் விஷயங்கள் | தூயா | கான்பீ | இல்லறம் |
|---|---|---|---|---|---|---|
| RGB | ஆம் | ஆம் | ஆம் | ஆம் | ஆம் | ஆம் |
| CCT | ஆம் | ஆம் | ஆம் | ஆம் | ஆம் | ஆம் |
| பிரகாசம் | ஆம் | ஆம் | ஆம் | ஆம் | ஆம் | ஆம் |

This image provides a visual representation of the controller's compatibility with popular ZigBee gateways and the types of control functions supported by each.
10. பராமரிப்பு
To ensure the longevity and proper functioning of your LED strip controller, follow these maintenance guidelines:
- சுத்தம்: Gently wipe the controller with a dry, soft cloth. Do not use liquid cleaners or abrasive materials.
- சுற்றுச்சூழல்: Keep the device in a dry environment, away from direct sunlight, moisture, and extreme temperatures.
- இணைப்புகள்: அனைத்து வயரிங் இணைப்புகளும் பாதுகாப்பாகவும் அரிப்பிலிருந்து விடுபட்டதாகவும் இருப்பதை உறுதிசெய்ய அவ்வப்போது அவற்றைச் சரிபார்க்கவும்.
- காற்றோட்டம்: Ensure the controller has adequate ventilation and is not covered, to prevent overheating.
11. சரிசெய்தல்
If you encounter issues with your GLEDOPTO LED Strip Controller, refer to the following common problems and solutions:
- விளக்குகள் எரியவில்லை:
- Check power connections to the controller and LED strip.
- Ensure the power adapter is functioning correctly and providing the correct voltage (DC12V-24V).
- Verify that the LED strip is correctly wired to the controller's output terminals.
- Controller not responding to app/voice commands:
- Ensure your ZigBee gateway is powered on and connected to your network.
- Check if the controller is successfully paired with your ZigBee gateway. Try re-pairing if necessary.
- Verify that your smartphone app is connected to the gateway and updated to the latest version.
- Confirm that the controller is within the effective range of your ZigBee network.
- Incorrect colors or modes:
- Ensure the correct 5-in-1 mode is selected on the controller (refer to Section 7.1).
- Check the wiring of your LED strip to ensure it matches the selected mode (e.g., RGBW strip wired to RGBW terminals).
- Flickering or unstable lights:
- Adjust the PWM frequency (refer to Section 8) to see if it resolves the issue, especially if using a different power supply.
- Ensure the power supply is sufficient for the length and type of LED strip being used.
- தளர்வான இணைப்புகள் அல்லது சேதமடைந்த வயரிங் சரிபார்க்கவும்.
- சாதனம் அதிக வெப்பமடைதல்:
- கட்டுப்படுத்தியைச் சுற்றி போதுமான காற்றோட்டத்தை உறுதி செய்யவும்.
- Verify that the total current draw of your LED strips does not exceed the controller's maximum (20A total, 15A per channel).
12. உத்தரவாதம் மற்றும் ஆதரவு
Warranty and specific support information for the GLEDOPTO ZigBee 3.0 Pro+ 5 in 1 LED Strip Controller (Model GL-C-201P) are not provided in this manual. Please refer to the product packaging, the retailer's website, or contact GLEDOPTO customer service directly for details regarding warranty coverage and technical support.
13. பயன்பாட்டு காட்சிகள்
The GLEDOPTO ZigBee 3.0 Pro+ 5 in 1 LED Strip Controller is suitable for various indoor lighting applications, enhancing ambiance and functionality in different spaces.
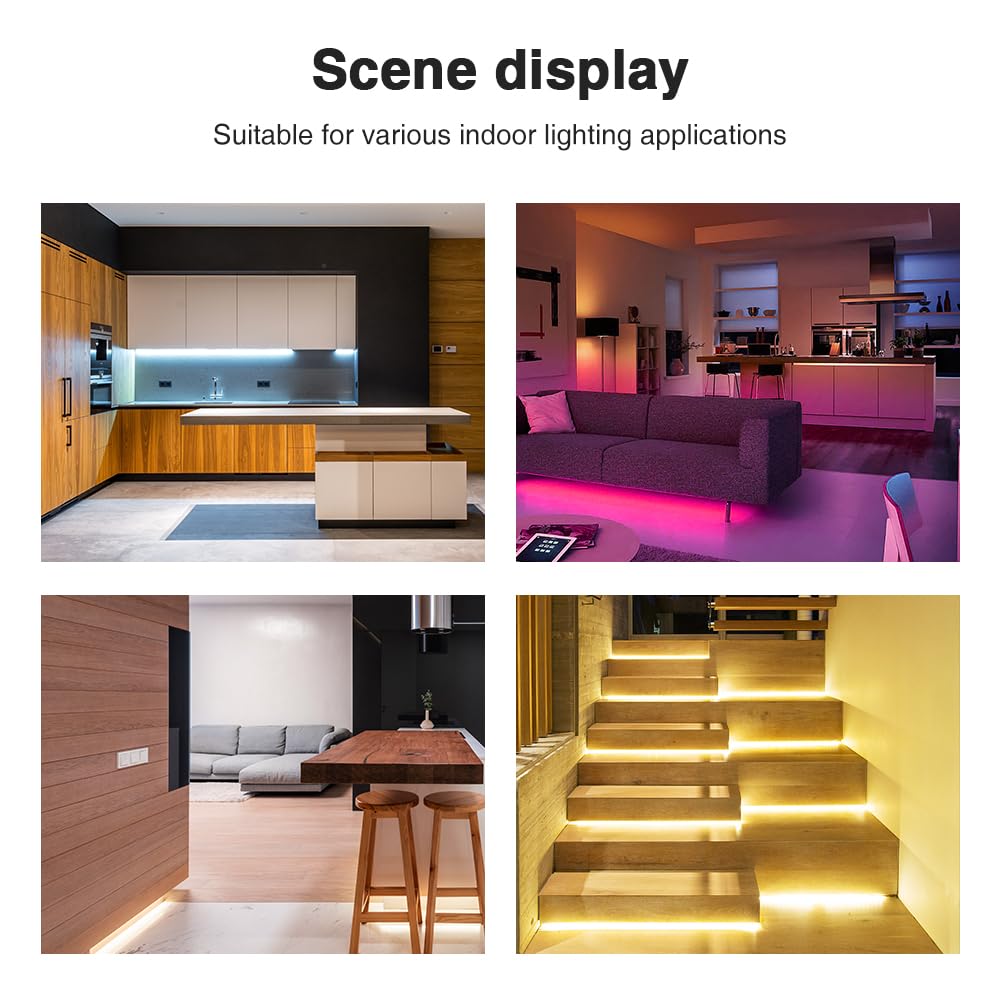
This image displays several examples of how LED strips controlled by this device can be used to create decorative and functional lighting in residential environments.


