1. தயாரிப்பு முடிந்துவிட்டதுview
The VTOMAN V3 Pro is a portable and compact car battery jump starter designed to provide reliable power for various vehicles. It also functions as a power bank and an emergency LED light, making it a versatile tool for automotive and outdoor use.

Image: The VTOMAN V3 Pro jump starter unit with its smart jumper cables attached, ready for use.
1.1 பெட்டியில் என்ன இருக்கிறது
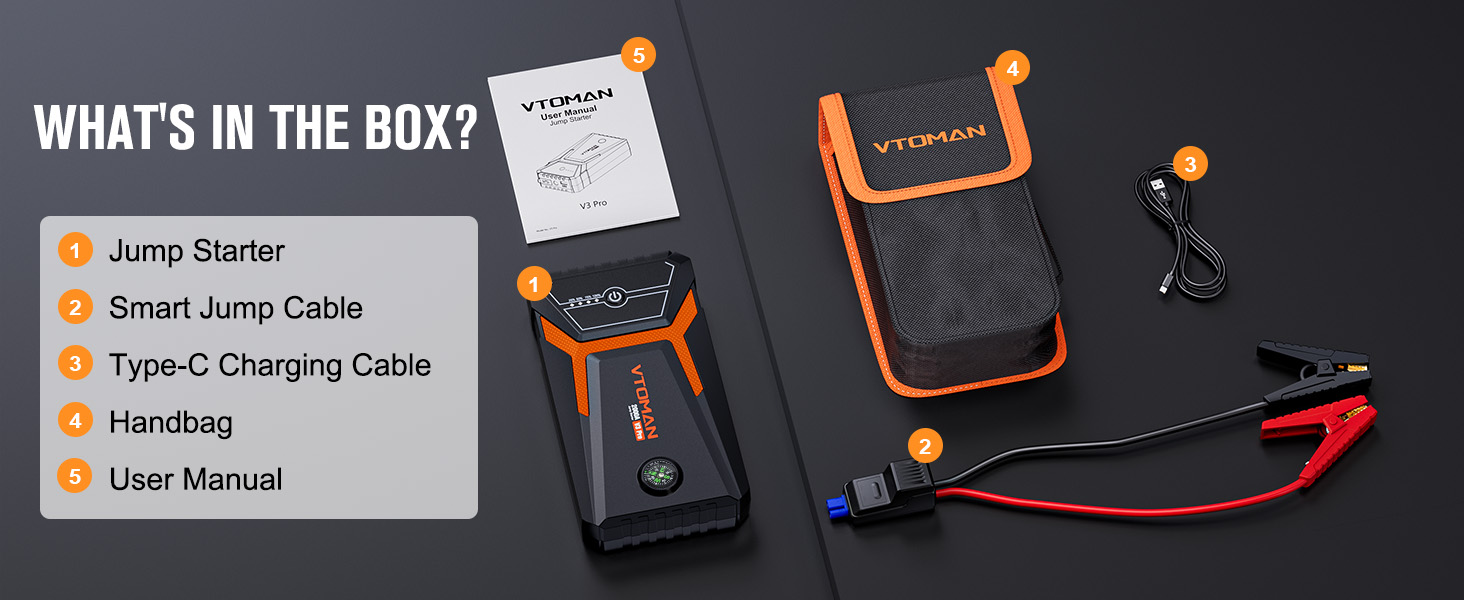
Image: A visual representation of all items included in the VTOMAN V3 Pro jump starter kit.
- 1 x VTOMAN V3 Pro Car Jump Starter
- 1 x ஸ்மார்ட் ஜம்பர் கேபிள்கள்
- 1 x வகை-C USB சார்ஜிங் கேபிள்
- 1 x கேரியிங் பேக்
- 1 x பயனர் கையேடு
1.2 தயாரிப்பு வரைபடம்

Image: A detailed diagram highlighting the various ports and features of the VTOMAN V3 Pro jump starter, including the power switch, electricity indicator, 12V jumper cable interface, LED flashlight, Type-C input port, USB output port, and integrated compass.
- மின்விசை மாற்றும் குமிழ்: Activates and deactivates the unit.
- Electricity Indicator: தற்போதைய பேட்டரி சார்ஜ் அளவைக் காட்டுகிறது.
- 12V Jumper Cable Interface: Port for connecting the smart jumper cables.
- LED ஒளிரும் விளக்கு: பல முறைகளுடன் வெளிச்சத்தை வழங்குகிறது.
- 5V/2A Type-C Input Port: For charging the jump starter unit.
- 5V/2.1A USB Output Port: வெளிப்புற சாதனங்களை சார்ஜ் செய்வதற்கு.
- Integrated Compass: For navigation assistance.
2. பாதுகாப்பு தகவல்
Read all safety information before using this product. Failure to follow these instructions may result in electric shock, fire, or serious injury.
2.1 பொது பாதுகாப்பு முன்னெச்சரிக்கைகள்
- மழை அல்லது ஈரமான நிலைமைகளுக்கு உற்பத்தியை வெளிப்படுத்த வேண்டாம்.
- Do not operate the product if it has been damaged.
- குழந்தைகளுக்கு எட்டாத இடத்தில் வைக்கவும்.
- பயன்பாடு மற்றும் சார்ஜ் செய்யும் போது சரியான காற்றோட்டத்தை உறுதி செய்யவும்.
- Do not short-circuit the jumper clamps.
- எப்போதும் நேர்மறை (+) cl ஐ இணைக்கவும்amp நேர்மறை (+) முனையத்திற்கும் எதிர்மறை (-) cl க்கும்amp எதிர்மறை (-) முனையத்திற்கு.
- Disconnect the jumper cables from the jump starter before disconnecting from the vehicle battery.
2.2 Intelligent Safety Protections
The VTOMAN V3 Pro is equipped with 10 intelligent safety protection technologies to ensure safe operation:

Image: An illustration detailing the 10 intelligent safety protections integrated into the VTOMAN V3 Pro jump starter, including over-charge, reverse-polarity, short-circuit, over-current, AI software, spark-proof, over-load, high and low-temperature, over-voltage, and reverse charge protection.
- Anti-Spark Protection: Prevents sparks during connection.
- Reverse Charging Protection: ஜம்ப் ஸ்டார்ட்டருக்குள் மீண்டும் பாயும் மின்னோட்டத்திலிருந்து பாதுகாக்கிறது.
- அதிகப்படியான பாதுகாப்பு: அதிகப்படியான மின்னோட்ட ஓட்டத்திற்கு எதிரான பாதுகாப்புகள்.
- அதிக சார்ஜ் பாதுகாப்பு: Prevents battery damage from overcharging.
- தலைகீழ் துருவமுனைப்பு பாதுகாப்பு: Alerts and protects against incorrect clamp இணைப்புகள்.
- உயர் வெப்பநிலை பாதுகாப்பு: உட்புற வெப்பநிலை பாதுகாப்பான வரம்புகளை மீறினால் மூடப்படும்.
- குறைந்த வெப்பநிலை பாதுகாப்பு: Ensures safe operation in cold conditions.
- ஷார்ட் சர்க்யூட் பாதுகாப்பு: ஷார்ட் சர்க்யூட்களால் ஏற்படும் சேதத்தைத் தடுக்கிறது.
- ஓவர்வோல்tagஇ பாதுகாப்பு: அதிகப்படியான ஒலியளவிலிருந்து பாதுகாக்கிறதுtage.
- அதிக சுமை பாதுகாப்பு: Prevents damage from drawing too much power.
If the jumper cable indicator shows a red light, it indicates an incorrect connection or a safety issue. Correct the connection before proceeding.
3. அமைவு மற்றும் சார்ஜிங்
3.1 ஆரம்ப சார்ஜிங்
Before first use, fully charge the VTOMAN V3 Pro jump starter. Use the provided Type-C USB cable and a compatible USB wall adapter (not included).

Image: The VTOMAN V3 Pro jump starter connected to a wall adapter via its Type-C USB cable for charging, illustrating the fast charging capability.
- Connect the Type-C cable to the input port on the jump starter.
- கேபிளின் மறுமுனையை USB பவர் மூலத்துடன் இணைக்கவும்.
- The electricity indicator lights will illuminate to show the charging progress.
- முழு சார்ஜ் ஏறக்குறைய 2.6 மணி நேரம் ஆகும்.
4. இயக்க வழிமுறைகள்
4.1 Jump Starting a Vehicle (Standard Mode)
The VTOMAN V3 Pro can jump start 12V vehicles with up to 6L gasoline or 4L diesel engines. It can operate in temperatures from -4°F to 140°F.
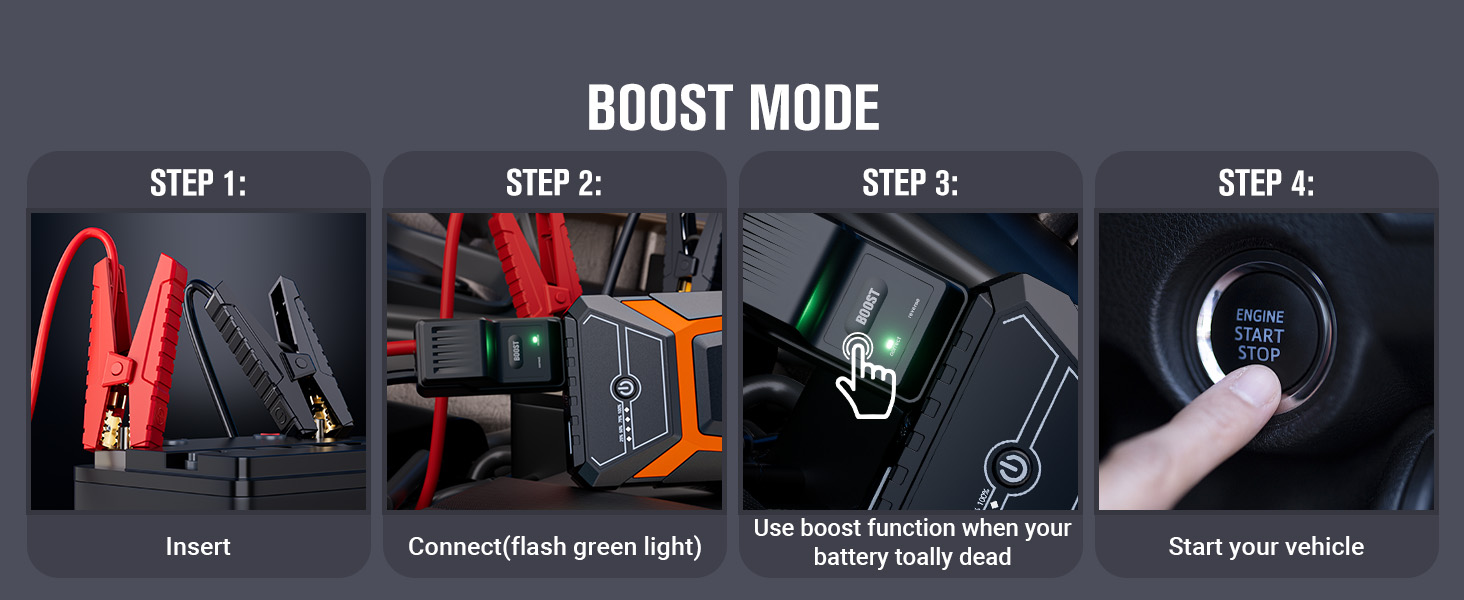
Image: A three-step visual guide demonstrating how to jump start a car: 1. Insert jumper cables into the jump starter. 2. Connect clamps to the car battery (green light indicates correct connection). 3. Start the vehicle.
- Ensure the jump starter is sufficiently charged.
- Insert the smart jumper cable connector into the 12V jumper cable interface on the jump starter.
- இணைக்கவும் red (+) clamp to the vehicle's நேர்மறை (+) பேட்டரி முனையம்.
- இணைக்கவும் black (-) clamp to the vehicle's negative (-) battery terminal.
- Once connected, the smart cable indicator light should be திட பச்சை, indicating a correct connection and readiness to jump start. If it's red, check connections.
- உங்கள் வாகனத்தைத் தொடங்கவும்.
- Once the vehicle starts, immediately remove the jumper cables from the vehicle battery, then disconnect them from the jump starter.
4.2 Jump Starting a Completely Dead Battery (Boost Mode)
If the vehicle battery is completely dead, the smart cable indicator light may be off or flashing green. In this scenario, use the Boost mode.

Image: A four-step visual guide for using Boost Mode: 1. Insert jumper cables. 2. Connect clamps (flashing green light). 3. Press the 'BOOST' button on the smart cable. 4. Start the vehicle.
- Follow steps 1-4 from Section 4.1.
- If the smart cable indicator light is off or flashing green, press the "BOOST" button on the smart cable.
- The indicator light should turn solid green.
- Start your vehicle within 30 seconds.
- Once the vehicle starts, immediately remove the jumper cables from the vehicle battery, then disconnect them from the jump starter.
4.3 பவர் பேங்காகப் பயன்படுத்துதல்
The V3 Pro features a 5V/2.1A USB output port to charge various mobile devices.
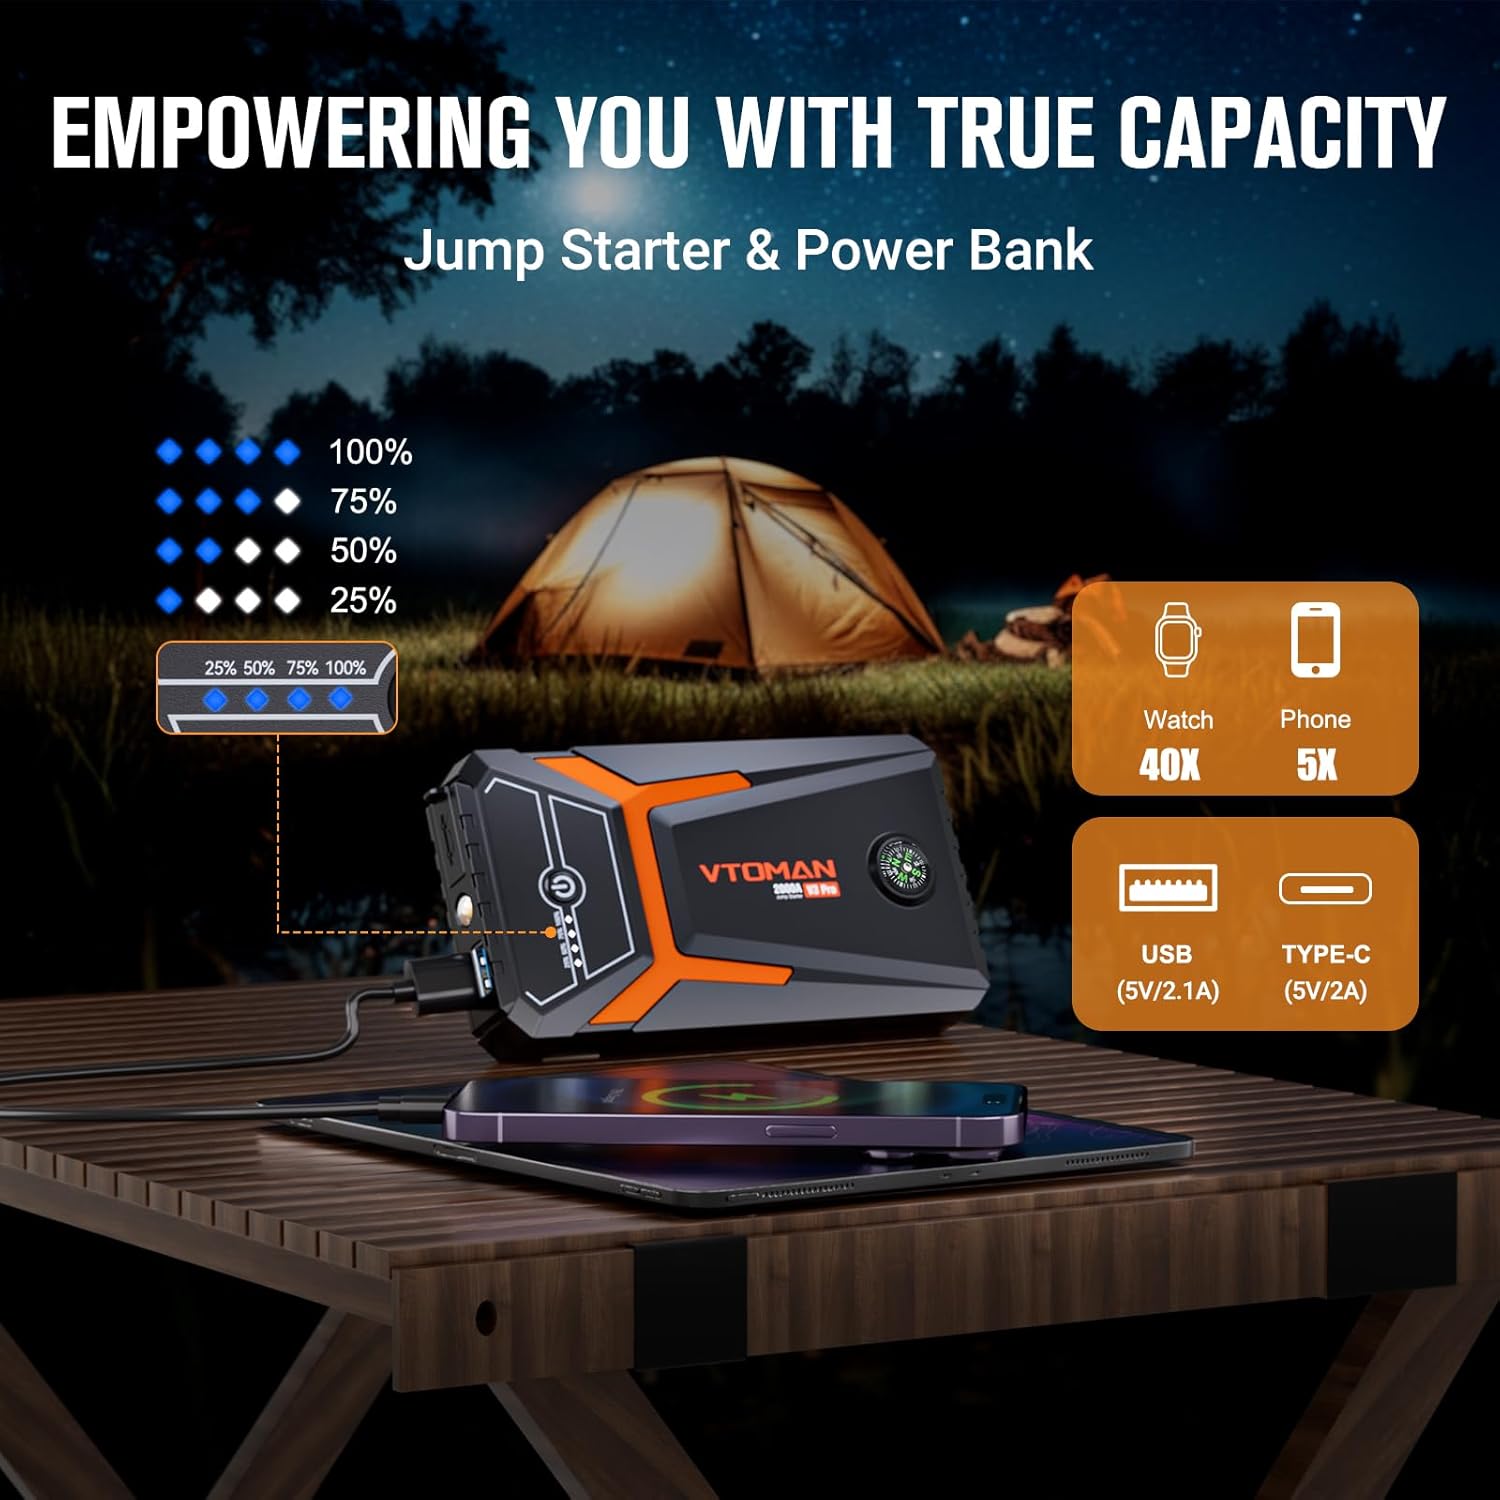
Image: The VTOMAN V3 Pro jump starter connected via USB to charge a smartphone, demonstrating its power bank functionality.
- Connect your device's USB charging cable to the USB output port on the jump starter.
- ஜம்ப் ஸ்டார்டர் தானாகவே உங்கள் சாதனத்தை சார்ஜ் செய்யத் தொடங்கும்.
4.4 Using the LED Emergency Light
The integrated LED flashlight has three modes for various situations.

Image: The VTOMAN V3 Pro jump starter's LED flashlight illuminating a dark area, with icons indicating its three modes: normal, strobe, and SOS.
- Press and hold the power button for 3 seconds to turn on the LED light (Normal mode).
- Press the power button once to switch to Strobe mode.
- Press the power button again to switch to SOS mode.
- Press the power button once more to turn off the light.
4.5 Compass Function
The V3 Pro includes an integrated compass for basic directional guidance during outdoor activities or emergencies.
5. பராமரிப்பு மற்றும் சேமிப்பு
Proper maintenance ensures the longevity and performance of your VTOMAN V3 Pro jump starter.

Image: An illustration depicting the 24-month standby time of the VTOMAN V3 Pro jump starter, highlighting its long-term charge retention.
- சார்ஜ்: Recharge the unit every 3-6 months, even if not used, to maintain optimal battery health.
- சுத்தம்: Wipe the unit with a dry, soft cloth. Do not use harsh chemicals or abrasives.
- சேமிப்பு: Store the jump starter in a cool, dry place away from direct sunlight and extreme temperatures. The unit has a 24-month ultra-long standby time and will automatically shut down after 30 seconds of inactivity to conserve power.
- வெப்பநிலை: Avoid storing or operating in temperatures outside the recommended range (-4°F to 140°F).
6. சரிசெய்தல்
If you encounter issues with your VTOMAN V3 Pro, refer to the following common problems and solutions.
| பிரச்சனை | சாத்தியமான காரணம் | தீர்வு |
|---|---|---|
| வாகனம் ஸ்டார்ட் ஆகவில்லை. | Low charge on jump starter, incorrect cable connection, vehicle battery completely dead. | Ensure jump starter is fully charged. Check cable connections (red to positive, black to negative). If battery is completely dead, use Boost Mode (Section 4.2). |
| Smart cable indicator is red. | Reverse polarity, short circuit, or other safety issue. | Immediately disconnect clamps. Recheck connections for correct polarity. Ensure clamps are not touching each other or other metal parts. |
| ஜம்ப் ஸ்டார்டர் சார்ஜ் ஆகவில்லை. | Faulty Type-C cable or USB adapter, unit malfunction. | Try a different Type-C cable and USB wall adapter. Ensure connections are secure. If issue persists, contact customer support. |
| LED விளக்கு வேலை செய்யவில்லை. | Unit off, low battery. | Ensure the unit is powered on. Check battery level and recharge if necessary. |
7. விவரக்குறிப்புகள்

Image: The VTOMAN V3 Pro jump starter held in a hand, illustrating its compact size and light weight (0.61 lbs), with dimensions of 5.95 x 3.15 x 1.15 inches.
| அம்சம் | விவரக்குறிப்பு |
|---|---|
| மாதிரி | வி3 ப்ரோ |
| உச்ச மின்னோட்டம் | 2000 Amps |
| எஞ்சின் இணக்கத்தன்மை | Up to 6L Gasoline / 4L Diesel Engines |
| பேட்டரி வகை | Lithium Polymer (2 batteries included) |
| உள்ளீடு (வகை-சி) | 5V/2A |
| வெளியீடு (USB) | 5V/2.1A |
| சார்ஜிங் நேரம் | Approx. 2.6 hours (0-100%) |
| காத்திருப்பு நேரம் | 24 மாதங்கள் வரை |
| இயக்க வெப்பநிலை | -4°F முதல் 140°F வரை (-20°C முதல் 60°C வரை) |
| தயாரிப்பு பரிமாணங்கள் | 5.95"டி x 3.15"அடி x 1.15"ஹெட் |
| பொருளின் எடை | 0.61 பவுண்டுகள் (தோராயமாக 9.8 அவுன்ஸ்) |
8. உத்தரவாதம் மற்றும் ஆதரவு
VTOMAN provides comprehensive support for its products.
- உத்தரவாதம்: வாங்கிய நாளிலிருந்து 18 மாத உத்தரவாதம்.
- தொழில்நுட்ப ஆதரவு: வாழ்நாள் முழுவதும் தொழில்நுட்ப ஆதரவு கிடைக்கிறது.
- தொடர்பு: For any after-sales questions or technical assistance, please contact VTOMAN customer service. Refer to the product packaging or official VTOMAN webதொடர்பு விவரங்களுக்கு தளம்.


