1. அறிமுகம்
This manual provides comprehensive instructions for the installation, operation, and maintenance of your RAINPOINT 149 Drip Irrigation System. Designed for efficient and automatic plant watering, this system features a solar panel for power and programmable settings to ensure your plants receive optimal hydration. Please read this manual thoroughly before use to ensure proper function and longevity of your device.
2. தொகுப்பு உள்ளடக்கங்கள்
உங்கள் தொகுப்பில் அனைத்து கூறுகளும் உள்ளனவா என்பதைச் சரிபார்க்கவும்:
- RAINPOINT 149 Controller with integrated solar panel
- நீர் நுழைவு வடிகட்டி
- எதிர்ப்பு சைஃபோன் வால்வு
- Drip tubing (main line and distribution lines)
- Drip emitters
- Tubing connectors and stakes
- USB சார்ஜிங் கேபிள்
- பயனர் கையேடு
3. தயாரிப்பு முடிந்துவிட்டதுview
The RAINPOINT 149 system is designed for ease of use and reliability. Key features include:
- Programmable Watering: Set frequency and duration with intuitive dials.
- சூரிய சக்தி: Integrated solar panel charges the internal lithium-ion battery.
- இரட்டை ஆற்றல் விருப்பங்கள்: Can be powered by solar or USB.
- ஸ்மார்ட் சிப் தொழில்நுட்பம்: Provides short-circuit protection, over-charge protection, and ultra-low power consumption.
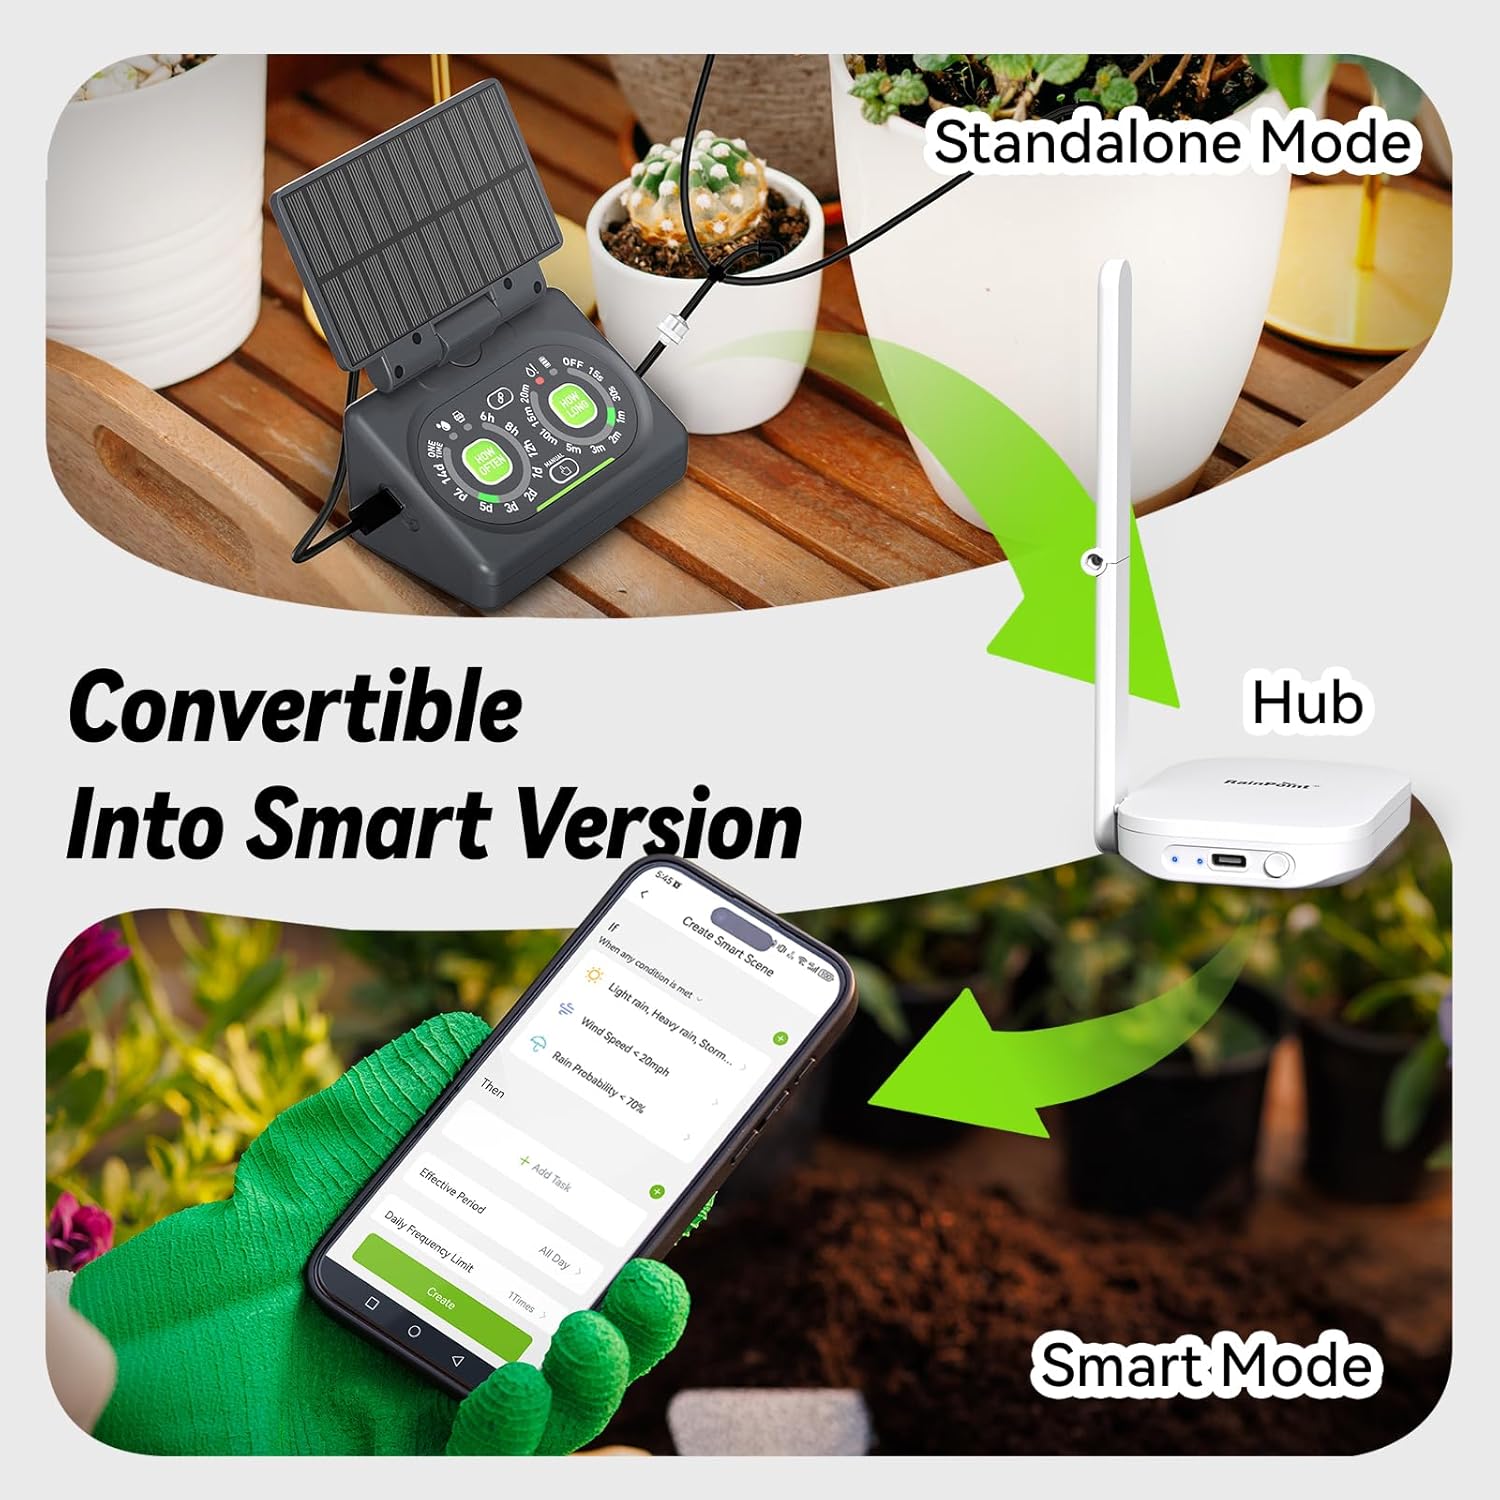
- விரிவாக்கக்கூடியது: Convertible to a smart version with a separate hub for app control.
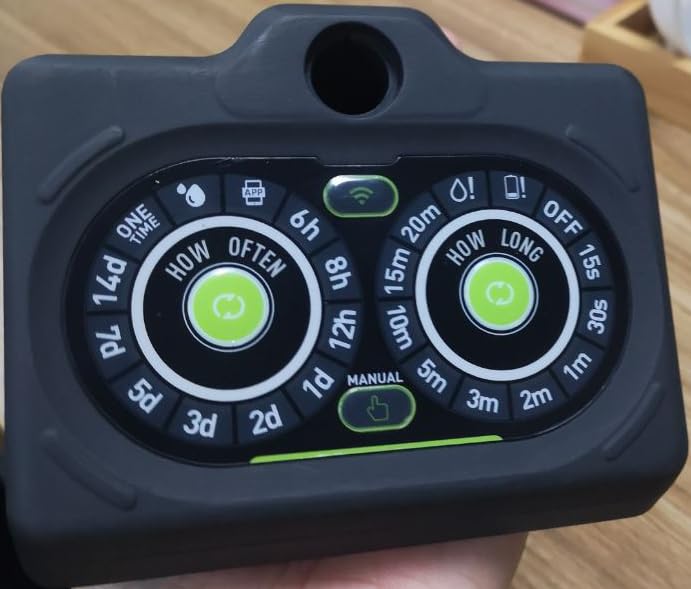
படம் 3.1: முன் view of the RAINPOINT 149 controller, showing the 'How Often' and 'How Long' setting dials, along with indicators for app connectivity and manual mode.

படம் 3.2: The adjustable solar panel integrated into the RAINPOINT 149 controller, designed for optimal sun exposure and charging efficiency. The image illustrates its flexible positioning.
படம் 3.3: Illustration of the two power options for the RAINPOINT 149 controller: solar power via the integrated panel and USB power for charging or continuous operation indoors.

படம் 3.4: The RAINPOINT 149 controller operating with solar power, highlighting its rechargeable battery backup feature for uninterrupted watering even without direct sunlight.

படம் 3.5: The RAINPOINT 149 controller's capability to convert from a standalone unit to a smart version when connected to a compatible hub, enabling app-based control and advanced scheduling.

படம் 3.6: Visual representation of the smart chip technology within the RAINPOINT 149 controller, emphasizing its protective features like short-circuit and over-charge protection, and ultra-low power consumption.
4 அமைவு
Follow these steps to set up your drip irrigation system:
- கட்டுப்படுத்தியை சார்ஜ் செய்யவும்: Before first use, fully charge the controller using the provided USB cable. The charging indicator will show status.
- Position the Controller: Mount the controller in a location where the solar panel receives direct sunlight for several hours daily. Ensure it is close to your water source (e.g., a water reservoir).
- நீர் நுழைவாயிலை இணைக்கவும்: Attach the water inlet filter to the controller's inlet port. Place the filtered end into your water reservoir.
- ஆன்டி-சிஃபோன் வால்வை நிறுவவும்: Connect the anti-siphon valve to the controller's outlet port. This prevents water from flowing back into the reservoir.
- Lay Out Tubing: Connect the main drip tubing to the anti-siphon valve. Route the tubing to your plants, securing it with stakes as needed.
- உமிழ்ப்பான்களை நிறுவவும்: Cut the main tubing at desired points and insert T-connectors or directly attach distribution lines. Place drip emitters near the base of each plant. Ensure all connections are secure to prevent leaks.
- சோதனை அமைப்பு: Once assembled, perform a manual watering cycle to check for proper water flow and any leaks. Adjust emitters as necessary for even distribution.

படம் 4.1: விரிவான view of the water flow components, including the anti-siphon valve and filter, ensuring clean and controlled water delivery to plants.

படம் 4.2: A diagram illustrating the stable water pressure and even water distribution achieved by the RAINPOINT system compared to other irrigation methods, ensuring consistent watering for multiple plants.
5. இயக்க வழிமுறைகள்
The RAINPOINT 149 controller offers simple dial-based programming.
5.1 Setting Watering Frequency ('How Often')
Rotate the left dial labeled 'HOW OFTEN' to select the desired watering interval. Options typically include:
- Every 6 hours (6h)
- Every 8 hours (8h)
- Every 12 hours (12h)
- Every 1 day (1d)
- Every 2 days (2d)
- Every 3 days (3d)
- Every 5 days (5d)
- Every 7 days (7d)
- Every 14 days (14d)
- One Time (for a single watering event)
5.2 Setting Watering Duration ('How Long')
Rotate the right dial labeled 'HOW LONG' to select the desired watering duration. Options typically include:
- 15 seconds (15s)
- 30 seconds (30s)
- 1 minute (1m)
- 2 minutes (2m)
- 3 minutes (3m)
- 5 minutes (5m)
- 10 minutes (10m)
- 15 minutes (15m)
- 20 minutes (20m)
- OFF (to disable watering)
5.3 கையேடு நீர்ப்பாசனம்
To initiate a manual watering cycle, press the 'MANUAL' button located between the two dials. The system will water for the duration currently set on the 'HOW LONG' dial. Press again to stop.

படம் 5.1: A hand demonstrating the adjustment of the 'How Long' and 'How Often' dials on the RAINPOINT 149 controller for setting watering schedules.
5.4 Smart Mode (Optional)
If you have purchased the compatible RAINPOINT hub, you can convert your system to 'Smart Mode'. Follow the hub's instructions to connect the controller to the app. This allows for advanced scheduling, remote control, and integration with smart home features.
6. பராமரிப்பு
Regular maintenance ensures optimal performance and extends the life of your irrigation system.
- சுத்தமான வடிகட்டிகள்: Periodically check and clean the water inlet filter to prevent clogging and ensure consistent water flow.
- கசிவுகளைச் சரிபார்க்கவும்: Inspect all tubing and emitter connections regularly for any leaks. Tighten or replace components as needed.
- சோலார் பேனல் சுத்தம்: Keep the solar panel clean from dust and debris to maximize charging efficiency.
- பேட்டரி பராமரிப்பு: Ensure the controller receives adequate sunlight for charging. If storing for extended periods, fully charge the battery and store in a cool, dry place. Recharge every 3-6 months to maintain battery health.
- குளிர்காலமயமாக்கல்: In freezing climates, disconnect the system, drain all water from tubing and components, and store the controller indoors to prevent frost damage.
7. சரிசெய்தல்
நீங்கள் சிக்கல்களை எதிர்கொண்டால், பின்வரும் பொதுவான சிக்கல்கள் மற்றும் தீர்வுகளைப் பார்க்கவும்:
| பிரச்சனை | சாத்தியமான காரணம் | தீர்வு |
|---|---|---|
| தண்ணீர் ஓட்டம் இல்லை | Clogged filter, kinked tubing, empty water reservoir, low battery. | Clean filter, straighten tubing, refill reservoir, charge battery. |
| System not watering at scheduled times | Incorrect dial settings, low battery, 'OFF' selected on 'How Long' dial. | Verify dial settings, charge battery, ensure 'How Long' is not set to 'OFF'. |
| Uneven water distribution | Clogged emitters, improper emitter placement, insufficient water pressure. | Clean or replace emitters, adjust placement, ensure reservoir is adequately filled. |
| சோலார் பேனல் சார்ஜ் ஆகவில்லை | Panel is dirty, insufficient sunlight, panel obstructed. | Clean solar panel, reposition for direct sunlight, remove obstructions. |
8. விவரக்குறிப்புகள்
| அம்சம் | விவரம் |
|---|---|
| மாதிரி எண் | HTP149FRF |
| பிராண்ட் | ரெயின்பாயிண்ட் |
| சக்தி ஆதாரம் | Solar Panel, USB (Rechargeable Lithium Ion Battery included) |
| சிறப்பு அம்சங்கள் | Automatic Watering, Leak Resistant, Programmable |
| பொருளின் எடை | 739 கிராம் |
9. உத்தரவாதம் மற்றும் ஆதரவு
RAINPOINT products are manufactured to high-quality standards. For warranty information or technical support, please refer to the contact details provided on the product packaging or the official RAINPOINT webவாங்கியதற்கான சான்றாக உங்கள் கொள்முதல் ரசீதை வைத்திருங்கள்.


