அறிமுகம்
This manual provides essential information for the safe and effective operation of your Vivitar Aqua Snap Underwater Digital Camera & Camcorder. Designed for use in wet conditions, this compact device allows you to capture high-definition photos and videos during various water activities. Please read these instructions thoroughly before using the camera.
தொகுப்பு உள்ளடக்கங்கள்
கீழே பட்டியலிடப்பட்டுள்ள அனைத்து பொருட்களும் உங்கள் தொகுப்பில் சேர்க்கப்பட்டுள்ளதா என்பதை சரிபார்க்கவும்:
- Vivitar Aqua Snap Digital Camera & Camcorder
- USB கேபிள்
- பயனர் கையேடு (இந்த ஆவணம்)
- Nonstandard Battery (pre-installed or included separately)

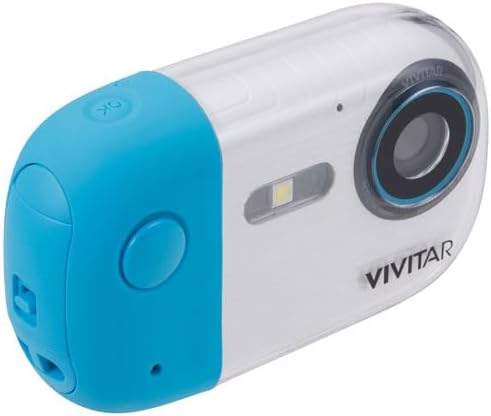
படம்: முன்பக்கம் view of the Vivitar Aqua Snap Digital Camera, showcasing அதன் சிறிய வடிவமைப்பு மற்றும் லென்ஸ்.
கேமரா ஓவர்view
Familiarize yourself with the camera's physical components:
- முன் லென்ஸ்: Captures images and video.
- முன் திரை: For selfie framing and quick previews.
- Rear Screen (2.4 Inches): க்கு viewing menus, framing shots, and playback.
- கட்டுப்பாட்டு பொத்தான்கள்: Located on the top and rear for navigation, mode selection, and operation.
- ஃபிளாஷ்: குறைந்த வெளிச்ச நிலைகளில் வெளிச்சத்தை வழங்குகிறது.
- நீர்ப்புகா முத்திரைகள்: Ensure all seals are properly closed before water immersion.
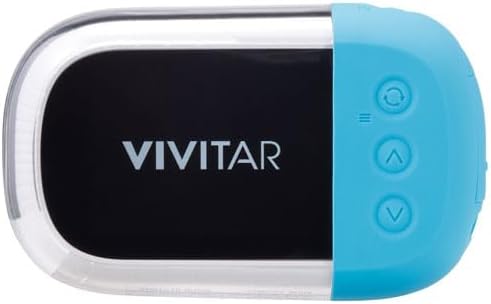
படம்: பின்புறம் view of the Vivitar Aqua Snap Digital Camera, displaying the main screen and control buttons for navigation and settings.
படம்: கோணல் view of the Vivitar Aqua Snap Digital Camera, highlighting the top-mounted power and shutter buttons.
அமைவு
1. பேட்டரி நிறுவல் மற்றும் சார்ஜிங்
Your camera requires one nonstandard battery, which is included. Ensure the battery is fully charged before first use.
- பேட்டரி பெட்டியைக் கண்டறியவும்.
- Open the compartment carefully, ensuring not to damage the waterproof seal.
- Insert the battery according to the polarity indicators.
- Close the battery compartment firmly until it clicks, ensuring the waterproof seal is intact.
- Connect the camera to a power source using the provided USB cable to charge. The charging indicator will illuminate.
2. மெமரி கார்டு நிறுவல்
The camera uses an SD Card (Media Type: SD Card) to store photos and videos.
- பொதுவாக பேட்டரி பெட்டிக்கு அருகில், SD கார்டு ஸ்லாட்டைக் கண்டறியவும்.
- Insert the SD card with the metal contacts facing the correct direction until it clicks into place.
- அகற்ற, அட்டை வெளியே வரும் வரை மெதுவாக அழுத்தவும்.
3. ஆரம்ப பவர் ஆன்
Press and hold the Power button (usually on the top) to turn on the camera. Follow any on-screen prompts for initial setup, such as language selection.
கேமராவை இயக்குதல்
1. புகைப்படம் எடுத்தல்
To take a high-resolution photo (up to 18MP):
- Ensure the camera is in Photo mode (check the icon on the screen).
- Frame your shot using the rear screen or front screen for selfies.
- Press the Shutter button firmly to capture the image.
2. வீடியோக்களை பதிவு செய்தல்
To record HD video (MP4 format):
- கேமராவை வீடியோ பயன்முறைக்கு மாற்றவும்.
- Press the Shutter button once to start recording. A timer or indicator will appear on the screen.
- பதிவு செய்வதை நிறுத்த மீண்டும் ஷட்டர் பொத்தானை அழுத்தவும்.
3. புகைப்படம் மற்றும் வீடியோ முறைகளுக்கு இடையில் மாறுதல்
Use the dedicated Mode button (often labeled 'M' or with a camera/video icon) to toggle between photo and video capture modes.
4. ஜூம் செயல்பாடு
Use the 'W' (Wide) and 'T' (Telephoto) buttons to zoom in and out digitally.
5. Selfie Mode (Front Screen)
The camera features a front screen for convenient selfie capture. To activate the front screen for framing, press the designated button (refer to your camera's specific button layout, often a screen switch icon).

படம்: கோணல் view of the Vivitar Aqua Snap Digital Camera, highlighting the front screen for selfie framing and the main lens.
6. பிளேபேக் மற்றும் நீக்குதல் Files
கிழிview your captured media:
- Enter Playback mode (often via the Mode button or a dedicated playback icon).
- உங்கள் புகைப்படங்கள் மற்றும் காணொளிகளை உருட்ட வழிசெலுத்தல் பொத்தான்களைப் பயன்படுத்தவும்.
- நீக்குவதற்கு ஏ file, select it and press the Delete button (often represented by a trash can icon). Confirm deletion when prompted.
7 அமைப்புகள்
Access the camera's menu to adjust various settings:
- தீர்மானம்: Adjust photo resolution (e.g., 18MP).
- ஆட்டோஃபோகஸ்: Enable or disable autofocus.
- காட்சி முறைகள்: Select pre-set modes for different environments (e.g., Beach, Night).
- எதிர்ப்பு குலுக்கல்: Stabilize your shots.
- ஸ்மைல் கேப்சர்: Automatically take a photo when a smile is detected.
- நேரிடுவது: பிரகாச அளவுகளை சரிசெய்யவும்.
- வெள்ளை இருப்பு: Correct color temperature.
- தேதி செயின்ட்amp: Add date/time to photos.
- வடிவம்: SD கார்டில் உள்ள எல்லா தரவையும் அழிக்கவும்.
- இயல்புநிலை அமைப்புகள்: தொழிற்சாலை அமைப்புகளை மீட்டமை.
8. Filter Function
The camera may include various filters to enhance your photos. To switch between filters, activate the camera and tap the "OK" button. This will cycle through available filters. To return to the original picture without a filter, continue tapping "OK" until the desired setting is reached.
Video: Demonstration of how to switch between filters on the Maxmango Underwater Camera. This feature is similar to the Vivitar Aqua Snap's filter functionality.
Waterproof Usage Guidelines
The Vivitar Aqua Snap is designed for underwater use, perfect for snorkeling, diving, and swimming. It is waterproof up to 10 meters (33 feet).
- Always ensure the battery compartment and any other ports are securely closed and sealed before immersing the camera in water.
- Avoid opening the battery or memory card compartments when the camera is wet or submerged.
- After use in saltwater, rinse the camera with fresh water and dry thoroughly with a soft cloth.
Video: A demonstration of a waterproof camera being used underwater, highlighting its functionality in aquatic environments. This illustrates the Vivitar Aqua Snap's intended use.
பராமரிப்பு மற்றும் பராமரிப்பு
- Keep the lens clean using a soft, lint-free cloth.
- பயன்பாட்டில் இல்லாத போது கேமராவை குளிர்ந்த, உலர்ந்த இடத்தில் சேமிக்கவும்.
- Avoid exposing the camera to extreme temperatures or direct sunlight for extended periods.
- Regularly check waterproof seals for any signs of wear or damage.
சரிசெய்தல்
கேமரா ஆன் ஆகவில்லை:
- பேட்டரி முழுமையாக சார்ஜ் செய்யப்பட்டு சரியாகச் செருகப்பட்டுள்ளதா என்பதை உறுதிப்படுத்தவும்.
- பேட்டரி பெட்டி பாதுகாப்பாக மூடப்பட்டுள்ளதா என சரிபார்க்கவும்.
மோசமான படம்/வீடியோ தரம்:
- கேமரா லென்ஸை சுத்தம் செய்யவும்.
- Adjust resolution settings to a higher quality.
- Ensure adequate lighting for your shots.
நீர் கசிவு:
- Immediately remove the camera from water.
- Open all compartments and allow the camera to dry completely in a well-ventilated area.
- Inspect all waterproof seals for damage or debris. Do not use underwater again if seals are compromised.
விவரக்குறிப்புகள்
| பிராண்ட்: | Vivitar |
| மாதிரி: | Aqua Snap |
| நீர்ப்புகா ஆழம்: | 10 மீட்டர் (33 அடி) வரை |
| வீடியோ பிடிப்பு தீர்மானம்: | HD (18MP for photos) |
| வீடியோ பிடிப்பு வடிவம்: | MP4 |
| ஊடக வகை: | SD கார்டு |
| திரை அளவு: | 2.4 Inches (Rear) |
| பொருளின் எடை: | 12 அவுன்ஸ் |
| தொகுப்பு அளவுகள்: | 6 x 4 x 2 அங்குலம் |
| பேட்டரிகள்: | 1 தரமற்ற பேட்டரி (சேர்க்கப்பட்டுள்ளது) |
உத்தரவாதம் மற்றும் ஆதரவு
கிடைக்கக்கூடிய தரவுகளில் தயாரிப்பு உத்தரவாதம் மற்றும் வாடிக்கையாளர் ஆதரவு தொடர்பான தகவல்கள் வழங்கப்படவில்லை. தயாரிப்பு பேக்கேஜிங் அல்லது உற்பத்தியாளரின் அதிகாரப்பூர்வ தகவலைப் பார்க்கவும். webஉத்தரவாதக் காப்பீடு மற்றும் வாடிக்கையாளர் ஆதரவை எவ்வாறு தொடர்பு கொள்வது என்பது பற்றிய விவரங்களுக்கு தளத்தைப் பார்வையிடவும்.


